Showing posts with label chicken. Show all posts

Monday, July 2, 2012

Teriyaki Chicken Kabobs


It is an undeniable truth in life that food on a stick is great.  Meat on a stick?  Great.  Vegetables on a stick?  Great.  Dessert on a stick?  Great.  Food and sticks just go so well together.  I took advantage of that fact for one of this week's meals - I made some really fantastic teriyaki chicken kabobs.  The same ingredients could have gone into a stir fry and been tasty, sure -- but really, why not put it on a stick?  

Kabobs are so tasty that Blogger's spell-check really wants to correct their name to "Kaboom!" The high-heat cooking method gives a great char to the vegetables that's hard to get from a pan while keeping the chicken tender and flavorful.  What are you waiting for?  Put some food on a stick!


Here's what I used: chicken breast, bell peppers, sweet onion, pineapple, fresh mushrooms, teriyaki sauce, rice vinegar, sesame oil, lime juice, and a bit of salt and pepper.


First, go ahead and chop the vegetables down to an appropriate bite-or-two size that will fit on your skewers.  I went ahead and left my mushrooms whole, but if yours are bigger feel free to chop them down, too.


Chop the chicken down into similar, bite-or-two sized pieces fit for skewering.  My chicken wasn't quite done thawing when I chopped it, but that actually worked to my advantage -- slightly frozen chicken is very, very easy to chop into just the right shape and size you're looking for.


The key to a good kabob is a good marinade.  I spiced up my bottle teriyaki sauce with some lime juice, rice vinegar, and sesame sesame oil to make sure that the chicken and vegetables would all be really packed with flavor.

I went ahead and marinated both the chicken and the vegetables (in separate bags) overnight - basically, everything but the pineapple.  Be especially certain not to leave pineapple in a marinade with meats for longer than an hour or so, as pineapple juice will break down meats and make them quite soft and unpleasant if they're in contact too long.

Give the chicken and vegetables plenty of time to marinate -- overnight if at all possible.


When it's time to cook, don't forget to chop your last ingredient - the pineapple!  Before you start chopping, get your skewers in to soak -- soak at least 30 minutes, lest they catch on fire.


Once your skewers have soaked at least a half-hour, assemble your kabobs.  I didn't really have a set pattern for my skewering - I just grabbed whatever seemed right to go next, and tried to make sure that each skewer got at least a few pieces of everything.  Pre-heat your grill or broiler while you assemble and it should be ready to go by the time you're done.


Broil the kebabs for 4-5 minutes per side, turning once, until the vegetables are slightly charred and the chicken is cooked through.  If you have some marinade leftover from the vegetables, feel free to give them an extra basting as you turn halfway through.


Serve hot over rice or your starch of choice.


Recipe: Teriyaki Chicken Kabobs
Prep Time: 15 Minutes (Plus Marinade Time) | Cook Time: 10 Minutes | Difficulty: Easy | Servings: 6-8

Ingredients
  • 2 lbs Boneless Skinless Chicken Breast
  • 1 whole Pineapple
  • 1 large Sweet Onion
  • 2 large Green Bell Peppers
  • 12 oz. Fresh Mushrooms
  • 1 cup Teriyaki Sauce
  • 2 tablespoons Lime Juice
  • 1/4 cup Rice Vinegar
  • 2 tsp Sesame Oil
  • Salt and Pepper to taste
  • Bamboo Skewers
Instructions
  1. Chop chicken and vegetables into bite-sized pieces large enough to easily skewer.
  2. Combine teriyaki sauce, rice vinegar, and lime juice.  Separate into two portions and marinate chicken and vegetables in separate containers overnight.
  3. Soak bamboo skewers at least 30 minutes before assembling kabobs.
  4. Chop pineapple into bite-sized pieces large enough to easily skewer.
  5. Assemble kabobs by alternating all ingredients on bamboo skewers.
  6. Broil kabobs 4-5 minutes per side until vegetables are lightly charred and chicken is cooked through.
  7. Serve warm over rice or other starch.

Sunday, May 13, 2012

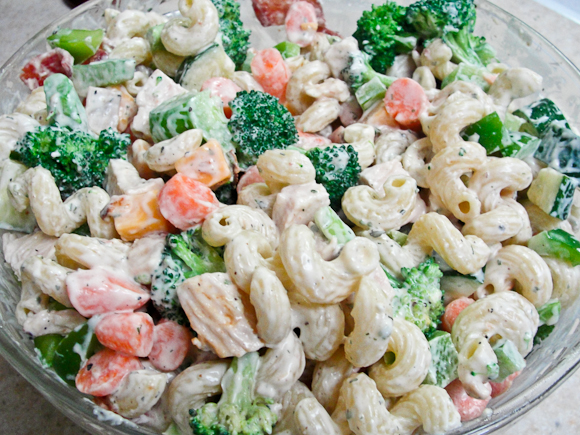
Creamy Ranch Pasta Salad


Pasta salad deserves better.  Sure, it's a delicious side, but why leave it there?  Every grocery store deli will happily sell you some gloppy macaroni salad, but come on, we can do better than that.  Why not make pasta salad a main course?  Why not add enough great ingredients that it can stand on its own?  Most importantly -- why not bacon?


As you can see, my board is fuller than usual.  A lot of stuff goes into this pasta salad, but there's not a lot of prep for most of it.  You'll need some pasta, of course.  Go for an interesting shape - I used Cavatappi to great success this time around.

We'll feature a pair of proteins, both chicken and bacon.  For the veggies, I use broccoli, cucumber, carrots, and bell pepper - but you can add or change as you see fit.  A lot of people are into tomatoes - raw ones make me sad, but you can go crazy with them if that's your thing.  I also love some cheese in my pasta salad, so I added a block of extra-sharp cheddar.

Finally, the supporting cast is made up of Greek yogurt, a bit of mayonnaise and sour cream, salt, pepper, garlic powder, and a packet of ranch dressing mix.


We'll start with the chicken.  If it's warm enough outside and you have easy access, you can always just grill it.  Since we don't own a grill, though (alas!), I like to use this method to simulate grilling in the oven while adding a ton of flavor.

First, rinse the chicken and pat it dry.  Season it well with salt, pepper, and garlic powder, then give dip it in the Greek yogurt to coat.  The yogurt dip will keep the chicken super moist while it cooks, even while you get a nice, slightly-blackened exterior.

Lay the yogurt-dipped chicken out on a wire rack atop a baking sheet -- this should let hot air circulate around the whole chicken breast at once and keep the bottom from getting soggy.  You may even want to line the baking sheet with foil to catch the drips and make clean-up simpler.


Broil the chicken 6 inches away from the broiler about 5 minutes per side until it's nicely blackened on the outside and the inside is up to temperature.  Set it aside for later.


While the chicken is cooking, fry up the bacon.  Try not to eat too much of it before it ever gets into the pasta salad.  Dry the finished product on papers towels and set aside for later.


Don't forget that we need some pasta, too!  Cook it up according to the package directions, leaving it on the al-dente side.  Drain well and set it aside to cool once it's done.


Now for all of that other stuff.  Chop the broccoli, cucumber, bell pepper, carrots, and cheese into bite-sized pieces.  I like to quickly blanch the broccoli for 30 seconds or so in boiling water to soften it just a touch before I chop it, but that's up to you.


The chicken and bacon should be cool enough to handle by now, so give those a good chopping, too.


Finally, it's time to put it all together.  You'll probably need a couple of large bowls for this - this recipe filled up the two largest bowls in my kitchen handily.  Combine everything, preferably leaving a little extra room at the top of the bowl so that you can stir the dressing in easily.


Speaking of dressing, we'd better make some.  Combine the mayonnaise, sour cream, and ranch dressing mix and stir well.  Give it a taste and adjust as you see fit - I added a little more garlic and some dried herbs.


Add your preferred amount of dressing to the salad and stir well to mix.  I like it fairly lightly dressed - there's enough good stuff in these bowls to be tasty all by itself.


Throw it in the fridge to fully chill and let the flavors marry a bit, and you're ready to serve.  This is a fantastic, summery main course, and so easy to prepare well in advance.  Enjoy!


Recipe: Creamy Ranch Pasta Salad
Prep Time: 10 Minutes | Cook Time: 20 Minutes | Chill Time: 1-2 Hours | Difficulty: Easy | Servings: 12-15
Ingredients
  • 16 oz Cavatappi Pasta
  • 1-2 pounds Boneless Skinless Chicken Breast
  • 1 pound Bacon
  • 3 heads Broccoli
  • 1 large Cucumber
  • 2 large Green Bell Peppers
  • 8 ounces Baby Carrots
  • 8 ounces Extra-Sharp Cheddar Cheese
  • 1 1/2 cups Mayonnaise
  • 1/2 cup Sour Cream
  • 16 ounces Greek Yogurt
  • 1 packet Ranch Dressing Mix
  • 2 teaspoons Garlic Powder
  • Salt and Pepper to taste

Instructions
  1. Cook pasta according to directions on package.  Drain well and set aside to cool.
  2. Rinse chicken and pat dry.  Season well with salt, pepper, and garlic powder then coat completely with Greek yogurt.
  3. Place yogurt-covered chicken on a wire rack atop a baking pan and broil approx. 5 minutes per side until blackened on the outside and done in the middle.  Set aside to cool.
  4. Fry bacon in a heavy skillet.  Dry well with papers towels and set aside.
  5. (Optional): Blanch broccoli 30 seconds in boiling water.
  6. Chop all vegetables and cheese into small, bite-sized pieces.
  7. Once chicken and bacon have cooled, chop into small, bite-sized pieces.
  8. Combine pasta, chicken, bacon, cheese, and vegetables in large bowl(s).
  9. In a small mixing bowl, combine mayonnaise, sour cream, and ranch dressing mix.  Adjust seasoning to taste and stir to mix.
  10. Add dressing to pasta mixture to taste and stir well to combine.
  11. Chill at least 1-2 hours before serving.  Serve cold.

Sunday, April 29, 2012

Herb-Roasted Whole Chicken


It's tempting to think that grocery stores have cornered the market on whole chickens.  Every store in town has whole rotisserie chickens available cheap and still hot off the spit nearly 24-hours per day.  And really, I've got nothing against that chicken.  In fact, I happily use it as a shortcut for things like Barbecue Chicken Pizza if I don't have the time to cook up my own chicken that day.

The world of whole chickens doesn't stop at the supermarket rotisserie, though.  Roasted meat is just a good thing, and it was high time that I tried my own hand at a whole bird.  As so often happens when I put off trying a recipe because there's a "good enough" alternative easily available, everything turned out both easier and tastier than expected.


One of the best things about this process is that it's both incredibly simple and incredibly cheap.  Unlike the boneless-skinless chicken breast that we buy so much of and pay a premium for, whole birds are almost absurdly inexpensive - I think I paid about $3.50 for this 5-pound chicken.  Throw in a lemon or two, a few cloves of garlic, half of an onion, salt, pepper, cooking oil, and some herbs (I used sage, thyme, marjoram, and savory), and you're all set.


First, pre-heat your oven to 425 degrees, and roughly chop about 1/3 to 1/2 of the onion.  You won't actually be eating it, so don't worry too much about size/consistency.  Peel the garlic cloves, slice the lemon into quarters, and separate your herbs into two roughly-equal piles.


Rinse the chicken well both inside and out and pat dry with paper towels.  Next, stuff the cavity with the lemon wedges, onion, herbs, and garlic.  Give the garlic cloves a good whack with the side of a knife before they go in so they'll add plenty of flavor.  Don't worry if you can't fit everything that you prepped into the cavity.


Twine?  Pssh.  No need for twine.  Just use a sharp knife to make a small slit in the skin near the back of the chicken opposite one leg, then tuck the tip of the leg through.


Fold the other leg under the first, tuck the wings in under the legs, and you've got a nicely trussed bird without any need for twine, skewers, or anything else inedible.


Take the other half of the herbs, remove them from any stems, and give them a fine chop.  Toss them in a small bowl with plenty of salt and pepper.


Add the juice of your second lemon and a couple of tablespoons of cooking oil.

I'm not usually a huge fan of cooking with vegetable oil rather than olive oil, but in this case, it's important.  We'll be roasting the chicken well over the smoke point of olive oil, so if you use it on the bird, you may end up with a very bitter, burnt taste.  Vegetable/canola oil (or blends) have a higher smoke point, and can stand up to the heat of the roasting process.


Coat the bird well on all sides with the herb mixture, and you're ready to roast.


 A little over an hour later, you'll have a beautifully-roasted chicken.  Take the temperature at the thickest part of the thigh and ensure that you've reached at least 175 degrees, then rest the finished bird under foil 10-20 minutes so it can cool and all the juices don't run out when it comes time to eat.


Slice, serve, and enjoy!


Recipe: Herb-Roasted Whole Chicken
Prep Time: 15 Minutes | Cook Time: 80 Minutes | Difficulty: Easy | Servings: 10

Ingredients
  • 1 Whole Chicken, approx. 5 lbs
  • 1 Whole Lemon
  • Juice of 1 Lemon
  • 2 oz Poultry Herbs (Sage, Thyme, Marjoram, Savory)
  • 1/2 Sweet Onion
  • 2-3 tbsp Vegetable Oil
  • Salt and Pepper to taste
Instructions
  1. Pre-heat oven to 425 degrees.
  2. Thoroughly rinse chicken both outside and in cavity.  Pat dry with paper towels.
  3. Quarter one lemon.  Roughly chop onion.  Peel and lightly crush garlic cloves.  Stuff chicken cavity with lemon, onion, garlic, and half of herbs.
  4. Truss chicken by making a small slit in the skin and inserting the end of the opposite leg.  Tuck other leg under the first.  Fold wings under tucked legs.
  5. Remove remaining herbs from stems and chop finely.  Mix generously with salt and pepper.  Add 2-3 tbsp oil and juice of the second lemon.
  6. Coat chicken thoroughly with herb mixture on all sides.
  7. Roast chicken on a heavy pan 75-90 minutes until skin is golden brown and internal temperature of thigh at the thickest point is at least 175 degrees.
  8. Rest chicken under foil 10-20 minutes.


Sunday, April 15, 2012

Fried Rice


Fried rice is so often overlooked.  That's not to say that people don't like it, but in my experience, it's generally relegated to the position of side-dish to more exciting menu options when we order Chinese.  This is an injustice!  Fried rice is fully capable of being a meal all by itself, not just a side dish or vehicle for leftovers.  This is a home-made fried rice dish with plenty of stuff in it to keep it interesting, filling, and delicious.


The most important base ingredient is pre-cooked rice.  If you try to make fried rice out of freshly-cooked rice, you'll end up with a big pile of moosh - no good.  You need to give the rice at least a couple of hours to release all of its excess moisture, preferably overnight in the fridge.

I marinated my chicken in a simple mixture of soy sauce, sesame oil, and lime juice, and the flavor was great.  Since you'll be cooking rice and throwing it in the fridge the night before, why not chop the chicken and marinate it at the same time?

As for the rest, you'll need some eggs, plenty of frozen vegetables, some pineapple, garlic, soy (or Tamari) sauce, and cooking oil.


I use a cast-iron skillet throughout this recipe - there are a number of reasons you might do otherwise.  First, if you have a good gas stove and own a wok, that's the ideal way to do fried rice.  My little electric stove just can't keep a wok hot enough to do it right, so I went for the cast iron.

Second, if your cast iron isn't sufficiently well-seasoned, eggs will stick to it like glue - you might consider a nonstick pan for the eggs.

Start by cooking your eggs.  Add lightly-beaten eggs to a skillet over medium heat, add a bit of salt and pepper, and let cook a minute or two undisturbed.  Set finished eggs aside for later.


Scramble the eggs and cook until done, taking care not to overcook.


Increase heat to medium-high, add a bit of cooking oil, and saute the chicken with some minced garlic until cooked through.  If you marinated it, there's no need to add anything more than a dash of salt and pepper at this stage.  If you're starting from plain chicken, you'll want to add some soy sauce at this point.

Set cooked chicken aside.


You probably still have plenty of oil in the pan from the chicken - if not, make sure there's 1-2 tablespoons in the bottom of the pan, then add just enough rice to form a single, thin layer.  Take care not to overcrowd the pan - you'll end up repeating this step and the next several times until you're out of rice.

Let cook 2-3 minutes, then stir and continue cooking an additional couple of minutes until the rice has crisped up somewhat and taken on some color.


Add some frozen vegetables and some soy sauce to the rice.  Continue cooking, stirring often, until the vegetables are hot and tender.  Remove everything from the pan into a serving dish, add fresh oil to the pan, and continue frying the rice and adding vegetables until you've used everything up.


Once all of the rice is fried, drain your pineapple well and add it to a hot pan.  Keep it moving to make sure it doesn't burn, and cook until you've put some color on it.  This will take care of some of that "canned" flavor.  You can use fresh pineapple, too, of course - but chances are there's some canned pineapple in your pantry right now, and that will work just fine.


Finally, mix everything together!  If things have been sitting for a while because you're making a lot, add things back to the pan to heat back up as you mix.


Serve hot - all by itself.  The dish can be a fine side or addition to another meal, but come on - isn't it time to give fried rice the spotlight for once?  It's tasty enough to do the job.


Recipe: Fried Rice
Prep Time: 10 Minutes | Cook Time: 20-30 Minutes | Difficulty: Easy | Servings: 4-6

Ingredients
  • 1 lb Chicken Breast, chopped
  • 6 cups Cooked Rice
  • 1 bag Frozen Mixed Vegetables (Carrots, corn, green beans)
  • 1 bag Frozen Broccoli
  • 1 can Pineapple Tidbits, drained
  • 2 Eggs, lightly beaten
  • 2 cloves Garlic, minced
  • Vegetable Oil for frying
  • Soy Sauce to taste
  • Salt and Pepper to taste
Instructions
  1. Optional: Marinate chicken overnight in soy sauce, sesame oil, and lime juice.
  2. In a large skillet over medium heat, scramble eggs.  Set aside.
  3. Add 2 tbsp vegetable oil to pan and increase to medium-high heat.  Saute chicken with minced garlic until cooked through.  Set aside.
  4. Add rice to oiled pan no more than 2 cups at a time in a single layer.  Cook 2-3 minutes, stir, and cook 2-3 more minutes.
  5. Add 1-2 cups frozen vegetables to rice.  Add soy sauce to taste.  Continue to cook, stirring often, until vegetables are hot and tender.
  6. Set aside finished rice.  Repeat steps 4-5 until all rice and vegetables are cooked.
  7. Add pineapple to hot pan and saute 4-5 minutes until hot and slightly charred.  Set aside.
  8. Combine rice mixture, cooked chicken, eggs, and pineapple.  Mix well and add additional soy sauce, salt, and pepper to taste.  Serve hot.