Showing posts with label Italian. Show all posts

Sunday, October 21, 2012

Crock Pot Italian Beef


If you're not from Chicagoland, you probably don't have easy access to good Italian Beef sandwiches.  In Chicago and the suburbs, I would bet you're never further than a 5 minute drive from a good Italian Beef.  Out here in Ohio, sadly, things are not the same.  All is not lost, however - it's easy to make a good beef sandwich in the crock pot at home.

Italian Beef sandwiches are traditionally wet-roasted to medium rare, then shaved thin on a deli slicer and finished in "the juice," then served on dense, chewy bread and topped with sweet peppers, hot peppers, or giardiniera (or some combination of the three).  I don't have a deli slicer handy, so my own version is shredded rather than sliced, but the result is much the same.  This recipe is an easy, delicious way to feed a large group - but make plenty, they may want seconds.


Here's what you'll need: 3-4 pounds of cheap beef (sirloin butt, top round, or bottom round), a couple of sweet onions, a couple of bell peppers, some beef broth, worcestershire sauce, garlic powder, italian seasoning, salt, and pepper.


Start by chopping the peppers and onions into large pieces.  Too small, and they'll either end up mushy or disintegrate altogether after cooking all day - and that just won't do.


Cover the bottom of the crock pot with a little more than half of the chopped veggies.  The rest will go on top in a minute.


Next, nestle the star player into the pot on top of the veggies, and cover that enormous hunk of beef with the rest of the chopped vegetables.  My cut of beef was a little bigger than I usually use, so it just barely fits in the pot - it took a while longer to cook, but it still turned out just fine.
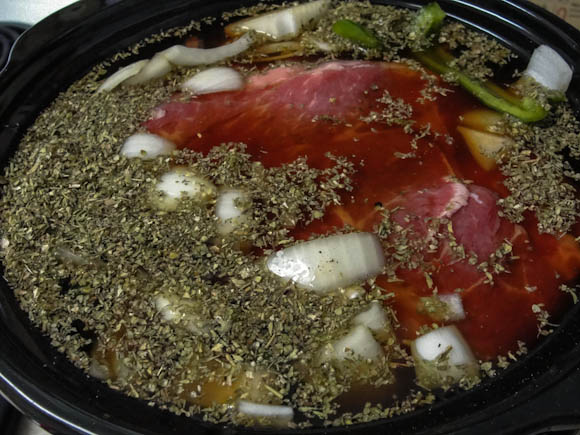

With the beef and vegetables in place, it's time to add the cooking liquid and the seasoning - add the Worcestershire sauce, beef broth, Italian seasoning, garlic powder, salt, and pepper to the pot.  Be sure to lift up the beef a bit to make sure that the liquid gets all the way down to the bottom of the pot.

With your liquid and seasoning in place, your beef is ready to cook.  Set the crock pot to low and cook 6-10 hours - the amount of time can vary quite a lot depending on the particular cut of beef you get.  The good news is that it's pretty tough to drastically overcook this beef, so if it goes an "extra" hour or two, no big deal.


You'll know the beef is done when it shreds very, very easily with a fork.  If it's at all tough to get apart, put it back in the pot and try again in an hour.  Once the beef is tender, shred it with a couple of forks until it's in nice, bite-sized pieces.


To assemble a sandwich, pile plenty of beef onto a good, chewy sandwich roll.  Drizzle with extra juice and/or serve with a cup of juice on the side.  Top the sandwich with roasted sweet peppers, giardiniera, hot peppers, or any combination thereof.  This time around, we used these Pickled Hot Peppers to great effect.

While this sandwich may never entirely stave off my craving for a Portillo's sandwich, this recipe is a nice approximation of the Chicago classic.  Enjoy!


Recipe: Crock Pot Italian Beef
Prep Time: 10 Minutes | Cook Time: 6-10 Hours in Crock Pot | Difficulty: Easy | Servings: 12-16

Ingredients
  • 3-4 lbs Beef (sirloin butt, top round, bottom round)
  • 2 large Sweet Onions
  • 2 large green Bell Peppers
  • 4 cups low-sodium Beef Broth
  • 3 tbsp Worcestershire Sauce
  • 2 tbsp Italian Seasoning
  • 1 tbsp Garlic Powder
  • 1 tbsp Salt
  • 2 tsp Black Pepper
Instructions
  1. Chop onions and peppers into large pieces.
  2. Line bottom of crock pot with half of chopped vegetables.  Set beef atop vegetables, then cover with the other half of the onions and peppers.
  3. Add Worcestershire sauce, Italian seasoning, garlic powder, salt, and pepper to crock pot.  Add enough beef broth to cover all of the ingredients.
  4. Cook in crock pot 6-10 hours on Low until a fork can easily pull the beef apart.
  5. Shred beef into small pieces with two forks.
  6. To assemble sandwiches, pile beef atop chewy sandwich rolls.  Drizzle with additional juice and/or serve with a side cup of juice.  Top with sweet peppers, giardiniera, and/or hot peppers.  Serve hot.


Sunday, July 15, 2012

Parmesan Zucchini Fries


Since Kristin and I live in a second-floor apartment, we don't get much of a chance to grow our own food.  In fact, even the poor herbs that I try to grow in the window only have about a 50% survival rate.  Kristin's family has a great garden, though, and they even like us enough that they sometimes share their home-grown veggies.  Thankfully, that means we don't miss out entirely on the fresher-than-fresh summer harvest.  This week, Kristin's mom shared a couple of beautiful, gargantuan zucchini with us.  I really don't think I've ever seen larger.  She mentioned that she was going to make Zucchini Parmesan out of the ones that she kept, and that sounded awfully good.

This week, I made something like a side-dish version of Zucchini Parmesan: zucchini fries. They're lightly breaded in crumbs and Parmesan, seasoned with classic Italian flavors, and served with marinara sauce.  These fries made an awesome accompaniment to our dinner, or could serve as an easy appetizer or party food.  If you find yourself saddled with a couple of giant zucchini (or some boring, regular-sized ones), give these fries a try.


Here's the cast of characters: a couple of enormous zucchini, some panko bread crumbs, some Parmesan cheese, an egg or two, a bit of milk, oregano, basil, garlic powder, salt, and pepper.

If you haven't been blessed with a giant zucchini, don't be too glum - just use a few more standard sized ones.


Start by cutting your zucchini down into 3-4 inch long sticks.  If you want your fries to be more crisp, err on the thinner side for the sticks.  I enjoyed getting a little more meaty zucchini bite, so left the sticks fairly thick.


Next, set up a breading station.  Make an egg wash by whisking the egg into the milk in a bowl large enough to submerge your zucchini sticks.  On a plate, combine the breadcrumbs, all of the seasonings, and plenty of grated Parmesan.  Don't be shy with salt and pepper - these fries will be a bit bland without a significant amount.


Cover a baking sheet with some parchment paper, or just grease it if you don't have parchment handy.

Your breading process is simple - dip each zucchini stick in the egg wash, roll in the breadcrumb mixture until it's lightly coated, and place the finished product on the baking sheet.

Don't worry about getting each and every piece 100% covered in crumbs, especially if you're using a larger crumb like panko and Parmesan that doesn't come from a green tube.  It just won't stick completely, but that's fine - you get plenty of crunch and flavor from this "rustic" breading.


Bake your fries for 25-30 minutes in a 425 degree oven until they're crispy and golden brown.


Serve immediately with marinara for dipping.


Recipe: Parmesan Zucchini Fries
Prep Time: 15 Minutes | Cook Time: 30 Minutes | Difficulty: Easy | Servings: 4-6 as Side Dish

Ingredients
  • 4 Large Zucchini (Or 2 Gargantuan Zucchini)
  • 2 Eggs
  • 1/2 cup Milk
  • 1 cup Panko Breadcrumbs
  • 1/2 cup Parmesan Cheese, grated
  • 1 tbsp Oregano
  • 1 tbsp Basil
  • 1/2 tbsp Garlic Powder
  • Salt and Pepper to taste
Instructions
  1. Pre-heat oven to 425 degrees.  Grease or cover baking sheets with parchment paper.
  2. Cut zucchini down into 3-4 inch long sticks.
  3. In bowl large enough to submerge zucchini sticks, whisk eggs into milk to create egg wash.
  4. On a large plate, combine panko breadcrumbs, grated Parmesan, oregano, basil, garlic powder, and plenty of salt and pepper.
  5. Dip each zucchini stick in egg wash, then roll in breadcrumb mixture to coat.  Place on prepared baking sheets.
  6. Bake 25-30 minutes at 425 degrees until fries are golden-brown and crispy.
  7. Serve immediately with marinara sauce for dipping.


Sunday, April 22, 2012

Roasted Garlic-Herb Cheese Bread


Kristin and I faced a puzzle this week.  We knew we wanted some pasta to eat, but none of the ways to jazz up basic spaghetti with marinara seemed all that appealing to us.  We just couldn't figure out how to take the meal from standard to interesting.

Then, it became clear.  Leave the spaghetti alone, and just make something awesome to go with it.  Alongside our simple pasta, I put together some garlic bread made from home-roasted garlic and topped with just a little bit of Mozzarella, Parmesan, and Asiago cheeses.  It was just what we needed.


You don't need terribly much for this bread.  Start with bread, of course - supermarket-made will do, though I look forward to repeating the recipe with my own baguettes when I have a little more time.  The bread will be topped with a compound butter made from salted butter, a bulb or two of garlic, plenty of herbs (I used Herbes de Provence), salt, and pepper.  Over all of that goes some Mozzarella, Parmesan, and Asiago cheese.


What really makes this bread great is roasting the garlic.  You can make perfectly good garlic bread from raw minced garlic or even from garlic powder, of course.  Roasting whole bulbs of garlic really intensifies the flavor and adds some sweetness in place of that raw-garlic bite.  It's fantastic, and so easy.

First, peel as much of the outer, papery layer from the bulbs as you can.  If you miss a bit, it's hardly the end of the world - we'll squeeze individual cloves out from the bulb later, anyhow.


With a sharp knife, cut the top 1/4 inch or so off of the whole bulb (from the pointed tip).  If your bulb was uneven like mine, you'll need to go clove-by-clove after the first slice.  Make sure the actual flesh of each clove is visible from the top.


I've found that the easiest way to cleanly roast garlic is inside of foil, with the foil sitting in the cup of a muffin tin in case it leaks.  With your garlic bulbs safely nestled in foil in the muffin tin, drizzle with a generous amount of olive oil, then some salt and black pepper.  Fold the foil closed over the top of the bulbs, and you're set to go.


Roast your foil-covered garlic bulbs at 400 degrees for 35-40 minutes until the cloves are golden brown and tender.  Be very, very careful checking this - you can burn your fingers very easily.


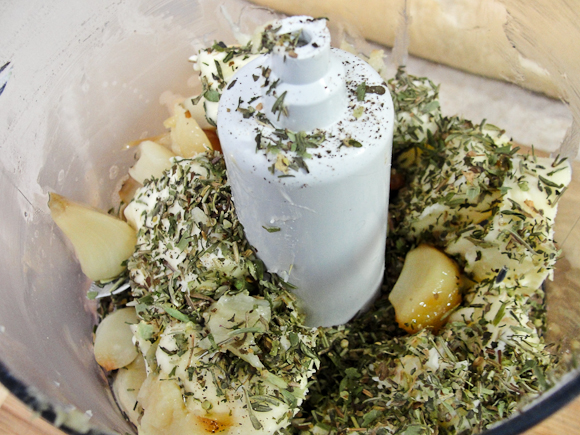
Let the garlic cool for a good ten minutes, then it's ready to turn into roasted garlic butter.  Add a stick of softened butter, your roasted garlic, a good dash of herbs, and some salt and pepper to the bowl of a food processor.

Whir it up until you've got a nice, smooth compound butter.  If you want to save some of this butter for later, roll it into a log in some parchment paper or plastic wrap and chill it in the fridge.  For our purposes, though, we'll take it straight to the bread.

Drop the oven down to 350 degrees and it should hit the right temperature when the bright is right about ready to go in.


Slice your bread in half lengthwise and spread generously with your garlic butter.


Bake the buttered bread in a 350 degree oven for 7-10 minutes until the buttered top has soaked in and more or less set.  You don't want the bread to be quite done at this point, but it should be close.

Turn the oven up to broil while we cheese the bread.


Sprinkle just a bit of mozzarella cheese over the top of the bread, then grate Asiago and/or Parmesan cheeses over the top of the rest.  Throw it back in the oven under the broiler and watch it carefully - it should be a minute, at the most, before the cheese is well-melted and bubbly and the edges of the bread get dark and crispy.


Slice it up and serve hot - preferably alongside a dish with some good sauce to soak up.


Recipe: Roasted Garlic-Herb Cheese Bread
Prep Time: 15 Minutes | Cook Time: 50 Minutes | Difficulty: Easy | Servings: One Loaf

Ingredients
  • 1 loaf French Bread
  • 1-2 large bulbs Garlic
  • 1 stick Butter, softened
  • 2 tbsp Herbes de Provence
  • 1/2 cup Mozzarella Cheese
  • Grated Parmesan and Asiago cheeses to taste
  • Salt and Pepper to taste
Instructions
  1. Pre-heat oven to 400 degrees.
  2. Peel papery outer layer from garlic bulbs and slice off top 1/4 inch of cloves.
  3. Line cups of a muffin tin with foil and place garlic bulbs sliced-side up.  Drizzle with olive oil and a sprinkle of salt and pepper.  Close foil over garlic.
  4. Roast garlic at 400 degrees for 35-40 minutes until golden-brown and tender.  Let cool 10 minutes and squeeze cloves out from skin.
  5. Reduce oven heat to 350 degrees.
  6. Combine softened butter, roasted garlic cloves, herbes de provence, salt, and pepper in the bowl of a food processor.  Process until smooth.
  7. Slice bread in half lengthwise and cover generously with garlic-butter.  Bake at 350 degrees 7-10 minutes until nearly done, then remove from oven and set oven to broil.
  8. Cover garlic bread with a small amount of mozzarella cheese.  Grate Asiago and Parmesan cheese over top to taste.
  9. Broil cheese-covered bread 30-60 seconds until cheese is melted and edges are crispy.
  10. Serve hot.

Sunday, January 15, 2012

Chicken Cacciatore


My original exposure to Chicken Cacciatore came from a short-lived brand of simmering sauces called "Chicken Tonight."  You may not remember them, but I bet you remember the jingle.  Play the video below and it'll all come rushing back.


Remember now?  The advertising obviously worked on my family, as we would often proclaim "I feel like chicken tonight!"  I think the only one of their sauces we tried was the cacciatore, but it was actually pretty tasty.  Chicken Tonight brand is now gone (though apparently quite alive and quite successful abroad), but chicken cacciatore remains delicious.  It's also quite easy!  This recipe made enough to feed Kristin and me for almost a week, so it's a great way to eat for a while or entertain company on a small budget.


This recipe makes great use of chicken thighs.  They're cheap, and both absorb a lot of flavor from the sauce in which they simmer and lend some nice meaty flavor of their own.  You'll also need bell peppers, sweet onion, button mushrooms, canned tomatoes, garlic olive oil, butter, flour, white wine, thyme, oregano, basil, salt, and pepper.

It sounds like a long list, but when the long list is mostly vegetables and seasonings, life is good.


First, pre-heat your oven to 350 degrees.

Season your chicken thighs all over with salt and pepper, then dredge in a thin coating of flour.

In a large dutch oven (or other pot capable of moving from stove to oven), melt a tablespoon of butter in a bit of olive oil.  Brown the chicken on both sides, 3-4 minutes per side.  Do this in batches, setting the chicken aside afterward.  You don't need to cook the chicken completely through, as it will finish in the oven, but do get it nice and brown.

While the chicken is cooking, chop the onion, bell pepper, and mushrooms into large-ish pieces.  They'll be cooking for quite a while, so keeping pieces large retains some texture.


Pour off most of the remaining fat once the chicken is browned, keeping a tablespoon or two in the pan.  Add all of the vegetables to the pan - onions, peppers, mushrooms, and minced garlic.  Cook just a couple of minutes until they're starting to soften.

After a couple of minutes, add a cup of decent white wine and your seasonings - thyme, basil, oregano, salt, and pepper.  A dry white is probably ideal, but all I had on hand was a Riesling, and that worked really nicely.  Drink the rest of whatever you use with dinner - it'll pair nicely.

Cook the vegetables and wine another minute or two until the wine starts to bubble.  This ensures that you avoid that edgy, "raw wine" taste.


Once the wine is bubbling, open and add your two large cans of diced tomatoes, juice and all.  Your dutch oven will be getting quite full at this point.  It should also be smelling better and better.


Reintroduce the chicken thighs to the magical mixture in the dutch oven.  At least partially submerge the chicken so it can absorb plenty of saucy goodness.


Now into the oven!  Cover and bake for 1 hour at 350 degrees.


By about 30 minutes in, your entire home will smell amazing.  Hang in there to finish the hour before pulling it out and uncovering the dutch oven.  Distract yourself in the last 10-15 minutes by cooking some pasta according to the directions on the box.  When the timer finally goes off, the cacciatore should look more or less like the photo above.


Devour promptly over noodles.


Recipe: Chicken Cacciatore
Prep Time: 15 Minutes | Cook Time: 90 Minutes | Difficulty: Easy | Servings: 8-10

Ingredients
  • 16 oz Pasta, cooked according to directions on package.
  • 8 Chicken Thighs
  • 1/3 cup Flour
  • 1 large Sweet Onion
  • 2 large Red Bell Peppers
  • 8 cloves Garlic
  • 12 oz White Button Mushrooms
  • 2 cans (28 oz) Diced Tomatoes
  • 3/4 cup White Wine
  • 2 tbsp Olive Oil
  • 1 tbsp Butter
  • 1 tsp Ground Thyme
  • 2 tsp Oregano
  • 1 tsp Basil
  • Salt and Pepper to taste

Instructions
  1. Pre-heat oven to 350 degrees.
  2. Roughly chop onions, peppers, and mushrooms.  Leave pieces fairly large.  Mince garlic.
  3. Season chicken with salt and pepper.  Dredge in flour.
  4. Melt butter in olive oil in a large dutch oven over medium heat.  Brown chicken on both sides, 3-4 minutes per side.  Set chicken aside and discard all but a small amount of fat.
  5. Saute onions, peppers, mushrooms, and garlic in remaining fat 2-3 minutes until beginning to soften.  Add thyme, oregano, basil, salt, pepper, and wine.  Cook another 1 minute until wine bubbles.
  6. Add canned tomatoes (with juice) and mix well.
  7. Return chicken to dutch oven, partially submerged.  Cover and bake 1 hour at 350 degrees.
  8. Serve hot over pasta.

Sunday, November 6, 2011

Goat-Cheese Meatballs


Is there anything more comforting than good, traditional Italian food?  Pasta isn't just an easy, standby meal - it can be a treat with just a bit of effort.  I like to fit some protein into my pasta meals, and what better way to do it than with meatballs?  Now there's nothing wrong with a standard, run of the mill meatball - but this week,  I was looking for a way to take things up a notch.  I pawed through the kitchen for something interesting to add, and realized that we had some goat cheese.  Inspiration!

At first, I considered trying to stuff each meatball with a cheesy center, but there wasn't enough goat cheese for that.  Still, it worked fantastically well crumbled up and added right to the mixture.  The whole meal took on that earthy flavor, and most bites were punctuated by a touch of creamy, fluffy cheese.  It was really a nice spin on a meatball, and one that I think I'll make again in the future.


Our meatball ingredients are more or less what you'd expect.  No fancy beef/pork/sausage mixtures here - I just stick to ground beef, mixed with eggs, breadcrumbs, milk, onion, and good Italian seasonings like Thyme, Basil, Oregano, Rosemary, Garlic, and a bit of Coriander.  The goat cheese adds some interest.  And, of course, you'll need some pasta to serve it over and plenty of sauce for simmering.


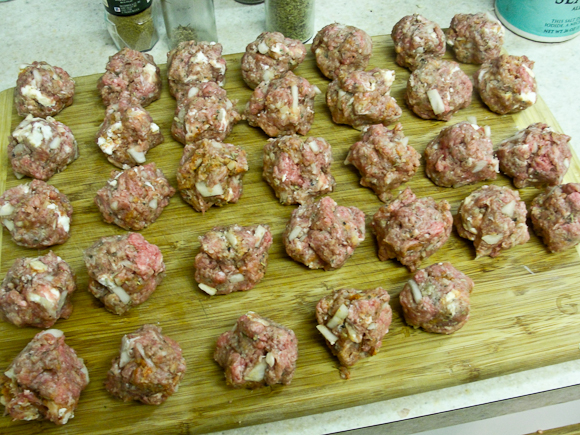
Meatballs are pleasantly straightforward.  Step one: combine everything but the cheese.  You'll have to dice the onion first, of course, but everything else can be more or less dumped into a large mixing bowl and mashed together.  Use your hands to mix it up well, don't be a chicken.  If it's too wet, add some more breadcrumbs.  If too dry, a bit more milk.


Now crumble up your goat cheese into pieces small enough to distribute well through the meatballs.  I aimed for roughly pea-sized, with some ranging slightly larger and smaller according to the whims of the cheese.


Combine the cheese with the rest of the mixture, again by hand.  Mix gently, as you don't want to pulverize the cheese.  The whole point is to have nice, cheesy bites, so you need those chunks to be relatively intact.


It's time: shape that mixture into some actual meatballs!  You can use an ice-cream scoop if you like, but I prefer to keep going by hand, aiming for 1 1/2 to 2 inches per meatball.  This recipe will make a lot of them.


Now into the sauce!  Most meatball recipes have you fry the meatballs first, but that's really not my preferred method.  They tend to cook unevenly or dry out that way.  Simmered in the sauce, they'll cook evenly and stay moist.  Perhaps best of all, they'll also lend a fantastic meatiness to the sauce itself.


After about 25 or 30 minutes, your meatballs will be cooked and your sauce will be transformed.  Even the jarred sauce that I used for this meal took on a much different texture and a really pleasant heartiness from the meat and cheese simmered into it.

The one real downside of cooking your meatballs in the sauce is that it makes it nigh impossible to finish the pasta itself in a pan with sauce, as is ideal.  This, however, is not the end of the world.  You'll be too busy devouring meatballs to really notice.


And that's it!  Serve hot over your pasta of choice.  Garlic bread would not go amiss as an accompaniment.


Recipe: Goat Cheese Meatballs
Prep Time: 15 Minutes | Cook Time: 30 Minutes | Difficulty: Easy | Servings: 10-12

Ingredients
  • 1 1/2 to 2 lbs Ground Beef
  • 2 Eggs
  • 1 Onion, diced
  • 4 oz. Goat Cheese
  • 1/2 cup Bread Crumbs (pref. Panko)
  • 1/2 cup Milk
  • 1 box Pasta
  • 1 family-size or 2 large jars Pasta Sauce
  • 2 tsp Oregano
  • 2 tsp Garlic Powder
  • 1 tsp Rosemary
  • 1 tsp Basil
  • 1 tsp Thyme
  • 1/2 tsp Coriander
  • Salt and Pepper to taste

Instructions

Simmer pasta sauce in a large pot over medium-low heat.

In a large mixing bowl, combine ground beef, diced onion, milk, breadcrumbs, eggs, and seasonings.  Mix well by hand.

Crumble goat-cheese into pea-sized pieces.  Incorporate gently into beef mixture.

Shape mixture into 1 1/2 to 2 inch balls.  Add to simmering sauce.

Cook meatballs 25-30 minutes in sauce.

Serve hot over pasta.  Top with Parmesan Cheese to taste.