Friday, April 22, 2011

Steak Caesar Salad


I've always been a fan of Caesar salad.  Naturally, I'm also a fan of steak.  I think you can see where this is going.

Here's a simple salad recipe to enjoy when it finally starts warming up outside.  Or, if you're like me and thought it was finally going to warm up outside, only to discover a day of 40 degrees and rain...well, you can enjoy it then, too.  Some marinated steak and home-made croutons make for a fresh, tasty lunch or dinner.

Normally, I'm crouton-challenged.  I am absolutely helpless in the face of dense, store-bought croutons when I try to get them onto a fork with a bite of salad.  I inevitably end up littering the bottom of my plate with the pulverized crumbs of what used to be croutons.  The first time I had a home-made crouton as a kid, I was hooked.  Fresher, tastier, lighter, and - best of all - stabbable!

Let's get started on some home-made Caesar Croutons.


The ingredients are simple.  Bread, preferably stale.  French or Italian works fine.  Sourdough is also quite tasty.  Anything unsliced will do, as we want to slice it into nice thick chunks.  Since my Caesar croutons are basically garlic bread, the rest is simple: olive oil, parmesan cheese, garlic powder, salt, and pepper.


Start by slicing your bread into nice, thick slices.  An inch to an inch-and-a-half is ideal, assuming you have airy break like French or Italian.  A little smaller for something denser like sourdough.


Cut your bread down into crouton-sized chunks.  I like big ones, about 1"x1"x.5".  If you like them a little smaller, that's fine too.  Much bigger and they won't fit into a bite of salad all that well.

My favorite method for cutting the bread down is to just use kitchen shears once I've got the bread into slices.  Tearing is also a fine option.  Or a knife, if you want to be a square.

Once your bread is crouton-sized, toss in a large bowl with a bit of olive oil.  We're not going for full coverage, just a drizzle.


Spread your proto-croutons out on a cookie sheet covered in parchment paper.  Drizzle with a bit more oil if it's looking dry, and sprinkle all of the seasonings over the top: Plenty of garlic powder and parmesan, and just a dash of salt and pepper.


Bake at 350 degrees for 5 minutes.  Pull out of the oven and give them a shake/turn.  Season the other side with a fresh dash of all the seasonings, then bake another 4-5 minutes.  That's it, they're done!

Now all we need is a salad...Turn the oven up to broil and we'll get started on that part while the croutons cool.  Resist the urge to eat them like popcorn.  Or, if you made more than you need, eat them as a pre-salad snack.


A good Caesar Salad doesn't need much.  Fresh romaine.  Parmesan.  Caesar dressing (Ken's lite is really quite good, and slightly less guilt-inducing).  Some fresh pepper for over the top.

Oh, and steak.  This is a great recipe to use up leftover steak from another meal.  I'm not really the type to let leftover steak stick around, so I used some fresh stuff.  Since you're not eating the steak as a steak, it's alright to use a cheaper cut - I went for Round this time.  A finer cut is better, of course, but I'm on a graduate-student budget.  Mine looks off-color in the photo because it spent a night in a marinade of Worcestershire sauce, garlic, salt, pepper, a dash of vinegar, and some water.


Food photography doesn't get more exciting than a bowl full of lettuce.  When you're finish admiring the photo, wash and chop your romaine.  Arrange artfully in a large salad bowl.  The same one you tossed the croutons in works fine, but wash it out first!


Broil your steak about 5 minutes per side 3-4 inches from the broiler.  It shouldn't need any help if you marinated it.  If you didn't, give it a hand with some salt and fresh-ground pepper.


And that's it!  When your steak is done, let it rest a bit and slice it up.  Dress your lettuce and lay it on a plate.  Cover with a generous portion of sliced steak and a hand-full or two of croutons.  Over the lot goes plenty of Parmesan cheese and some pepper fresh from the mill.

It's simple, but it's awfully good.  If you're clever, you'll make more than you need for dinner and have components left-over for lunch the next day.

-


Recipe: Steak Caesar Salad

Prep Time: 10-15 minutes   |   Cook Time: 15-20 minutes   |   Difficulty: Easy   |   Servings: 3-4.

Ingredients

Croutons:
  • 1/2 loaf stale French or Italian bread.
  • 1/4 cup Olive Oil.
  • 2 tablespoons Parmesan Cheese.
  • 1 tablespoon Garlic Powder.
  • 1 teaspoon Salt.

Salad:
  • 1 head Romaine Lettuce, washed.
  • 12 Ounces Steak - Top/Bottom Round.
  • 1/4 cup Caesar Dressing.
  • 2 tablespoons Parmesan Cheese.
  • Salt and Pepper to taste.

Marinade (Optional):
  • 1/4 cup Worcestershire Sauce.
  • 1 clove garlic, minced
  • 1 teaspoon salt
  • 1 teaspoon pepper
  • 1/4 cup water
Instructions

Croutons:

Pre-heat oven to 350 degrees.  Cover a baking sheet with parchment paper.

Slice bread approximately 1-1.5" thick, then cut down into crouton-sized bites (approx. 1"-1"-.5").  Toss with olive oil in a large bowl.  Spread onto baking sheet over parchment paper and sprinkle on all remaining ingredients.

Bake 5 minutes.  Remove from oven, flip, and add additional seasoning if necessary.  Return to oven and bake an additional 4-5 minutes.


Salad:

Optional: Combine all marinade ingredients in a gallon-sized plastic bag.  Marinate steak a minimum of one hour.

Turn oven on to broil.  

Remove steaks from marinade (if used).  Broil steaks 3-4 inches from element approximately 5 minutes per side, or until desired temperature.  Rest several minutes and slice thin.

Chop romaine down and place in a large salad bowl.  Toss with Caesar dressing.  Arrange approximately 1/4 head of lettuce on a plate.  Add sliced steak and a generous portion of croutons.  Top with Parmesan cheese and fresh-ground pepper to taste.


Sunday, April 17, 2011

Stuffed Shells


These stuffed shells - or pretty close, at least - are the first meal I ever cooked for my girlfriend Kristin.  It was quite early on in our relationship, and I decided that I wanted to cook something impressive.  Stuffed shells can be pretty boring - especially if they're just stuffed with ricotta.  I searched the internet for a while for inspiration, and put together this recipe.  I found out after the fact that Kristin isn't generally a big fan of stuffed shells.  These, we both devoured quite happily.


You'll need some shells, of course.  A 12 oz box will do the trick.  Two pounds of beef - I usually like 85/15 for the ideal combination of flavor and general lack of grease.  In this case, I used a pound of 90/10 and a pound of 80/20.  We'll fill with the beef, some pasta sauce, a package of frozen, chopped spinach, 8 ounces of cream cheese, two eggs for binder, and fresh basil, oregano, minced garlic for flavor.  Parmesan and asiago cheeses round out the mix.  On top of it all goes the rest of the pasta sauce and a bit of mozzarella cheese.

To get started, put some water on to boil for the shells.  Also dig out a whole mess of baking dishes - this makes a lot.  I end up using two pie pans and an 8"x11" baking dish.  You can halve the recipe if you want, but then you'll have half a box of jumbo shells floating around, and that's just awkward.  Plan to eat these for several days, or share them with somebody.  Once you taste them, though, you'll be disinclined to share.

Cook your pasta shells to al dente.  Absolutely, positively don't let them overcook.  You want them plenty firm so they'll stand up to the filling and baking.

Also, preheat the oven to 350.


Fresh basil is key, here.  I adore basil - it's probably my single favorite spice.  Spring for some nice, fresh stuff.  You can really tell the difference in this dish, and I use a lot of it.  No need for a fancy chiffonade here, just give it a rough chop.

In a large skillet, combine the beef with your basil and garlic.  Squeeze as much water as you can out of the frozen spinach - don't be a wimp, just use your hands.  Add that to the mix, along with two beaten eggs.  Season with oregano, salt, and pepper.  Use plenty of basil, oregano, garlic, and pepper, but go easy on the salt.  Cook the mixture in the skillet until all of the beef is nicely browned.


In a large (large!) mixing bowl, combine your softened cream cheese with a few tablespoons each of grated Parmesan and Asiago cheese.  With these on the bottom of the bowl, pour the mixture from the skillet into the mixing bowl.  The heat from the beef mixture will get the cheese melting nicely.  Mix well, and add about a cup of pasta sauce.

Taste this magical mixture and adjust seasonings as needed.  You may also need a bit more pasta sauce.  You'll want it to look about like this:


I could eat this stuff with a spoon.  Or without a spoon.  But it's better in shells, and I'm not sure Kristin would have kept dating me if I just handed her a bowl of meat that first time I cooked for her.


Once the shells are done, it's time to start filling.  This is an awkward process.  Who decided shells were the right shape to fill, anyway?  In any case, I find that the maneuver in the picture just above works best for me.  Push the shell open with two fingers, and slip a nice large spoonful of filling in there.  Expect to get messy.


You want them about this full.


 Lay the shells in your greased baking dishes - pie pans, in my case.  Overlap isn't a big problem, here.


Cover with some of your remaining pasta sauce.  Not too much - the filling should have plenty of moisture to it.  Throw these into your 350 degree oven for 10 minutes.


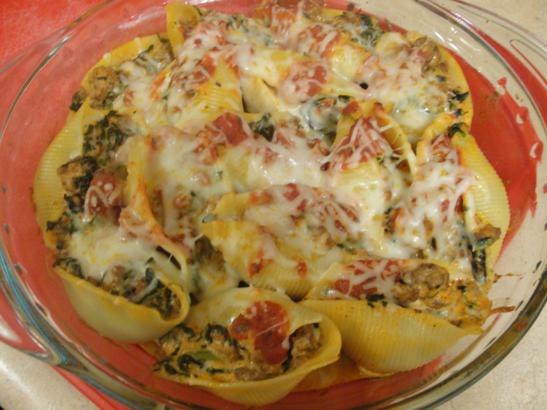
Check on your shells after 10 minutes.  They'll smell delicious, but not be quite done, yet.  Now is the time to cover them with your mozzarella (or other Italian-blend) cheese.  Again, not too much.  There's plenty of cheese in the filling already, so the mozzarella is really just the icing on the cake.


Back into the oven they go.  They should be done after another 5-10 minutes.  Check after 5, and keep an eye on them after that.  Once the cheese is nicely melted and the filling bubbly, your shells are ready!

Serve immediately alongside a tossed salad.


Recipe: Stuffed Shells

Prep Time: 5-10 minutes   |   Cook Time: 30-40 minutes   |   Difficulty: Medium   |   Servings: 8-10.

Ingredients
  • 1 package (12 oz) jumbo pasta shells
  • 2 pounds Ground Beef
  • 1 package frozen chopped spinach, thawed
  • 2 Eggs, lightly beaten
  • 1 8 ounce package Cream Cheese, softened
  • 1 jar (14-16oz) Pasta Sauce
  • 1/2 cup Mozzarella Cheese, grated.
  • 3 tablespoons Parmesan Cheese, grated.
  • 3 tablespoons Asiago Cheese, grated.
  • 2 ounces fresh Basil, chopped.
  • 1 tablespoon Oregano.
  • 2 tablespoons Garlic, minced.
  • Salt and pepper to taste.
Instructions

Pre-heat oven to 350 degrees.  Grease several baking dishes.

Cook pasta shells to al-dente, approximately 10 minutes.

In a large skillet, combine ground beef, spinach, eggs, garlic, oregano and basil. Cook beef mixture until beef is browned. 

In a large mixing bowl, combine cream cheese, Parmesan, and Asiago.  Add beef mixture and 1 cup pasta sauce.  Mix well.

Fill shells with a large spoonful of filling - approximately 2 tablespoons.  Arrange in baking dishes.  Cover lightly with remaining pasta sauce.

Bake stuffed shells 10 minutes.  Remove from oven and cover lightly with mozzarella cheese.  Bake an additional 5-10 minutes until filling is bubbly and cheese well-melted.


Serve immediately alongside tossed salad.

(Yes, that is Boba Fett in the corner of the picture.  I have a Star Wars apron because my girlfriend is amazing.)

Sunday, April 10, 2011

Soy-Apricot Glazed Chicken and Sesame Noodles


This is one of the first recipes I ever "invented."  Invented really isn't the term for it, though.  See, it started with two different recipes - The Pioneer Woman's sesame noodles and a very, very basic glazed pork chop.  I'd made the sesame noodles as a side, and the pork chop was basically a pantry meal - a case of "So I've got pork chops, soy sauce, and half a jar of marmalade..."

Then, one day, it all became clear.  Why not made those same noodles and some tasty asian-glazed protein all at the same time.  I abandoned the pork in favor of chicken.  And, of course, I ought to add the secret weapon of Asian-flavored cooking: broccoli.

Seriously, I think any time I eat anything with a Chinese-style sauce and there's no broccoli, it's a huge missed opportunity.  Broccoli just loves to soak up sauces, and man is it good in anything starring soy.  I'd happily eat these noodles with just the sauce and broccoli.  Or just the broccoli in the sauce.  But the whole thing is pretty good together, too.

This is a recipe that changes a little every time I make it.  I used to make two different sauces: one for the noodles and one to glaze the chicken.  They shared 90% of their ingredients, though, so it's really more sensible just to use a little more to glaze the chicken and let that sauce the noodles, too.  Ratios are pretty flexible, as are different flavorings in the sauce.  Any citrus makes a tasty glaze, and you can easily add or subtract ginger, sesame, and hot sauce as desired for a different experience.

Here's what I made this time around, starting with the cast of characters:


The big three: Chicken, of course.  A pound or a pound and a half, boneless/skinless.  Broccoli, too.  Please use fresh!  And noodles - I usually use fettuccine.

Now for the glaze/sauce: Soy sauce (I prefer Tamari sauce, most of the time.  Less sodium and a bit more complex in flavor), minced garlic, sesame oil, rice vinegar, Sriracha hot sauce, and some fruit preserves.  I went for Apricot this time around, and it was quite nice.  Try to go for something made mostly of fruit - a lot of what's on the shelf is fruit-flavored corn syrup, and that's not so yummy.

Also, some green onions for garnish.

Let's make some noodles!

An optional first step: Marinade!  Trim your chicken and slice it into "medallions" about an inch thick.  Put together a simple marinade of 1/4 cup Tamari (soy) sauce, 1-2 tsp minced garlic, and 1/4 cup water.  Some orange juice in there can be good, too.  I like to get my chicken in the marinade the night before.  If you can only let it sit for an hour, though, that's fine too.  If you're really in a hurry, no problem - the glaze makes it plenty flavorful anyhow.


Whether you marinated or not, you'll need to steam some broccoli.  Nothing fancy, here, just chop it down into pretty little florettes and toss them in a nice big saucepan with just enough water to touch the bottom of the steamer.  Cover, put on the heat, and forget about it until the lid suddenly starts jumping from the steam and scares the heck out of you.


With the broccoli on to steam, get your noodles started, as well.  I may or may not have forgotten to take a picture of the noodling.  Thankfully, it's a straightforward process: noodles + boiling water + time = victory.

Time to get the chicken cooking.  If you marinated the chicken, you're all set - just get it in the pan over medium heat.  If you didn't marinade, cut it down first, then add it to the pan on medium.  Surface area is a very, very good thing in this recipe - the more glazed area, the better!


We'll basically replicate the marinade to cook the chicken in.  Add 1/4 cup Tamari and 1-2 tsp minced garlic to your pan.  We'll save the rest for a bit later - the fruit part of the glaze involves a lot of natural sugar, so letting it scorch would be a sad, sad thing.  Cook the chicken until you can't see any more pink on the outside.  We don't want the inside quite done, though.


Your broccoli is probably about done steaming by now.  Again, we don't want it quite as tender as you'd like to eat it.  Look for that particularly vibrant shade of broccoli-green.  Or just sample a piece - chef's privilege. If it's just a bit less tender than you want it on your plate - it's done (for now).


Pull your chicken out of the pan and chop it into nice, bite-sized pieces.  Tongs are a very good idea, here - you really don't want to get too handsy with the chicken itself.  Hot soy sauce hurts.  You'll probably notice the very center of the chicken is just a touch pink - perfect.  It will finish in the rest of the glaze-y goodness.

Return the chicken to the pan, and add the broccoli to that very same pan.  It's glazing time!  About 1/4 cup of preserves usually takes care of it on the fruit front.  Also add 1-2 tsp of sesame oil (more if you're a sesame fan, less if you just want a hint), a squirt of Sriracha for some heat, and about a tablespoon of the rice vinegar to balance things out.  Again, the ratios here are quite flexible, so adjust, add, or omit as your heart desires.


Resist the urge to just take a fork to the whole thing at this point.  Give it 3-5 minutes to simmer in the sauce.  This is a great time to fight the craving by getting your noodles into a nice, big serving bowl and chopping your green onions for garnish.

When you can't stand it any more, dump the whole pan into the serving bowl full of noodles mix well.


Take a moment to admire your handiwork.


Garnish with green onions, and serve immediately!


Recipe: Soy-Apricot Glazed Chicken and Sesame Noodles

Prep Time: 5-10 minutes   |   Cook Time: 20-30 minutes   |   Difficulty: Easy   |   Servings: 4-6.

Ingredients

  • 1-1.5 pounds Boneless Skinless Chicken Breast
  • 12 oz Fettuccine noodles
  • 3-4 crowns Broccoli, cut into florettes
  • 1/4-1/2 cup Tamari (soy) Sauce
  • 1-2 tbsp minced garlic
  • 1-2 tsp Sesame Oil
  • 1/4 -1/3 cup Apricot Preserves
  • 1 tbsp Rice Vinegar
  • Sriracha hot sauce to taste
Instructions

Optional: Marinate chicken in 1/4 c. Tamari sauce, 1-2 tsp minced garlic, and 1/2 c. water for at least one hour - preferably overnight.

Steam broccoli to just before tender.

Cook noodles according to box instructions.

Cut down chicken into roughly inch-thick "medallions."  In a large skillet over medium heat, cook chicken with 1/4 cup Tamari sauce and 1-2 tsp minced garlic.  Cook until no pink is visible.

When broccoli is finished steaming and no pink is visible on chicken, remove the chicken and chop down into bite-sized pieces.  Return chicken and broccoli both to the large skillet.

To the chicken and broccoli, add preserves, sesame oil, rice vinegar, and sriracha.  Simmer over medium-low heat 3-5 minutes.

In a large serving bowl, combine chicken, broccoli, noodles, and sauce.  Garnish with finely sliced green onions.  Serve immediately.


Thursday, April 7, 2011

Sweet Potato Fries


I have a terrible confession to make.  Even the most loyal of friends shrink away from my when I admit this to them.  I'm a food-lover, obviously.  And, on my dad's side, I come from a long line of what he proudly describes as "faceless Irish peasants."  And yet...here it is:

I.  Hate.  Potatoes.

Still there?  Good.  I'm glad you could forgive me.  I don't know what it is about them, really.  They've just never appealed.  I can eat them to be polite, of course.  But given my druthers, I'd rather be far away from those dirty spuds in all their forms.  Mashed, baked, au gratin, I'll pass on em all.  Even, to the cause of great shame and strife, french fries.  Some fries are palatable, but the ones I like are cut so thin and cooked so crispy that you can't even tell they were once potatoes.  The thick-cut steak fries that make most folks drool?  No way.

However, I've found myself a fantastic substitute for french fries - both much more pleasant to my (admittedly strange) tastes, and considerably less guilt-ridden: sweet potato fries!  It might be a bit of a misnomer to call these fries, since they're entirely oven-baked, but I figure being made of potato and roughly fry-shaped qualifies them.  If you'd rather call them Baked Rectangle-ish Sweet Potato Finger-Food Side-Dishes, I guess that's fine.

In any case, let's get to it!  Here's the cast of characters:


Yams, salt, and pepper are the basics.  Yeah, I know, the recipe is titled "Sweet Potato" and I'm using Yams.  Sweet potatoes work, too, but I happen to like yams better.  Some supermarkets even sell yams as sweet potatoes.  Whichever you end up with, the process will be the same.

You can add most anything you like to those and it'll likely be delicious.  My personal favorite combination is a spicy-sweet mix of Cinnamon, Cumin, Onion Powder, Garlic Powder, and Cayenne.

Preheat your oven to 400 and pull out a baking pan (or two).  Spread some foil over the top and give it a good long spray with some Pam - these buggers will stick if you let em.


Lots of chopping to do!  The size of your fries is really up to you.  I like them relatively thin and crispy, so I shoot for 1/4 to 1/2 inch thick and 3-5 inches long.  If you're more of a soft-and-fluffy person, by all means, cut thicker!

Once they're all chopped up, toss em onto the baking sheet.  No need to spread them out prettily, as we've got to get them coated in some oil, first.  I use Olive Oil, but Canola works fine, too.  Drizzle just a bit - a tablespoon or two, depending how many spuds you're using and how many pieces you've cut them into.  Then fold the foil over a few times to "toss."  It's not the most elegant method, but it ensures that everything gets coated nicely.


Now season it up!  You'll be tempted to use way too much of everything, but I wouldn't use more than, say, a teaspoon of each seasoning across all of the fries.  The sweet potatoes themselves are plenty flavorful!  No need to aim carefully - go ahead and just sprinkle all over the place.  The seasoning that sits on the foil can help coat the other side of the fries when we turn them halfway through.


Now into the oven!  Check on them in 15-20 minutes.


They'll look about like this.  Starting to get brown and smell delicious.  We're halfway there!  Carefully use the same foil-folding method you used to coat with oil to get the fries flipped.  A spatula works fine, too, but it's likely to tear the foil up.


Now back into the oven for another 10-20 minutes.  If your fries were looking particularly brown, you might turn the oven down to 325-350 at this point, or just bake closer to 10 minutes for the second round.  Depending on the thickness of the cut and the particular spuds you're using, they can be done considerably quicker or more slowly.  

If you're anything like me, you're getting terribly impatient at this point.  I suggest distracting yourself by making some cheeseburgers!


Start checking the fries after another 10 minutes or so.  They'll probably be getting close, and if you reaaaally want to, you could just eat them at this point.  Trust me, though, they're way better if you let them get crispier.  They'll look suspiciously like they've burnt, but I promise they haven't.


When they're about this brown, pull em out.  Conveniently enough, I find my burgers are generally a perfect medium-rare by the time the fries are ready.


 Serve a generous pile alongside your burgers.  Devour promptly.


Recipe: Sweet Potato Fries


Prep Time: 5-10 Minutes   |   Cook Time: 30-45 Minutes   |   Difficulty: Easy   |   Servings: 4-6.

Ingredients

  • 2-3 Large Sweet Potatoes (Yams)
  • 1-2 tablespoons Olive Oil
  • 1-2 teaspoons Salt
  • 1 teaspoon ground Black Pepper
  • 1 teaspoon Onion Powder
  • 1 teaspoon Garlic Powder
  • .5 teaspoon Cayenne Pepper
  • .5 teaspoon Cinnamon
  • .5 teaspoon Cumin
Instructions

Preheat oven to 400 degrees.  Cover one or two large cookie sheets with foil and grease.

Wash and chop sweet potatoes down into fries, about 1/2-by-1/2-by-4 inches.  Uneven pieces are no problem.  Coat sweet potato pieces with 1 tbsp of oil and toss by folding the foil over gently.

Sprinkle seasonings over the sweet potato pieces.  Excess seasonings on the foil will coat the fries when they are flipped halfway through baking.

Bake for 30-45 minutes, checking and flipping the fries after 20 minutes.

Serve immediately.