Showing posts with label Sides. Show all posts

Sunday, February 3, 2013

Cauliflower Puree with Sauteed Zucchini


It's been a while since I've posted, and a lot has happened in the meantime.  We've been pretty busy - Kristin and I have packed up and moved to Wisconsin to start a pair of new jobs.  That's meant a new home, new schedules, and a new kitchen.  As we're settling back into the routine, I'm happy to find more time to think about blogging again.

Kristin and I have few fundamental disagreements when it comes to food.  One thing we just can't see eye to eye on, though, is potatoes.  She - like the rest of the world - loves them.  I - the weird one - hate them.  Since I do most of our cooking, this leaves Kristin tragically craving potatoes.  We may finally have found a good compromise, since this cauliflower puree seems to scratch that itch for her without resulting to the scourge of potatoes.


Here's what you'll need: cauliflower, zucchini, sour cream, some soft melting cheese (I used Neufchatel, and have also used goat cheese here to great effect), a bit of butter, a splash of milk, garlic powder, salt, and pepper.

Feel free to vary the ingredients here to taste - much like potatoes, this puree will take to all sorts of flavors, so add, remove, or adjust seasonings to fit your particular meal.


Start by chopping down the cauliflower.  There's really no need to turn it into pretty florettes - you're going to puree it, after all.  The goal here is just to break it down into manageable pieces with a fair amount of surface area for easy cooking.


Throw the chopping cauliflower into a pot of lightly-salted water, bring to a boil, then reduce the heat and simmer for 15 minutes or so until the cauliflower is tender, but not mushy.


If you really want to be a purist, you could stick to just some tasty pureed cauliflower, but I decided to top this dish with some chopped, sauteed zucchini to offer some additional flavor and textural contrast.

While the cauliflower is simmering away, dice your zucchini into nice, small pieces.


Saute the diced zucchini with a bit of butter, salt, pepper, and garlic powder.  It should only take a couple of minutes - take it off the heat when the zucchini still has some bite to it, otherwise you'll end up with a much more boring soft-on-soft texture with the finished product.


When the cauliflower is tender, drain it well in a colander.  You don't want watery puree, so drain it really, really well - shake it around, leave it for a minute or two, shake some more, and even consider pressing some water out.


When your cauliflower is well drained, throw it into a blender or large food processor along with a dollop of sour cream, the cheese, and a generous quantity of salt, pepper, and garlic powder.  Don't add any milk yet.

This process could also benefit a great deal from an immersion blender if you have one - if so, combine everything in the pot you used to simmer the cauliflower instead and just take the immersion blender to it.


Once everything is in the blender, give it a whir.  If it's being stubborn, add a splash of milk to help it mix - otherwise, there's no need.  Keep blending until you hit a texture you're happy with - just a few pulses for a thicker texture, or longer for a smoother, thinner texture.  Try a bit and adjust the seasonings to your taste.


Serve hot with plenty of sauteed zucchini on top.


Recipe: Cauliflower Puree with Sauteed Zucchini
Prep Time: 5 Minutes | Cook Time: 20-30 Minutes | Difficulty: Easy | Servings: 6-8

Ingredients

  • 2 large heads Cauliflower
  • 2 large Zucchini
  • 4 oz Neufchatel Cheese
  • 2 tbsp Sour Cream
  • 2 tbsp Butter
  • 1 tbsp Garlic Powder
  • Salt and Pepper to taste
  • Optional: Milk as needed to blend

Instructions

  1. Chop cauliflower down into small pieces.
  2. Add cauliflower to a pot of lightly salted water.  Bring to boil, then reduce heat and simmer 15-20 minutes until tender.
  3. Finely dice zucchini.
  4. Saute zucchini until just tender in a skillet over medium-high heat with butter, salt, pepper, and a dash of garlic powder.
  5. When cauliflower is tender, drain well to remove as much water as possible.
  6. In a blender or large food processor, combine drained cauliflower, sour cream, neufchatel cheese, salt, pepper, and garlic powder.
  7. Blend cauliflower mixture to desired texture, adding milk as needed.
  8. Serve cauliflower puree hot topped with sauteed zucchini.

Sunday, September 16, 2012

Roasted Broccoli and Cauliflower


Roasting can be an unsung hero among cooking methods.  It's not flashy or noisy, it's simple.  It's not fiddly or complex, it's easy.  All you need is plenty of heat and plenty of time.  This week I roasted some broccoli and cauliflower, veggies that I would usually just steam.  Roasting took longer, but the flavors and texture were leaps and bounds more interesting than my usual methods.  This makes for a side that can stand up to just about anything, but without becoming too heavy or overpowering itself.


The ingredients this week are simple and inexpensive.  Here's what you'll need: broccoli, cauliflower, a lemon, a few cloves of garlic, some olive oil, salt and pepper, and a bit of Parmesan to sprinkle on top if you're so inclined.


There's lots of chopping to do.  Break down the broccoli and cauliflower into florettes, leaving a couple of inches of stalk.  Also mince the garlic and zest the lemon.


Throw everything you just chopped and zested into a large bowl.  Drizzle the mixture with olive oil and the juice from the lemon, then sprinkle with salt and black pepper.  Stir it around a bit and let it sit for 10 or 15 minutes.  Pre-heat the oven to 425 while you wait.


After you've waited 10 or 15 minutes, give the veggie mixture another good stir, then pour it out into a single layer on a greased sheet pan.


Roast in the oven at 425 degrees for 25-35 minutes, turning halfway, until the vegetables are nicely brown and tender enough to pierce easily with a fork.  These actually went back in a little longer after this shot, because I like mine quite crispy.  Don't fret if you end up with some really, really dark pieces - they may look burnt, but they're probably the tastiest ones.


Serve hot with a sprinkle of Parmesan cheese if you so desire.


Recipe: Roasted Broccoli and Cauliflower
Prep Time: 5 Minutes | Cook Time: 25-35 Minutes | Difficulty: Easy | Servings: 4-6

Ingredients

  • 1-2 pounds fresh Broccoli
  • 1 head fresh Cauliflower
  • 1 lemon
  • 3-4 tbsp Olive Oil
  • 4 cloves Garlic
  • Salt and Pepper to taste
  • Optional: Grated Parmesan Cheese
Instructions
  1. Pre-heat oven to 425 degrees.
  2. Chop broccoli and cauliflower into florettes with 1-2 inches of stalk.
  3. Mince garlic and zest lemon.  Add to large mixing  bowl with broccoli and cauliflower.
  4. Drizzle olive oil over contents of bowl.  Add lemon juice, salt, and pepper and stir to mix.  Let sit 10-15 minutes.
  5. Arrange vegetable mixture in a single layer on a greased baking sheet.
  6. Roast vegetables 25-35 minutes, turning halfway, until well-browned and tender enough to pierce easily with a fork.
  7. Serve hot with a sprinkle of Parmesan cheese if desired.

Sunday, August 12, 2012

Broccoli Ramen Salad


Summertime demands some fresh, light, flavorful side dishes.  It can be tough to make cold food interesting, and especially to make raw food interesting, but this little salad really does the trick.  It's lightning fast to put together, super flavorful, and not at all heavy - we were so happy to have it when the temperature soared over 100 degrees for so much of this summer.

I'm no fan of prepackaged ramen noodles, but they really add life to this salad.  They soften just a bit in the tangy dressing, making for a nice textural counterpoint to the crunchy nuts and crisp vegetables, but they never end up too soft.  This recipe is also immensely easy to customize - a dash of soy sauce and ginger lend it an Asian flair, or some lime and cilantro make it an easy complement for Mexican food.  Whenever you need something tasty, cool, and easy in the heat, give this salad a try.


Here's what you'll need: A large package a broccoli slaw, two packages of chicken flavored ramen, a bunch of green onions, unsalted roasted peanuts and sunflower seeds, apple cider vinegar, vegetable oil, and a bit of white sugar.


First, make the dressing by whisking together vegetable oil, cider vinegar, sugar, and one ramen seasoning packet (just one, otherwise things get too salty and gross).


Next, chop down the green onions and crush up the ramen noodles into small pieces.  Don't worry about keeping things too uniform.

This process can sometimes involve tiny noodle pieces flying all around the kitchen.  This is immensely entertaining to the cat, but maybe less so to whoever has to clean it up - consider crushing the noodles in a bag or a bowl to minimize projectiles.


Now mix everything but the peanuts and sunflower seeds together in a large bowl, add the dressing, and give it a good stir.  You can serve right away if necessary, but the flavors really improve with an hour or two in the fridge.


Serve the salad up cold, and garnish with peanuts and sunflower seeds right when it's time to eat.  If you're bringing the salad elsewhere, like to a pot luck, it's fine to add the nuts before you leave - they can make it several hours before getting soggy.  If you expect leftovers or are just eating at home, though, you'll want to add nuts to individual portions.


Recipe: Broccoli Ramen Salad
Prep Time: 10 Minutes | Cook Time: None | Difficulty: Easy | Servings: 10-12

Ingredients
  • 1 large (16-20 oz) package Broccoli Slaw
  • 2 packages chicken flavored Ramen Noodles
  • 1 bunch Green Onions, chopped
  • 1/2 cup Unsalted Roasted Peanuts
  • 1/2 cup Unsalted Roasted Sunflower Seeds
  • 1/4 cup White Sugar
  • 1/4 cup Vegetable Oil
  • 1/3 cup Cider Vinegar
Instructions
  1. Whisk together vegetable oil, cider vinegar, sugar, and one ramen seasoning packet to create dressing.
  2. Finely chop green onions and break down ramen noodles into small pieces.
  3. In a large bowl, combine broccoli slaw, green onions, and broken ramen noodles.  Pour dressing over mixture and toss to coat.
  4. Refrigerate to chill - ideally 1-2 hours to enhance flavor.
  5. Top with peanuts and sunflower seeds just before serving.  Serve cold.

Sunday, July 15, 2012

Parmesan Zucchini Fries


Since Kristin and I live in a second-floor apartment, we don't get much of a chance to grow our own food.  In fact, even the poor herbs that I try to grow in the window only have about a 50% survival rate.  Kristin's family has a great garden, though, and they even like us enough that they sometimes share their home-grown veggies.  Thankfully, that means we don't miss out entirely on the fresher-than-fresh summer harvest.  This week, Kristin's mom shared a couple of beautiful, gargantuan zucchini with us.  I really don't think I've ever seen larger.  She mentioned that she was going to make Zucchini Parmesan out of the ones that she kept, and that sounded awfully good.

This week, I made something like a side-dish version of Zucchini Parmesan: zucchini fries. They're lightly breaded in crumbs and Parmesan, seasoned with classic Italian flavors, and served with marinara sauce.  These fries made an awesome accompaniment to our dinner, or could serve as an easy appetizer or party food.  If you find yourself saddled with a couple of giant zucchini (or some boring, regular-sized ones), give these fries a try.


Here's the cast of characters: a couple of enormous zucchini, some panko bread crumbs, some Parmesan cheese, an egg or two, a bit of milk, oregano, basil, garlic powder, salt, and pepper.

If you haven't been blessed with a giant zucchini, don't be too glum - just use a few more standard sized ones.


Start by cutting your zucchini down into 3-4 inch long sticks.  If you want your fries to be more crisp, err on the thinner side for the sticks.  I enjoyed getting a little more meaty zucchini bite, so left the sticks fairly thick.


Next, set up a breading station.  Make an egg wash by whisking the egg into the milk in a bowl large enough to submerge your zucchini sticks.  On a plate, combine the breadcrumbs, all of the seasonings, and plenty of grated Parmesan.  Don't be shy with salt and pepper - these fries will be a bit bland without a significant amount.


Cover a baking sheet with some parchment paper, or just grease it if you don't have parchment handy.

Your breading process is simple - dip each zucchini stick in the egg wash, roll in the breadcrumb mixture until it's lightly coated, and place the finished product on the baking sheet.

Don't worry about getting each and every piece 100% covered in crumbs, especially if you're using a larger crumb like panko and Parmesan that doesn't come from a green tube.  It just won't stick completely, but that's fine - you get plenty of crunch and flavor from this "rustic" breading.


Bake your fries for 25-30 minutes in a 425 degree oven until they're crispy and golden brown.


Serve immediately with marinara for dipping.


Recipe: Parmesan Zucchini Fries
Prep Time: 15 Minutes | Cook Time: 30 Minutes | Difficulty: Easy | Servings: 4-6 as Side Dish

Ingredients
  • 4 Large Zucchini (Or 2 Gargantuan Zucchini)
  • 2 Eggs
  • 1/2 cup Milk
  • 1 cup Panko Breadcrumbs
  • 1/2 cup Parmesan Cheese, grated
  • 1 tbsp Oregano
  • 1 tbsp Basil
  • 1/2 tbsp Garlic Powder
  • Salt and Pepper to taste
Instructions
  1. Pre-heat oven to 425 degrees.  Grease or cover baking sheets with parchment paper.
  2. Cut zucchini down into 3-4 inch long sticks.
  3. In bowl large enough to submerge zucchini sticks, whisk eggs into milk to create egg wash.
  4. On a large plate, combine panko breadcrumbs, grated Parmesan, oregano, basil, garlic powder, and plenty of salt and pepper.
  5. Dip each zucchini stick in egg wash, then roll in breadcrumb mixture to coat.  Place on prepared baking sheets.
  6. Bake 25-30 minutes at 425 degrees until fries are golden-brown and crispy.
  7. Serve immediately with marinara sauce for dipping.


Sunday, July 8, 2012

Guacamole


It's hot.  Unbearably hot.  Unspeakably hot.  Much too hot to heat up the kitchen unless life depends on it.  So what better time to use an ingredient that doesn't need heating - the avocado? In part to beat the heat and in part because it's just delicious, we made a nice big batch of guacamole this week.  It's fresh and creamy and, maybe most important of all this week, cool.


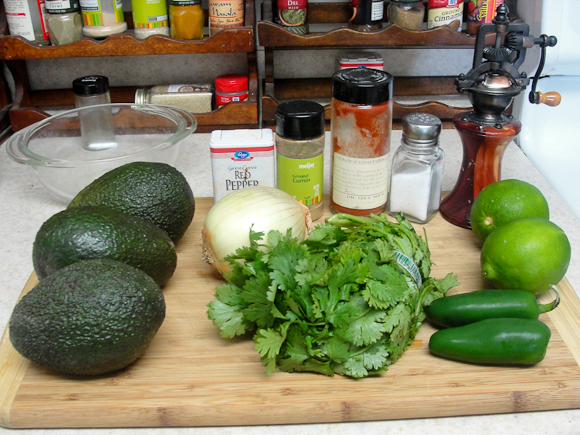
Here's what I used: three avocados, two jalapeno peppers, the juice from two limes, a sweet onion, a bunch of cilantro, some cayenne pepper, cumin, smoked paprika, salt, and pepper.

These ingredients form a solid "base" guacamole, which can then be jazzed up as you see fit.  If you like yours with pico de gallo or salsa or anything else mixed in, just mix in after the last step.


Start by opening up the avocados, scooping out the meat, and giving it a thorough mashing.


Next, chop up the onion, jalapeno, and cilantro.  I only used about half of the onion and it was plenty - and of course you can use red onion in place of sweet onion if you prefer.  As always, if you want more heat, leave the veins and seeds in the peppers.


Here's the last step: mix everything together.  Dump the chopped vegetables into the mashed avocado and mix them in, then add the seasonings and lime juice and keep stirring and adjusting until it's perfect.  Every avocado is a little different, so every batch of guacamole will need a somewhat different balance of seasonings.

Note that using plenty of smoked paprika can darken the color of the guacamole and even make it look a bit like it's browning prematurely - don't worry too much if this happens.  I love the smokiness of the flavor enough to overlook the color change.


And that's it!  Give it an hour or so in the fridge to let the flavors marry, then serve with plenty of chips, preferably along with some cold beers and/or sangria.


Recipe: Guacamole
Prep Time: 5-10 Minutes | Cook Time: None | Difficulty: Easy | Servings: 6 Cups

Ingredients

  • 3 Ripe Avocados
  • 2 Jalapeno Peppers
  • Juice of 2 Limes
  • 1/2 large Sweet Onion (or Red Onion)
  • 1/4 cup Cilantro, chopped
  • 1 tsp Cayenne Pepper
  • 2 tsp Ground Cumin
  • 2 tsp Smoked Paprika
  • Salt and Pepper to taste
Instructions
  1. Slice open avocados, scoop out flesh into a bowl, and mash thoroughly until few lumps remain.
  2. Chop onion, jalapeno, and cilantro.  Add to mashed avocado and mix.
  3. Add lime juice and seasonings, mix well, and adjust to taste.
  4. Refrigerate 1 hour before serving.


Sunday, June 17, 2012

"Broccoli and Friends" Salad


This salad has many names -- most of them lame.  You can find it behind the deli at most grocery stores in one form or another, and it's often called something like "Broccoli Salad."  At really adventurous places, you might see "Broccoli Grape Salad."  Names like that convey and ingredient or two, but they don't capture how tasty this little salad actually is.

Leave it to Kristin's family to come up with a better name.  I had only ever had the supermarket version of this salad a few times before, so I didn't know what was going on or what I should be excited about when I heard Kristin's older sister exclaim "Broccoli and Friends!"  I've become good friends with "Broccoli and Friends" since -- it's a quick, easy, flavorful side that pairs with almost anything, especially in the summer.


Just a few ingredients for this one.  The role of "Broccoli" will be played by broccoli.  The role of "Friends" will be played by red onion, bacon, sliced or slivered almonds, grades, mayonnaise, lemon juice, salt, and pepper.


First, toast up the almonds in a skillet with just a dash of salt.  Don't get them too dark, you just want plenty of crunch.  If you don't have almonds on hand, pine nuts or sunflower seeds could fill in nicely.


While the almonds are toasting, chop the broccoli into florettes, halve the grapes, and finely dice the red onion.  Combine the broccoli, grapes, onion, and toasted almonds in a large bowl and give them a good mix.


Mmm, bacon.  Chop up and fry the bacon to your desired level of crispyness.  I like it fairly soft for this recipe, but I could see the appeal in another source of crispy crunch, too.  Try both ways for science!


Mix the bacon into the rest of the ingredients.


Finally, whisk together the mayonnaise and lemon juice, then season with a dash of salt and a good amount of cracked black pepper.  Pour it over the bowl and stir well to make sure everything is coated.


If you're in a hurry, you can serve the salad right away.  It's better if it can sit in the fridge for at least an hour or two, though - it's best nice and cold, and the flavors like a little bit of time to meld.  Either way you do it, offer hearty portions and enjoy!


Recipe: Broccoli and Friends
Prep Time: 10 Minutes | Cook Time: 10 Minutes | Difficulty: Easy | Servings: 8-10

Ingredients
  • 2-3 pounds Broccoli
  • 1/2 pound Bacon
  • 2 cups Grapes
  • 1 cup Slivered Almonds
  • 1 medium Red Onion
  • 1 1/2 cups Mayonnaise
  • 1/3 cup Lemon Juice
  • Salt and Pepper to taste

Instructions
  1. Toast almonds with a pinch of salt until crisp and golden brown.
  2. Chop broccoli into florettes, dice red onion, and halve grapes.  Mix together with almonds in a large bowl.
  3. Chop bacon into small pieces and saute until desired level of crispyness.  Mix bacon into large bowl.
  4. Whisk together mayonnaise and lemon juice in a small bowl.  Add a dash of salt and plenty of black pepper to taste.
  5. Pour mayonnaise mixture into large bowl and stir well to coat all ingredients.
  6. Refrigerate 1-2 hours before serving.