Showing posts with label Lunch. Show all posts

Sunday, October 21, 2012

Crock Pot Italian Beef


If you're not from Chicagoland, you probably don't have easy access to good Italian Beef sandwiches.  In Chicago and the suburbs, I would bet you're never further than a 5 minute drive from a good Italian Beef.  Out here in Ohio, sadly, things are not the same.  All is not lost, however - it's easy to make a good beef sandwich in the crock pot at home.

Italian Beef sandwiches are traditionally wet-roasted to medium rare, then shaved thin on a deli slicer and finished in "the juice," then served on dense, chewy bread and topped with sweet peppers, hot peppers, or giardiniera (or some combination of the three).  I don't have a deli slicer handy, so my own version is shredded rather than sliced, but the result is much the same.  This recipe is an easy, delicious way to feed a large group - but make plenty, they may want seconds.


Here's what you'll need: 3-4 pounds of cheap beef (sirloin butt, top round, or bottom round), a couple of sweet onions, a couple of bell peppers, some beef broth, worcestershire sauce, garlic powder, italian seasoning, salt, and pepper.


Start by chopping the peppers and onions into large pieces.  Too small, and they'll either end up mushy or disintegrate altogether after cooking all day - and that just won't do.


Cover the bottom of the crock pot with a little more than half of the chopped veggies.  The rest will go on top in a minute.


Next, nestle the star player into the pot on top of the veggies, and cover that enormous hunk of beef with the rest of the chopped vegetables.  My cut of beef was a little bigger than I usually use, so it just barely fits in the pot - it took a while longer to cook, but it still turned out just fine.
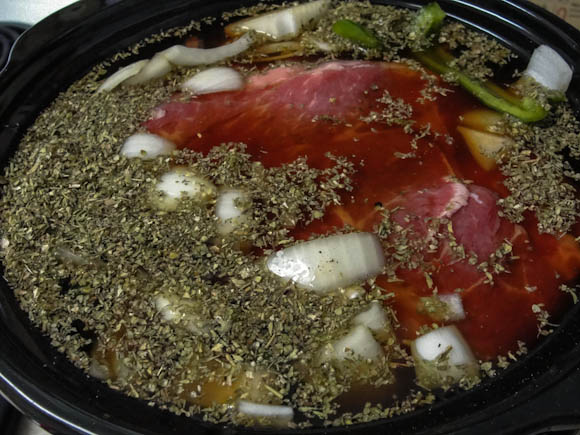

With the beef and vegetables in place, it's time to add the cooking liquid and the seasoning - add the Worcestershire sauce, beef broth, Italian seasoning, garlic powder, salt, and pepper to the pot.  Be sure to lift up the beef a bit to make sure that the liquid gets all the way down to the bottom of the pot.

With your liquid and seasoning in place, your beef is ready to cook.  Set the crock pot to low and cook 6-10 hours - the amount of time can vary quite a lot depending on the particular cut of beef you get.  The good news is that it's pretty tough to drastically overcook this beef, so if it goes an "extra" hour or two, no big deal.


You'll know the beef is done when it shreds very, very easily with a fork.  If it's at all tough to get apart, put it back in the pot and try again in an hour.  Once the beef is tender, shred it with a couple of forks until it's in nice, bite-sized pieces.


To assemble a sandwich, pile plenty of beef onto a good, chewy sandwich roll.  Drizzle with extra juice and/or serve with a cup of juice on the side.  Top the sandwich with roasted sweet peppers, giardiniera, hot peppers, or any combination thereof.  This time around, we used these Pickled Hot Peppers to great effect.

While this sandwich may never entirely stave off my craving for a Portillo's sandwich, this recipe is a nice approximation of the Chicago classic.  Enjoy!


Recipe: Crock Pot Italian Beef
Prep Time: 10 Minutes | Cook Time: 6-10 Hours in Crock Pot | Difficulty: Easy | Servings: 12-16

Ingredients
  • 3-4 lbs Beef (sirloin butt, top round, bottom round)
  • 2 large Sweet Onions
  • 2 large green Bell Peppers
  • 4 cups low-sodium Beef Broth
  • 3 tbsp Worcestershire Sauce
  • 2 tbsp Italian Seasoning
  • 1 tbsp Garlic Powder
  • 1 tbsp Salt
  • 2 tsp Black Pepper
Instructions
  1. Chop onions and peppers into large pieces.
  2. Line bottom of crock pot with half of chopped vegetables.  Set beef atop vegetables, then cover with the other half of the onions and peppers.
  3. Add Worcestershire sauce, Italian seasoning, garlic powder, salt, and pepper to crock pot.  Add enough beef broth to cover all of the ingredients.
  4. Cook in crock pot 6-10 hours on Low until a fork can easily pull the beef apart.
  5. Shred beef into small pieces with two forks.
  6. To assemble sandwiches, pile beef atop chewy sandwich rolls.  Drizzle with additional juice and/or serve with a side cup of juice.  Top with sweet peppers, giardiniera, and/or hot peppers.  Serve hot.


Sunday, May 13, 2012

Creamy Ranch Pasta Salad


Pasta salad deserves better.  Sure, it's a delicious side, but why leave it there?  Every grocery store deli will happily sell you some gloppy macaroni salad, but come on, we can do better than that.  Why not make pasta salad a main course?  Why not add enough great ingredients that it can stand on its own?  Most importantly -- why not bacon?


As you can see, my board is fuller than usual.  A lot of stuff goes into this pasta salad, but there's not a lot of prep for most of it.  You'll need some pasta, of course.  Go for an interesting shape - I used Cavatappi to great success this time around.

We'll feature a pair of proteins, both chicken and bacon.  For the veggies, I use broccoli, cucumber, carrots, and bell pepper - but you can add or change as you see fit.  A lot of people are into tomatoes - raw ones make me sad, but you can go crazy with them if that's your thing.  I also love some cheese in my pasta salad, so I added a block of extra-sharp cheddar.

Finally, the supporting cast is made up of Greek yogurt, a bit of mayonnaise and sour cream, salt, pepper, garlic powder, and a packet of ranch dressing mix.


We'll start with the chicken.  If it's warm enough outside and you have easy access, you can always just grill it.  Since we don't own a grill, though (alas!), I like to use this method to simulate grilling in the oven while adding a ton of flavor.

First, rinse the chicken and pat it dry.  Season it well with salt, pepper, and garlic powder, then give dip it in the Greek yogurt to coat.  The yogurt dip will keep the chicken super moist while it cooks, even while you get a nice, slightly-blackened exterior.

Lay the yogurt-dipped chicken out on a wire rack atop a baking sheet -- this should let hot air circulate around the whole chicken breast at once and keep the bottom from getting soggy.  You may even want to line the baking sheet with foil to catch the drips and make clean-up simpler.


Broil the chicken 6 inches away from the broiler about 5 minutes per side until it's nicely blackened on the outside and the inside is up to temperature.  Set it aside for later.


While the chicken is cooking, fry up the bacon.  Try not to eat too much of it before it ever gets into the pasta salad.  Dry the finished product on papers towels and set aside for later.


Don't forget that we need some pasta, too!  Cook it up according to the package directions, leaving it on the al-dente side.  Drain well and set it aside to cool once it's done.


Now for all of that other stuff.  Chop the broccoli, cucumber, bell pepper, carrots, and cheese into bite-sized pieces.  I like to quickly blanch the broccoli for 30 seconds or so in boiling water to soften it just a touch before I chop it, but that's up to you.


The chicken and bacon should be cool enough to handle by now, so give those a good chopping, too.


Finally, it's time to put it all together.  You'll probably need a couple of large bowls for this - this recipe filled up the two largest bowls in my kitchen handily.  Combine everything, preferably leaving a little extra room at the top of the bowl so that you can stir the dressing in easily.


Speaking of dressing, we'd better make some.  Combine the mayonnaise, sour cream, and ranch dressing mix and stir well.  Give it a taste and adjust as you see fit - I added a little more garlic and some dried herbs.


Add your preferred amount of dressing to the salad and stir well to mix.  I like it fairly lightly dressed - there's enough good stuff in these bowls to be tasty all by itself.


Throw it in the fridge to fully chill and let the flavors marry a bit, and you're ready to serve.  This is a fantastic, summery main course, and so easy to prepare well in advance.  Enjoy!


Recipe: Creamy Ranch Pasta Salad
Prep Time: 10 Minutes | Cook Time: 20 Minutes | Chill Time: 1-2 Hours | Difficulty: Easy | Servings: 12-15
Ingredients
  • 16 oz Cavatappi Pasta
  • 1-2 pounds Boneless Skinless Chicken Breast
  • 1 pound Bacon
  • 3 heads Broccoli
  • 1 large Cucumber
  • 2 large Green Bell Peppers
  • 8 ounces Baby Carrots
  • 8 ounces Extra-Sharp Cheddar Cheese
  • 1 1/2 cups Mayonnaise
  • 1/2 cup Sour Cream
  • 16 ounces Greek Yogurt
  • 1 packet Ranch Dressing Mix
  • 2 teaspoons Garlic Powder
  • Salt and Pepper to taste

Instructions
  1. Cook pasta according to directions on package.  Drain well and set aside to cool.
  2. Rinse chicken and pat dry.  Season well with salt, pepper, and garlic powder then coat completely with Greek yogurt.
  3. Place yogurt-covered chicken on a wire rack atop a baking pan and broil approx. 5 minutes per side until blackened on the outside and done in the middle.  Set aside to cool.
  4. Fry bacon in a heavy skillet.  Dry well with papers towels and set aside.
  5. (Optional): Blanch broccoli 30 seconds in boiling water.
  6. Chop all vegetables and cheese into small, bite-sized pieces.
  7. Once chicken and bacon have cooled, chop into small, bite-sized pieces.
  8. Combine pasta, chicken, bacon, cheese, and vegetables in large bowl(s).
  9. In a small mixing bowl, combine mayonnaise, sour cream, and ranch dressing mix.  Adjust seasoning to taste and stir to mix.
  10. Add dressing to pasta mixture to taste and stir well to combine.
  11. Chill at least 1-2 hours before serving.  Serve cold.

Sunday, March 18, 2012

Simple Cinnamon Apples

 
This is one of those recipes - you start with things that are good all by themselves, and they come together into something more than the sum of its parts.  Better yet, it's a recipe that many enjoyed as a kid - childhood comfort food.  Cinnamon apples are just wonderful - sweet, spicy, and nostalgic.  And did I mention they're easy?  Make them today!


Here's all you need: apples, a bit of butter, some brown sugar, cinnamon, vanilla extract, and nutmeg.  That's it!  You probably have all of these things in your pantry right now, so there's no excuse not to get started on this recipe.

Apple-wise, I used Golden Delicious to great results.  These can also be really nice with something more tart like a Granny Smith.  Really, any apple will work, so try a range and see which you like best.  Do it for science!


First, peel and slice your apples.  I like slices about 1/2 inch thick so that the finished product doesn't go all to mush.


With the apples slices in a large mixing bowl, toss with cinnamon, brown sugar, nutmeg, and vanilla until all of the slices are coated.


In a large skillet, melt a tablespoon or two of butter over medium heat.  Add the coated apples and 2-3 tablespoons of water and cook, stirring every minute or two.  You'll need somewhere between 8 and 12 minutes of cooking, all told, depending on the thickness of the apples and how soft you like them.


That's it!  Wasn't that easy?

Serve warm alongside just about anything, or just as a snack by themselves.  Be ready to eat more than you thought you would and dejectedly realize that they're all gone.  You'll want to make another batch soon!


Recipe: Simple Cinnamon Apples
Prep Time: 10 Minutes | Cook Time: 15 Minutes | Difficulty: Easy | Servings: 4-6

Ingredients
  • 6 medium Apples
  • 1/3 cup Brown Sugar
  • 2 tsp Ground Cinnamon
  • 1/2 tsp Ground Nutmeg
  • 1/2 tsp Vanilla Extract
  • 1 tbsp Butter
  • 3 tbsp Water

Instructions
  1. Peel and slice apples and place in a large mixing bowl.
  2. Add brown sugar, cinnamon, nutmeg, and vanilla to bowl of sliced apples and toss to coat.
  3. Melt butter in a large skillet over medium heat.
  4. Add coated apple slices to skillet, add water, and cook 8-12 minutes until tender, stirring often.
  5. Serve warm.


Saturday, January 28, 2012

No-Knead Bread


I posted last week about my views on the relationship between soup and bread.  To reiterate: I think soup should be eaten with bread as the primary utensil, rather than silly things like spoons.  It's nature's way.

In general, my love of bread with my soup is easy to fulfill.  However, when I made last week's Tomato-Vegetable Soup with Turkey, I realized that I had forgotten to buy any bread to accompany it.  Worse yet, the weather was gross, so I really didn't want to leave the apartment and go to the store.  The solution: make some bread!  It's super easy, cost-effective, and way better than anything the Meijer bakery could have offered me anyhow.

This bread is incredibly easy to make, and - for bread - very quick.  It's about 5 hours from raw ingredients to finished loaf.  It's not exactly lightning fast, but you don't need an overnight rise or lots of kneading - any kneading at all, in fact!  I like to to mix the ingredients and let things rise before work, then bake once I get home.  Give it a try!


This is a very simple recipe: you probably have all of the ingredients on-hand!  All you need is flour, yeast, salt, a bit of olive oil, and water.  Seasonings are optional, but some herbal action makes this bread an even better match for soup.  I particularly like some coarse-grained salt, oregano, and basil.


In a large mixing bowl, combine 3 cups flour, 1 teaspoon salt, and 2 1/4 teaspoons yeast (1 packet).  Next, add 1 1/2 cups of warm water and mix until the dough is "shaggy."  That's a technical term, believe it or not.  The dough surface will be rough and very, very sticky.


It's rising time.  Cover your bowl with plastic wrap and leave it alone someplace warm for 4 hours.


Four hours later, it will look something like the above.  Behold, the power of yeast!

Of course, you can let the dough rest considerably longer if you like.  Consider four hours a hard minimum, though.


Here's the only slightly tricky aspect to this bread.  When it's time to bake, you need to get the dough from bowl to pan.  Here's how to do it in a way that results in a crusty bread with a fluffy, soft center.

First, spread about a tablespoon of olive oil over a baking sheet.  Dump the dough out of the bowl and onto the oiled baking sheet.


Now give that dough one thorough smooshing.  "Smooshing," unlike "shaggy," is not yet a technical term - but it probably should be.


Your smooshed dough should be somewhat flattened-out like so.


Now gather up the dough from the edges and fold in and upward, so that the oiled surface is all on the outside, and the un-oiled surface is all on the inside of a sort of packet.


Place dough in a loaf pan, smooth side down.  Cover again and let rise 30 minutes before baking.  It's very, very important to let it rise again, otherwise you'll end up with very sad bread.

Now is also the time to add any seasonings you want to bake into the bread.  Sprinkle them directly on top of the loaf before you let it rise the second time.  I add some extra salt every time at this point, and sometimes various other herbs (Pictures for this post will be un-herbed so that the appearance of the dough and finished product itself is easier to see).


While things are rising, become a Dough-Monster and attack your camera-wielding fiancee.  After that, pre-heat your oven to 450.


30 minutes later, the dough will have risen slightly, and will be ready to bake!  Cover the loaf pan and bake 25 minutes at 450 degrees.  If you don't have a cover for your pan, you can just put a baking sheet or appropriately-sized pan lid on top.  You just need something to keep the top of the bread from burning before the rest is done.


Uncover the bread after 25 minutes and bake another 3-5 minutes to finish off the top crust - this makes it extra crusty and crispy and wonderful.


Voila, bread!  Cool the loaf on a wire rack for a few minutes before slicing.  You can also sprinkle additional herbs, salt, or other seasonings on top of the loaf at this point for a bit of extra color and flavor.


Cut into nice, thick slices serve while still warm if at all possible.  Eat with or without butter, dunked in soup, or make some fantastic grilled cheese.  The possibilities are endless!


Recipe: No-Knead Bread
Prep Time: 4 hours, 30 minutes (10 minutes hands-on) | Cook Time: 30 minutes | Difficulty: Easy | Servings: 8-12 thick slices.

Ingredients
  • 3 cups All-Purpose Flour
  • 2 1/4 tsp. Yeast.
  • 1 tsp. Salt.
  • 1 1/2 cups warm Water.
  • 1 tbsp Olive Oil
  • Optional: Additional salt and herbs to taste.
Instructions
  1. Combine flour, yeast, and salt in a large mixing bowl.  Add warm water and mix until dough is "shaggy."
  2. Cover with plastic wrap and let dough rise in a warm location at least 4 hours.
  3. Spread olive oil on a baking sheet.  Empty dough from mixing bowl onto baking sheet and flatten slightly.  Pick up dough from edges to form a "packet" with oiled side out.  Place in loaf pan, smooth side down.
  4. Pre-heat oven to 450 degrees.  Let dough rise a second time, approx. 30 minutes.  Add additional salt and herbs to top of dough if desired.
  5. Bake covered in loaf pan 25 minutes at 450 degrees.  Uncover and bake an additional 2-5 minutes until surface is cracked and golden-brown.
  6. Cool on a wire rack 3-5 minutes before slicing.
  7. Serve warm.

Saturday, January 21, 2012

Tomato-Vegetable Soup with Turkey


Generally speaking, I think soup is best used as a condiment for good bread.  A lot of the time, I can take or leave a bowl of soup - it's okay for one night now and again, but I generally want a meal with a little more substance.  This left me in a difficult position shortly before Christmas, when I had a wisdom tooth out and couldn't eat any solid food.

I needed a soup that I could put up with nearly every meal for days on end.  My thoughts immediately went to a tomato soup made by Kristin's brother in law, adapted from Pioneer Woman's Sherried Tomato Soup. I made some changes to that recipe to add a little spice and complexity, cooked a big batch, and pureed it down to be thin enough to eat without risk to my dental health.  It was fantastic!

That post-wisdom-tooth soup was tasty, but I still prefer not to eat as if I've just had oral surgery whenever possible.  This further adaptation of my first attempt adds some meat and many more vegetables.  The result is a complex, hearty dish with definite roots in tomato soup, but enough interesting elements to eat as a main course - accompanied, of course, by some good bread.


Here's what you'll need: ground turkey (not too lean), tomato juice, canned diced tomatoes, frozen corn, bell pepper, sweet onion, carrots, sherry, Worcestershire sauce, heavy cream, basil, cayenne pepper, and paprika.


First, dice up all of your vegetables in a manner that inadvertently honors your Irish heritage.


Brown the ground turkey with a bit of salt and pepper in a large stock pot or dutch oven.  Take care not to overcook it - remove and set the turkey aside as soon as all of the pink is gone from the meat.


There should be just a little bit of fat left in the bottom of the pan from the ground turkey.  If there's not much, consider adding just a tiny bit of butter.  Cook all of the vegetables over medium heat until tender.


When the vegetables are tender, return the ground turkey to the pot and add the tomato juice, diced tomatoes and their juice, frozen corn, Worcestershire sauce, basil, paprika, salt, pepper, and cayenne.  Be conservative with the seasonings for now - you can add more at the end once the cream has been incorporated.


Simmer over low heat for 30 minutes to marry the flavors.


After that half-hour has elapsed, shut off the heat and add the heavy cream and sherry and stir well to mix.  Taste and adjust the seasonings as needed - you may want more paprika and cayenne if you like a bit more kick.


Serve hot with crusty bread.


Recipe: Tomato-Vegetable Soup with Turkey
Prep Time: 10 minutes | Cook Time: 45 minutes | Difficulty: Easy | Servings: 10-12

Ingredients
  • 1.5 lbs Ground Turkey (pref. 90/10 or 93/7)
  • 46 oz. Tomato Juice
  • 1 28 oz. can Diced Tomatoes
  • 1 large Sweet Onion
  • 1 large Green Bell Pepper
  • 10 oz Frozen Sweet Corn
  • 3/4 cup Shredded/Diced Carrot
  • 1 cup Cooking Sherry
  • 1 cup Heavy Cream
  • 2 tbsp Worcestershire Sauce
  • 1/2 tbsp Basil
  • 1 tsp Smoked Paprika
  • 1/4 tsp Cayenne Pepper
  • Salt and pepper to taste.

Instructions
  1. Finely chop sweet onion, bell pepper, and carrots.
  2. In a large stock pot or dutch oven, brown ground turkey over medium-high heat.  Remove and seat aside.
  3. Reduce heat to medium.  Cook vegetables in remaining fat until tender.
  4. Reduce heat to low.  Return ground turkey to pan.  Add tomato juice, canned tomatoes, corn, Worcestershire sauce, basil, paprika, salt, pepper, and cayenne pepper and simmer 30 minutes.
  5. Turn off heat.  Add heavy cream and cooking sherry.  Taste and adjust seasonings as necessary.
  6. Serve hot with crusty bread.