Sunday, November 27, 2011

Cloverleaf Rolls


I feel sort of guilty sharing a Thanksgiving recipe once Thanksgiving is already finished.  I had hoped to get this one posted before the holiday, but failed to perfect the recipe until the critical batch - the one I was actually bringing to Thanksgiving dinner.  It was a close one.

These are simple, tasty yeast rolls.  They're fairly fluffy and just a bit sweet, though not so much as something like a Parker House roll.  They were delicious with just a little butter, and also served well to soak up gravy. They could also make a great base for small leftover sandwiches.  All told, these are tasty, versatile rolls that I'll definitely make again (perhaps in half-batches) for further occasions.


You don't need much for this recipe.  It's a pretty basic bread-making assortment: Flour, sugar, vegetable oil, milk, baking soda, baking powder, salt, and yeast.


Start by combining 4 1/2 cups milk, 1 1/4 cups sugar, and 1 cup of oil in the largest stock pot you own and stirring to combine.  It'll never fully combine - the oil and milk just don't get along all that well.  That's okay.


Warm this mixture on the stove over medium-low heat until lukewarm - about 100 degrees Fahrenheit.  Check frequently with a thermometer.  Don't panic if you overshoot - just wait 20 minutes or so and it'll cool to the appropriate temperature.  However long it takes, make sure you're not more than about 10 degree off in either direction, as this is the temperature the yeast needs to be happiest.


Once the mixture is the right temperature, add your yeast, and start adding flour.  The best way to get things evenly combined is to add the flour a couple of cups at a time, and stir to mix often.

Add 8 cups of flour total.  The dough will be very wet and sticky at this point.  We'll add more flour later, but the yeast does better at this stage when it's not weighed down by all that extra mass.


Cover the pot and walk away for an hour.  Let it rise until it's roughly doubled in size.


Yeast is powerful!  Depending on its mood, the dough may more than double in size, so keep an eye on it.


After rising, add 1 tsp baking powder, 1 tsp baking soda, and 2 tbsp salt, stirring or kneading to combine.

Now we'll work on the stickiness of the dough.  Add flour a cup at a time and mix well.  Keep adding flour until the dough is well-behaved enough not to stick to your hands as you knead or try to roll a bit into a ball.


Grease muffin tins, and add three small dough-balls to each cup.  The dough-balls should be about the size of a donut hole.  Don't worry about making it pretty at this stage - another rise will erase most of the wrinkles and imperfections.


Cover the muffin pans and let the dough rise someplace warm for about two hours, until they're more or less doubled in size.  They should look more or less like rolls.


Bake at 350 degrees F 10-12 minutes until just brown.  Don't let them go too long - the color on top will be pretty, but they'll end up dry.


Cool on wire racks before storing.  They're best eaten right out of the oven, though.


Serve warm with butter.  Room temperature is okay, too, but is there a roll in the world that's not better warm?  Warm bread is just good.

Enjoy!


Recipe: Cloverleaf Rolls
Prep Time: 3-4 hours | Cook Time: 15 Minutes | Difficulty: Easy | Servings: 36-48

Ingredients
  • 4 1/2 cups Milk
  • 11 cups Flour
  • 1 1/4 cups White Sugar
  • 1 cup Vegetable Oil
  • 2 packages (4 1/2 tsp) Yeast
  • 1 tsp Baking Powder
  • 1 tsp Baking Soda
  • 2 tbsp Salt
Instructions
  1. In a very large stock pot, combine milk, vegetable oil, and sugar.  Heat over medium-low heat until lukewarm, approx. 100 degrees F.
  2. Add yeast and 8 cups flour to warm mixture in stock pot, mixing after the first 4 cups of flour and again once all 8 are added.
  3. Cover and let rise approx. 1 hour or until roughly doubled in size.
  4. When dough has risen, add baking powder, baking soda, and salt and stir or knead to combine.
  5. Add flour 1 cup at a time and mix well.  Stop adding flour when dough is pliable enough to roll into a small ball without sticking to hands or falling apart.
  6. Grease un-lined muffin tins.
  7. Form dough into balls, using approx. 2 tbsp dough per ball.  Balls should be about the size of a donut hole.
  8. Place three small dough-balls into each greased muffin cup in a triangular formation.
  9. Cover muffin pan with a lid or kitchen towel and let rise in a warm location approx. 2 hours, or until dough roughly doubles in size.
  10. Bake in a 350 degree oven 10-12 minutes until just barely brown.

Monday, November 21, 2011

Broccoli-Cheese Soup


If you've had it nowhere else, you've probably had Broccoli-Cheese Soup at Panera Bread.  Theirs is pretty tasty, particularly in a bread bowl.  Not that the bread bowl changes the flavor of the soup - it's just an added bonus that you get to devour a broccoli-cheese flavored breadbowl once the soup is gone.  This is quite in keeping with my general philosophy that soup and stews are best eaten with bread as an implement rather than silverware.

As it ends up, it's pretty easy to make broccoli-cheese soup at home, too - and it's quite a lot healthier than Panera's.  Give it a try!


It's a nice, vegetable-heavy cast of characters today.  Broccoli takes the forefront, in a broth of milk, cream, cheese, and chicken broth (vegetable broth or none at all is okay if you're going vegetarian).   Onion, salt, pepper, paprika, and nutmeg add a bit of flavor, and flour thickens things up nicely.


You've got a lot of vegetables to chop.  Start with the onion.


Then the broccoli!  It's hard to tell from the picture, but I contentedly included some stems as well.  The soup will simmer long enough to cook them thoroughly, so don't be afraid of a bit of stem with your florette.


Saute the onions with some butter in a large dutch oven or stock pot.  Use a bit more butter than you strictly need to keep the onions from sticking, as you'll need to give the flour something to mix with in a moment.


After 3-4 minutes of cooking, when the onions are becoming translucent, reduce the heat a bit and add the flour.  Stir for a bit and you'll end up with a truly unpleasant looking mixture.  Fear not.


Once the onions, butter, and flour are combined, it's time to get things simmering.  Add the milk, cream, chicken broth, and broccoli and simmer over medium-low heat for about a half hour.


That half-hour of simmering is the perfect chance to grate your cheese.  Yes, you could buy shredded cheese, but storebought shredded cheese generally comes with an extra helping of chemicals, and is covered in a starchy or pulpy coating to keep it from sticking - we don't need all that extra stuff.

So while everything simmers, bust out the grater and turn a block of cheese...


...into a pile of cheese.


After a half-hour of simmering, the flour from the onions will have thickened things up nicely, and the broccoli should be nice and tender.  Taste a piece (careful, it'll hold the heat like crazy!) to be sure it's at an edible texture - if not, give it another 10 minutes or so.


Once the broccoli is tender enough for your liking, mix the cheese in a bit at a time.


Once that's all mixed through, season to taste.  I like plenty of black pepper, a good amount of salt, some paprika, and just the barest dash of nutmeg.  Yes, nutmeg.  Trust me.


Give it a couple of minutes to make sure everything is melted and the flavors well-married, and it's time to eat!

If you're particularly picky about texture, you can give the finished soup a spin in the blender on puree until it's smoother.  This will result in a more Panera-esque soup, but also results in much smaller chunks of broccoli.  Personally, I just leave it alone and enjoy the rustic texture.


Recipe: Broccoli-Cheese Soup
Prep Time: 10 minutes | Cook Time: 40 minutes | Difficulty: Easy | Servings: 8-10

Ingredients
  • 4 Heads Broccoli, chopped
  • 1 large Sweet Onion, diced
  • 5 cups Milk
  • 1 cup Heavy Cream
  • 1/2 cup Chicken Broth
  • 1/2 cup Flour
  • 1/4 cup Butter
  • 12 oz. Grated Cheese (cheddar)
  • 1 tbsp Salt
  • 1 tbsp Black Pepper
  • 2 tsp Smoked Paprika
  • 1/2 tsp Nutmeg
Instructions
  1. Dice onion and chop broccoli into bite-sized pieces.
  2. In a large dutch oven over medium-high heat, saute onions with butter 4-5 minutes.  Reduce heat and add flour, stirring until combined.
  3. Add milk, cream, chicken broth, and broccoli.  Simmer over low heat 30 minutes until broccoli is tender.
  4. Slowly add grated cheese and seasonings.  Stir until cheese is melted.
  5. Optional: Puree to desired texture.
  6. Serve hot.

Sunday, November 13, 2011

Soy-Honey Chicken


This meal began as an attempt to replicate one of my favorite elements of Chinese take-out: Sesame Chicken.  And then, well...I sort of forgot about the "sesame" bit and ended up just making some tasty chicken.  Next time I'll put those poor, neglected sesame seeds in my cabinet to good use, I swear!  In the meantime, I'll just have to content myself with a tasty dish of lightly fried chicken breast and broccoli in sweet, tangy, and slightly-hot sauce.  Gee, life is tough.


Marinating is good.  I highly recommend it.  So long as you're not making this dish completely last-minute, make a quick marinade of soy sauce, sesame oil, white wine, sugar, salt, and pepper.


Marinade the chicken for at least an hour and you'll get extra-flavorful results.


Here's what you'll need for the sauce.  This is sort of a silly array of bottles, isn't it?  Clearly the sauce isn't exactly "from scratch."  However, this array of tasty, Asian ingredients (...and Ketchup) are all easy to find and mix into a really fantastic, sweet-tangy-hot sauce.


Mix together all of the sauce ingredients above with a bit of water in a small saucepan.  Bring to a boil, then reduce the heat and simmer over low until the sauce has reduced a bit.  Later, we'll cover everything in saucy tastiness.


Now back to that chicken!  The "breading" we'll fry in is a mixture of flour and cornstarch.  The cornstarch crisps up nicely, and the flour gives that classic golden-brown color.  It's a good pairing.


Drain off the excess marinade from the chicken, then toss it in the flour/cornstarch until coated. Set aside for a few minutes to make sure the coating will stick around.


In the meantime, it's the perfect opportunity to steam some broccoli!


Once you've rested the chicken for a few minutes, heat some oil in a wok or other high-walled pan. Don't use too much - just about a quarter-inch is more than plenty.


Now fry that chicken!  Use nice small batches, taking care not to overcrowd the pan.  A couple of minutes per side will result in wonderful, golden-brown color.


Once the chicken is golden-brown, carefully (carefully!) remove from the pan and transfer onto a plate covered in paper towels to absorb excess oil.  Keep frying chicken in small batches until it's all cooked.


And now, the grand combination!  Combine the broccoli, chicken, and sauce and mix well until everything is covered in deliciousness.


Serve hot over rice.  Devour promptly.


Recipe: Soy-Honey Chicken
Prep Time: 10 Minutes | Cook Time: 30 Minutes | Difficulty: Medium | Servings: 6-8

Ingredients
Chicken
  • 1 1/2 lbs Chicken Breast
  • 1/4 cup Flour
  • 2 tbsp Cornstarch
Marinade
  • 1 tbsp Soy Sauce
  • 2 tbsp White Wine
  • 2 tsp Sesame Oil
  • 1 tbsp White Sugar
  • Salt and Pepper to Taste
Sauce
  • 3 crowns Broccoli
  • 1/4 cup Chili Sauce
  • 2 tbsp Honey
  • 2 tbsp Ketchup
  • 1 tbsp Oyster Sauce
  • 1-2 tbsp Sriracha hot sauce (to taste)
  • 1/2 cup Water
Instructions
Chop chicken into bite-sized pieces.  

Combine all marinade ingredients in a gallon zip-loc bag.  Add chicken and marinade at least 1 hour.

Combine all sauce ingredients in a small saucepan.  Bring to boil, then simmer over low heat 10 minutes or until reduced slightly.

Dredge chicken in flour and cornstarch.  Set aside 2-3 minutes.

Chop broccoli into bite-sized florettes.  Steam until tender.

Heat 1/4 inch of frying oil in wok over medium-high heat.  Fry chicken approx. 2 minutes per side until golden brown.  Remove and pat dry on paper towels.

Combine chicken, broccoli, and sauce and mix thoroughly.

Serve hot over steamed rice.


Sunday, November 6, 2011

Goat-Cheese Meatballs


Is there anything more comforting than good, traditional Italian food?  Pasta isn't just an easy, standby meal - it can be a treat with just a bit of effort.  I like to fit some protein into my pasta meals, and what better way to do it than with meatballs?  Now there's nothing wrong with a standard, run of the mill meatball - but this week,  I was looking for a way to take things up a notch.  I pawed through the kitchen for something interesting to add, and realized that we had some goat cheese.  Inspiration!

At first, I considered trying to stuff each meatball with a cheesy center, but there wasn't enough goat cheese for that.  Still, it worked fantastically well crumbled up and added right to the mixture.  The whole meal took on that earthy flavor, and most bites were punctuated by a touch of creamy, fluffy cheese.  It was really a nice spin on a meatball, and one that I think I'll make again in the future.


Our meatball ingredients are more or less what you'd expect.  No fancy beef/pork/sausage mixtures here - I just stick to ground beef, mixed with eggs, breadcrumbs, milk, onion, and good Italian seasonings like Thyme, Basil, Oregano, Rosemary, Garlic, and a bit of Coriander.  The goat cheese adds some interest.  And, of course, you'll need some pasta to serve it over and plenty of sauce for simmering.


Meatballs are pleasantly straightforward.  Step one: combine everything but the cheese.  You'll have to dice the onion first, of course, but everything else can be more or less dumped into a large mixing bowl and mashed together.  Use your hands to mix it up well, don't be a chicken.  If it's too wet, add some more breadcrumbs.  If too dry, a bit more milk.


Now crumble up your goat cheese into pieces small enough to distribute well through the meatballs.  I aimed for roughly pea-sized, with some ranging slightly larger and smaller according to the whims of the cheese.


Combine the cheese with the rest of the mixture, again by hand.  Mix gently, as you don't want to pulverize the cheese.  The whole point is to have nice, cheesy bites, so you need those chunks to be relatively intact.


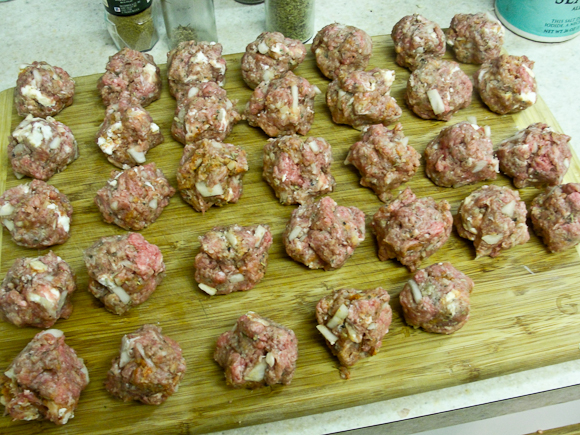
It's time: shape that mixture into some actual meatballs!  You can use an ice-cream scoop if you like, but I prefer to keep going by hand, aiming for 1 1/2 to 2 inches per meatball.  This recipe will make a lot of them.


Now into the sauce!  Most meatball recipes have you fry the meatballs first, but that's really not my preferred method.  They tend to cook unevenly or dry out that way.  Simmered in the sauce, they'll cook evenly and stay moist.  Perhaps best of all, they'll also lend a fantastic meatiness to the sauce itself.


After about 25 or 30 minutes, your meatballs will be cooked and your sauce will be transformed.  Even the jarred sauce that I used for this meal took on a much different texture and a really pleasant heartiness from the meat and cheese simmered into it.

The one real downside of cooking your meatballs in the sauce is that it makes it nigh impossible to finish the pasta itself in a pan with sauce, as is ideal.  This, however, is not the end of the world.  You'll be too busy devouring meatballs to really notice.


And that's it!  Serve hot over your pasta of choice.  Garlic bread would not go amiss as an accompaniment.


Recipe: Goat Cheese Meatballs
Prep Time: 15 Minutes | Cook Time: 30 Minutes | Difficulty: Easy | Servings: 10-12

Ingredients
  • 1 1/2 to 2 lbs Ground Beef
  • 2 Eggs
  • 1 Onion, diced
  • 4 oz. Goat Cheese
  • 1/2 cup Bread Crumbs (pref. Panko)
  • 1/2 cup Milk
  • 1 box Pasta
  • 1 family-size or 2 large jars Pasta Sauce
  • 2 tsp Oregano
  • 2 tsp Garlic Powder
  • 1 tsp Rosemary
  • 1 tsp Basil
  • 1 tsp Thyme
  • 1/2 tsp Coriander
  • Salt and Pepper to taste

Instructions

Simmer pasta sauce in a large pot over medium-low heat.

In a large mixing bowl, combine ground beef, diced onion, milk, breadcrumbs, eggs, and seasonings.  Mix well by hand.

Crumble goat-cheese into pea-sized pieces.  Incorporate gently into beef mixture.

Shape mixture into 1 1/2 to 2 inch balls.  Add to simmering sauce.

Cook meatballs 25-30 minutes in sauce.

Serve hot over pasta.  Top with Parmesan Cheese to taste.