Showing posts with label bacon. Show all posts

Sunday, June 17, 2012

"Broccoli and Friends" Salad


This salad has many names -- most of them lame.  You can find it behind the deli at most grocery stores in one form or another, and it's often called something like "Broccoli Salad."  At really adventurous places, you might see "Broccoli Grape Salad."  Names like that convey and ingredient or two, but they don't capture how tasty this little salad actually is.

Leave it to Kristin's family to come up with a better name.  I had only ever had the supermarket version of this salad a few times before, so I didn't know what was going on or what I should be excited about when I heard Kristin's older sister exclaim "Broccoli and Friends!"  I've become good friends with "Broccoli and Friends" since -- it's a quick, easy, flavorful side that pairs with almost anything, especially in the summer.


Just a few ingredients for this one.  The role of "Broccoli" will be played by broccoli.  The role of "Friends" will be played by red onion, bacon, sliced or slivered almonds, grades, mayonnaise, lemon juice, salt, and pepper.


First, toast up the almonds in a skillet with just a dash of salt.  Don't get them too dark, you just want plenty of crunch.  If you don't have almonds on hand, pine nuts or sunflower seeds could fill in nicely.


While the almonds are toasting, chop the broccoli into florettes, halve the grapes, and finely dice the red onion.  Combine the broccoli, grapes, onion, and toasted almonds in a large bowl and give them a good mix.


Mmm, bacon.  Chop up and fry the bacon to your desired level of crispyness.  I like it fairly soft for this recipe, but I could see the appeal in another source of crispy crunch, too.  Try both ways for science!


Mix the bacon into the rest of the ingredients.


Finally, whisk together the mayonnaise and lemon juice, then season with a dash of salt and a good amount of cracked black pepper.  Pour it over the bowl and stir well to make sure everything is coated.


If you're in a hurry, you can serve the salad right away.  It's better if it can sit in the fridge for at least an hour or two, though - it's best nice and cold, and the flavors like a little bit of time to meld.  Either way you do it, offer hearty portions and enjoy!


Recipe: Broccoli and Friends
Prep Time: 10 Minutes | Cook Time: 10 Minutes | Difficulty: Easy | Servings: 8-10

Ingredients
  • 2-3 pounds Broccoli
  • 1/2 pound Bacon
  • 2 cups Grapes
  • 1 cup Slivered Almonds
  • 1 medium Red Onion
  • 1 1/2 cups Mayonnaise
  • 1/3 cup Lemon Juice
  • Salt and Pepper to taste

Instructions
  1. Toast almonds with a pinch of salt until crisp and golden brown.
  2. Chop broccoli into florettes, dice red onion, and halve grapes.  Mix together with almonds in a large bowl.
  3. Chop bacon into small pieces and saute until desired level of crispyness.  Mix bacon into large bowl.
  4. Whisk together mayonnaise and lemon juice in a small bowl.  Add a dash of salt and plenty of black pepper to taste.
  5. Pour mayonnaise mixture into large bowl and stir well to coat all ingredients.
  6. Refrigerate 1-2 hours before serving.

Sunday, May 13, 2012

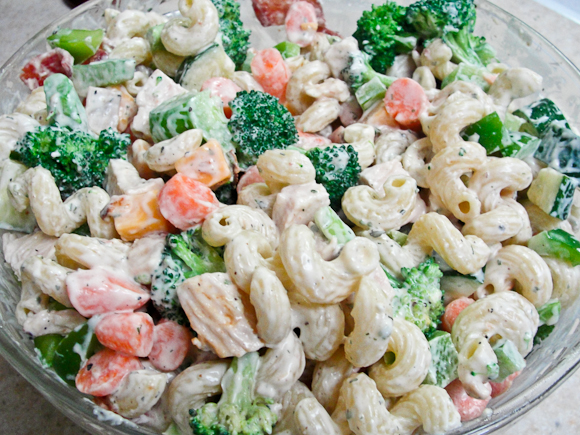
Creamy Ranch Pasta Salad


Pasta salad deserves better.  Sure, it's a delicious side, but why leave it there?  Every grocery store deli will happily sell you some gloppy macaroni salad, but come on, we can do better than that.  Why not make pasta salad a main course?  Why not add enough great ingredients that it can stand on its own?  Most importantly -- why not bacon?


As you can see, my board is fuller than usual.  A lot of stuff goes into this pasta salad, but there's not a lot of prep for most of it.  You'll need some pasta, of course.  Go for an interesting shape - I used Cavatappi to great success this time around.

We'll feature a pair of proteins, both chicken and bacon.  For the veggies, I use broccoli, cucumber, carrots, and bell pepper - but you can add or change as you see fit.  A lot of people are into tomatoes - raw ones make me sad, but you can go crazy with them if that's your thing.  I also love some cheese in my pasta salad, so I added a block of extra-sharp cheddar.

Finally, the supporting cast is made up of Greek yogurt, a bit of mayonnaise and sour cream, salt, pepper, garlic powder, and a packet of ranch dressing mix.


We'll start with the chicken.  If it's warm enough outside and you have easy access, you can always just grill it.  Since we don't own a grill, though (alas!), I like to use this method to simulate grilling in the oven while adding a ton of flavor.

First, rinse the chicken and pat it dry.  Season it well with salt, pepper, and garlic powder, then give dip it in the Greek yogurt to coat.  The yogurt dip will keep the chicken super moist while it cooks, even while you get a nice, slightly-blackened exterior.

Lay the yogurt-dipped chicken out on a wire rack atop a baking sheet -- this should let hot air circulate around the whole chicken breast at once and keep the bottom from getting soggy.  You may even want to line the baking sheet with foil to catch the drips and make clean-up simpler.


Broil the chicken 6 inches away from the broiler about 5 minutes per side until it's nicely blackened on the outside and the inside is up to temperature.  Set it aside for later.


While the chicken is cooking, fry up the bacon.  Try not to eat too much of it before it ever gets into the pasta salad.  Dry the finished product on papers towels and set aside for later.


Don't forget that we need some pasta, too!  Cook it up according to the package directions, leaving it on the al-dente side.  Drain well and set it aside to cool once it's done.


Now for all of that other stuff.  Chop the broccoli, cucumber, bell pepper, carrots, and cheese into bite-sized pieces.  I like to quickly blanch the broccoli for 30 seconds or so in boiling water to soften it just a touch before I chop it, but that's up to you.


The chicken and bacon should be cool enough to handle by now, so give those a good chopping, too.


Finally, it's time to put it all together.  You'll probably need a couple of large bowls for this - this recipe filled up the two largest bowls in my kitchen handily.  Combine everything, preferably leaving a little extra room at the top of the bowl so that you can stir the dressing in easily.


Speaking of dressing, we'd better make some.  Combine the mayonnaise, sour cream, and ranch dressing mix and stir well.  Give it a taste and adjust as you see fit - I added a little more garlic and some dried herbs.


Add your preferred amount of dressing to the salad and stir well to mix.  I like it fairly lightly dressed - there's enough good stuff in these bowls to be tasty all by itself.


Throw it in the fridge to fully chill and let the flavors marry a bit, and you're ready to serve.  This is a fantastic, summery main course, and so easy to prepare well in advance.  Enjoy!


Recipe: Creamy Ranch Pasta Salad
Prep Time: 10 Minutes | Cook Time: 20 Minutes | Chill Time: 1-2 Hours | Difficulty: Easy | Servings: 12-15
Ingredients
  • 16 oz Cavatappi Pasta
  • 1-2 pounds Boneless Skinless Chicken Breast
  • 1 pound Bacon
  • 3 heads Broccoli
  • 1 large Cucumber
  • 2 large Green Bell Peppers
  • 8 ounces Baby Carrots
  • 8 ounces Extra-Sharp Cheddar Cheese
  • 1 1/2 cups Mayonnaise
  • 1/2 cup Sour Cream
  • 16 ounces Greek Yogurt
  • 1 packet Ranch Dressing Mix
  • 2 teaspoons Garlic Powder
  • Salt and Pepper to taste

Instructions
  1. Cook pasta according to directions on package.  Drain well and set aside to cool.
  2. Rinse chicken and pat dry.  Season well with salt, pepper, and garlic powder then coat completely with Greek yogurt.
  3. Place yogurt-covered chicken on a wire rack atop a baking pan and broil approx. 5 minutes per side until blackened on the outside and done in the middle.  Set aside to cool.
  4. Fry bacon in a heavy skillet.  Dry well with papers towels and set aside.
  5. (Optional): Blanch broccoli 30 seconds in boiling water.
  6. Chop all vegetables and cheese into small, bite-sized pieces.
  7. Once chicken and bacon have cooled, chop into small, bite-sized pieces.
  8. Combine pasta, chicken, bacon, cheese, and vegetables in large bowl(s).
  9. In a small mixing bowl, combine mayonnaise, sour cream, and ranch dressing mix.  Adjust seasoning to taste and stir to mix.
  10. Add dressing to pasta mixture to taste and stir well to combine.
  11. Chill at least 1-2 hours before serving.  Serve cold.
Saturday, June 4, 2011

Bacony Baked Beans


This is another of those "I don't usually like this stuff, but this version is delicious" posts, much like I did with fries a while ago.  My stepfather particularly liked (in fact, he still does, now again) because I "won't eat a bean!"  In general, I'm not a big baked bean person.  As a kid, the only beans I would eat were green beans, and I'm not sure those really count.  The exception was my mom's baked beans.  As she describes them, her recipe is really more like "chili that tastes like baked beans."  I wasn't the biggest fan of beans in chili either, growing up, but I've since reformed my ways.

This recipe grew out of my attempts to remember mom's recipe, despite having not experienced them for years and years.  Hers involve ground beef and some different kinds of beans, but the spirit is there.  And, really, these ended up quite tasty themselves.

These beans come from humble, relatively simple beginnings, but have met with rave reviews both times that I've brought them to a get-together.  Give them a try!


Here's what you'll need: Some Pork and Beans, plenty of bacon, a large sweet onion, a green bell pepper, some barbecue sauce, a little vinegar, some good mustard (Not yellow!), brown sugar, salt, and pepper.  Some hot sauce and/or cayenne goes great in these, too.  I like a healthy squirt of Sriracha just to give a little pep, but it's entirely optional.  Ratios and flavorings are definitely adaptable depending on how much you want to make and your preferences.


Start by dicing both the sweet onion and the green pepper.  If you like a bit of varied  texture in your beans, chop fairly large chunks.  If you're going more for flavor than texture, dice down smaller.

If you really want to play along at home, this is also the ideal time to slice your thumb open as a result of using an unfamiliar knife.  Whoops.  Stanch the bleeding before you move on to the next step.


Mmm, bacon.  Trim away the really fatty bits and give the rest a rough chop.  It seems a bit like sacrilege not to cook bacon in strip form, but it really makes more sense to cook it at the size we want it in the end.  Better yet, this lets us cook it together with the veggies.


Toss the bacon into a medium-high heat skillet.  Give it a minute or two all by itself, until its released some fat to coat the bottom of the pan.


That bacon fat is just the thing to cook up our peppers and onions in.  This way we don't need any added oil, and can impart plenty of flavor to the veggies.  Get them in the pan, too.


Cook everything until the veggies are tender and the bacon is cooked through.  Your bacon won't get particularly crispy this way, but that's okay.  We don't want it to end up overcooked after the beans go into the oven shortly.

At this point, it will smell more like you're making a Denver Omelet than baked beans.  Not that there's anything wrong with that.


Let's make some sauce.  Into the skillet of bacon and veggies, add plenty of barbecue sauce, a healthy squeeze of mustard, a dash of vinegar, and a small handful of brown sugar.  Careful measurements aren't particularly important here.  Give it a taste and use your best judgment.  Now is also the time to add hot sauce or cayenne, if that's your thing.


Let that cook over medium heat for a couple of minutes.

At this point, you're probably starting to wonder when we'll see an actual bean in this baked bean recipe.


Well, it's bean time!  Open up your can(s) of beans and empty them into a large baking dish.  Pour out the contents of the skillet into that same dish and mix, mix, mix.

Now, you could just eat them this way.  If you're in a hurry, go ahead and do so.  But if you really want the flavors to marry, it's time for the "baked" part.


Bake your pan of beans uncovered in a 350 degree oven for approximately 45 minutes, or until the sauce has thickened.  Compare this picture with the unbaked one above, and you'll notice that the unbaked has a much thinner sauce, but color-wise there's not much change.  Don't look for much in the way of browning.


Do resist the urge to dip a finger or spoon right in and start eating.  Baked beans right out of the oven are basically napalm.  Give them a little time to cool, preferably in the car on the way to a shindig.  Yeah, I said shindig.

Serve as a side to accompany burgers, brats, hot dogs, or pretty much anything else grilled.  Or just eat them.  I'll let you decide.

-


Recipe: Bacony Baked Beans


Prep Time: 10-15 minutes   |   Cook Time: 1 hour   |   Difficulty: Easy   |   Servings: 16-20.

Ingredients
  • 2 28 oz cans Pork and Beans
  • 1 pound Bacon, fat trimmed
  • One large Sweet Onion
  • One large Green Bell Pepper
  • 1/4 cup Dark Brown Sugar, packed
  • 1/4-1/2 cup Barbecue Sauce
  • 1-2 tbsp Apple Cider Vinegar
  • 2-3 tbsp Dijon Mustard
  • Hot Sauce to taste
  • Salt and Pepper to taste
Instructions

Preheat oven to 350 degrees.


Chop onion and bell pepper.  Trim extra fat from bacon and chop to bite-sized chunks.


Fry bacon in a skillet over medium-high heat for 2-3 minutes.  Add vegetables and mix well.  Cook mixture until vegetables are tender and bacon fully cooked.


Reduce skillet to medium heat.  Add barbecue sauce, vinegar, mustard, brown sugar, and hot sauce.  Mix well and cook an additional 2 minutes.

Add Pork and Beans to a 9x13" baking dish.  Pour contents of skillet into dish and mix well.

Bake 45 minutes until sauce has thickened considerably.  Let cook 10-15 minutes before serving.