Sunday, April 29, 2012

Herb-Roasted Whole Chicken


It's tempting to think that grocery stores have cornered the market on whole chickens.  Every store in town has whole rotisserie chickens available cheap and still hot off the spit nearly 24-hours per day.  And really, I've got nothing against that chicken.  In fact, I happily use it as a shortcut for things like Barbecue Chicken Pizza if I don't have the time to cook up my own chicken that day.

The world of whole chickens doesn't stop at the supermarket rotisserie, though.  Roasted meat is just a good thing, and it was high time that I tried my own hand at a whole bird.  As so often happens when I put off trying a recipe because there's a "good enough" alternative easily available, everything turned out both easier and tastier than expected.


One of the best things about this process is that it's both incredibly simple and incredibly cheap.  Unlike the boneless-skinless chicken breast that we buy so much of and pay a premium for, whole birds are almost absurdly inexpensive - I think I paid about $3.50 for this 5-pound chicken.  Throw in a lemon or two, a few cloves of garlic, half of an onion, salt, pepper, cooking oil, and some herbs (I used sage, thyme, marjoram, and savory), and you're all set.


First, pre-heat your oven to 425 degrees, and roughly chop about 1/3 to 1/2 of the onion.  You won't actually be eating it, so don't worry too much about size/consistency.  Peel the garlic cloves, slice the lemon into quarters, and separate your herbs into two roughly-equal piles.


Rinse the chicken well both inside and out and pat dry with paper towels.  Next, stuff the cavity with the lemon wedges, onion, herbs, and garlic.  Give the garlic cloves a good whack with the side of a knife before they go in so they'll add plenty of flavor.  Don't worry if you can't fit everything that you prepped into the cavity.


Twine?  Pssh.  No need for twine.  Just use a sharp knife to make a small slit in the skin near the back of the chicken opposite one leg, then tuck the tip of the leg through.


Fold the other leg under the first, tuck the wings in under the legs, and you've got a nicely trussed bird without any need for twine, skewers, or anything else inedible.


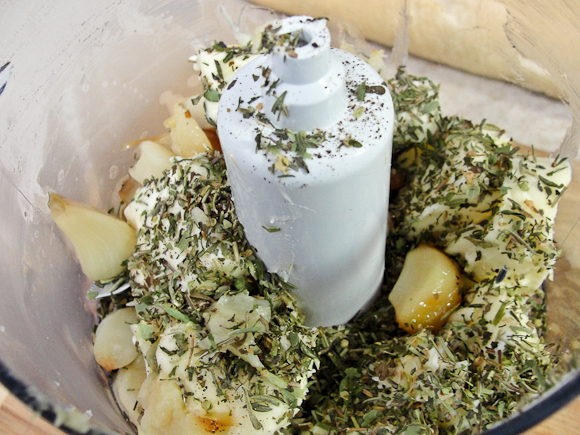
Take the other half of the herbs, remove them from any stems, and give them a fine chop.  Toss them in a small bowl with plenty of salt and pepper.


Add the juice of your second lemon and a couple of tablespoons of cooking oil.

I'm not usually a huge fan of cooking with vegetable oil rather than olive oil, but in this case, it's important.  We'll be roasting the chicken well over the smoke point of olive oil, so if you use it on the bird, you may end up with a very bitter, burnt taste.  Vegetable/canola oil (or blends) have a higher smoke point, and can stand up to the heat of the roasting process.


Coat the bird well on all sides with the herb mixture, and you're ready to roast.


 A little over an hour later, you'll have a beautifully-roasted chicken.  Take the temperature at the thickest part of the thigh and ensure that you've reached at least 175 degrees, then rest the finished bird under foil 10-20 minutes so it can cool and all the juices don't run out when it comes time to eat.


Slice, serve, and enjoy!


Recipe: Herb-Roasted Whole Chicken
Prep Time: 15 Minutes | Cook Time: 80 Minutes | Difficulty: Easy | Servings: 10

Ingredients
  • 1 Whole Chicken, approx. 5 lbs
  • 1 Whole Lemon
  • Juice of 1 Lemon
  • 2 oz Poultry Herbs (Sage, Thyme, Marjoram, Savory)
  • 1/2 Sweet Onion
  • 2-3 tbsp Vegetable Oil
  • Salt and Pepper to taste
Instructions
  1. Pre-heat oven to 425 degrees.
  2. Thoroughly rinse chicken both outside and in cavity.  Pat dry with paper towels.
  3. Quarter one lemon.  Roughly chop onion.  Peel and lightly crush garlic cloves.  Stuff chicken cavity with lemon, onion, garlic, and half of herbs.
  4. Truss chicken by making a small slit in the skin and inserting the end of the opposite leg.  Tuck other leg under the first.  Fold wings under tucked legs.
  5. Remove remaining herbs from stems and chop finely.  Mix generously with salt and pepper.  Add 2-3 tbsp oil and juice of the second lemon.
  6. Coat chicken thoroughly with herb mixture on all sides.
  7. Roast chicken on a heavy pan 75-90 minutes until skin is golden brown and internal temperature of thigh at the thickest point is at least 175 degrees.
  8. Rest chicken under foil 10-20 minutes.


Sunday, April 22, 2012

Roasted Garlic-Herb Cheese Bread


Kristin and I faced a puzzle this week.  We knew we wanted some pasta to eat, but none of the ways to jazz up basic spaghetti with marinara seemed all that appealing to us.  We just couldn't figure out how to take the meal from standard to interesting.

Then, it became clear.  Leave the spaghetti alone, and just make something awesome to go with it.  Alongside our simple pasta, I put together some garlic bread made from home-roasted garlic and topped with just a little bit of Mozzarella, Parmesan, and Asiago cheeses.  It was just what we needed.


You don't need terribly much for this bread.  Start with bread, of course - supermarket-made will do, though I look forward to repeating the recipe with my own baguettes when I have a little more time.  The bread will be topped with a compound butter made from salted butter, a bulb or two of garlic, plenty of herbs (I used Herbes de Provence), salt, and pepper.  Over all of that goes some Mozzarella, Parmesan, and Asiago cheese.


What really makes this bread great is roasting the garlic.  You can make perfectly good garlic bread from raw minced garlic or even from garlic powder, of course.  Roasting whole bulbs of garlic really intensifies the flavor and adds some sweetness in place of that raw-garlic bite.  It's fantastic, and so easy.

First, peel as much of the outer, papery layer from the bulbs as you can.  If you miss a bit, it's hardly the end of the world - we'll squeeze individual cloves out from the bulb later, anyhow.


With a sharp knife, cut the top 1/4 inch or so off of the whole bulb (from the pointed tip).  If your bulb was uneven like mine, you'll need to go clove-by-clove after the first slice.  Make sure the actual flesh of each clove is visible from the top.


I've found that the easiest way to cleanly roast garlic is inside of foil, with the foil sitting in the cup of a muffin tin in case it leaks.  With your garlic bulbs safely nestled in foil in the muffin tin, drizzle with a generous amount of olive oil, then some salt and black pepper.  Fold the foil closed over the top of the bulbs, and you're set to go.


Roast your foil-covered garlic bulbs at 400 degrees for 35-40 minutes until the cloves are golden brown and tender.  Be very, very careful checking this - you can burn your fingers very easily.


Let the garlic cool for a good ten minutes, then it's ready to turn into roasted garlic butter.  Add a stick of softened butter, your roasted garlic, a good dash of herbs, and some salt and pepper to the bowl of a food processor.

Whir it up until you've got a nice, smooth compound butter.  If you want to save some of this butter for later, roll it into a log in some parchment paper or plastic wrap and chill it in the fridge.  For our purposes, though, we'll take it straight to the bread.

Drop the oven down to 350 degrees and it should hit the right temperature when the bright is right about ready to go in.


Slice your bread in half lengthwise and spread generously with your garlic butter.


Bake the buttered bread in a 350 degree oven for 7-10 minutes until the buttered top has soaked in and more or less set.  You don't want the bread to be quite done at this point, but it should be close.

Turn the oven up to broil while we cheese the bread.


Sprinkle just a bit of mozzarella cheese over the top of the bread, then grate Asiago and/or Parmesan cheeses over the top of the rest.  Throw it back in the oven under the broiler and watch it carefully - it should be a minute, at the most, before the cheese is well-melted and bubbly and the edges of the bread get dark and crispy.


Slice it up and serve hot - preferably alongside a dish with some good sauce to soak up.


Recipe: Roasted Garlic-Herb Cheese Bread
Prep Time: 15 Minutes | Cook Time: 50 Minutes | Difficulty: Easy | Servings: One Loaf

Ingredients
  • 1 loaf French Bread
  • 1-2 large bulbs Garlic
  • 1 stick Butter, softened
  • 2 tbsp Herbes de Provence
  • 1/2 cup Mozzarella Cheese
  • Grated Parmesan and Asiago cheeses to taste
  • Salt and Pepper to taste
Instructions
  1. Pre-heat oven to 400 degrees.
  2. Peel papery outer layer from garlic bulbs and slice off top 1/4 inch of cloves.
  3. Line cups of a muffin tin with foil and place garlic bulbs sliced-side up.  Drizzle with olive oil and a sprinkle of salt and pepper.  Close foil over garlic.
  4. Roast garlic at 400 degrees for 35-40 minutes until golden-brown and tender.  Let cool 10 minutes and squeeze cloves out from skin.
  5. Reduce oven heat to 350 degrees.
  6. Combine softened butter, roasted garlic cloves, herbes de provence, salt, and pepper in the bowl of a food processor.  Process until smooth.
  7. Slice bread in half lengthwise and cover generously with garlic-butter.  Bake at 350 degrees 7-10 minutes until nearly done, then remove from oven and set oven to broil.
  8. Cover garlic bread with a small amount of mozzarella cheese.  Grate Asiago and Parmesan cheese over top to taste.
  9. Broil cheese-covered bread 30-60 seconds until cheese is melted and edges are crispy.
  10. Serve hot.

Sunday, April 15, 2012

Fried Rice


Fried rice is so often overlooked.  That's not to say that people don't like it, but in my experience, it's generally relegated to the position of side-dish to more exciting menu options when we order Chinese.  This is an injustice!  Fried rice is fully capable of being a meal all by itself, not just a side dish or vehicle for leftovers.  This is a home-made fried rice dish with plenty of stuff in it to keep it interesting, filling, and delicious.


The most important base ingredient is pre-cooked rice.  If you try to make fried rice out of freshly-cooked rice, you'll end up with a big pile of moosh - no good.  You need to give the rice at least a couple of hours to release all of its excess moisture, preferably overnight in the fridge.

I marinated my chicken in a simple mixture of soy sauce, sesame oil, and lime juice, and the flavor was great.  Since you'll be cooking rice and throwing it in the fridge the night before, why not chop the chicken and marinate it at the same time?

As for the rest, you'll need some eggs, plenty of frozen vegetables, some pineapple, garlic, soy (or Tamari) sauce, and cooking oil.


I use a cast-iron skillet throughout this recipe - there are a number of reasons you might do otherwise.  First, if you have a good gas stove and own a wok, that's the ideal way to do fried rice.  My little electric stove just can't keep a wok hot enough to do it right, so I went for the cast iron.

Second, if your cast iron isn't sufficiently well-seasoned, eggs will stick to it like glue - you might consider a nonstick pan for the eggs.

Start by cooking your eggs.  Add lightly-beaten eggs to a skillet over medium heat, add a bit of salt and pepper, and let cook a minute or two undisturbed.  Set finished eggs aside for later.


Scramble the eggs and cook until done, taking care not to overcook.


Increase heat to medium-high, add a bit of cooking oil, and saute the chicken with some minced garlic until cooked through.  If you marinated it, there's no need to add anything more than a dash of salt and pepper at this stage.  If you're starting from plain chicken, you'll want to add some soy sauce at this point.

Set cooked chicken aside.


You probably still have plenty of oil in the pan from the chicken - if not, make sure there's 1-2 tablespoons in the bottom of the pan, then add just enough rice to form a single, thin layer.  Take care not to overcrowd the pan - you'll end up repeating this step and the next several times until you're out of rice.

Let cook 2-3 minutes, then stir and continue cooking an additional couple of minutes until the rice has crisped up somewhat and taken on some color.


Add some frozen vegetables and some soy sauce to the rice.  Continue cooking, stirring often, until the vegetables are hot and tender.  Remove everything from the pan into a serving dish, add fresh oil to the pan, and continue frying the rice and adding vegetables until you've used everything up.


Once all of the rice is fried, drain your pineapple well and add it to a hot pan.  Keep it moving to make sure it doesn't burn, and cook until you've put some color on it.  This will take care of some of that "canned" flavor.  You can use fresh pineapple, too, of course - but chances are there's some canned pineapple in your pantry right now, and that will work just fine.


Finally, mix everything together!  If things have been sitting for a while because you're making a lot, add things back to the pan to heat back up as you mix.


Serve hot - all by itself.  The dish can be a fine side or addition to another meal, but come on - isn't it time to give fried rice the spotlight for once?  It's tasty enough to do the job.


Recipe: Fried Rice
Prep Time: 10 Minutes | Cook Time: 20-30 Minutes | Difficulty: Easy | Servings: 4-6

Ingredients
  • 1 lb Chicken Breast, chopped
  • 6 cups Cooked Rice
  • 1 bag Frozen Mixed Vegetables (Carrots, corn, green beans)
  • 1 bag Frozen Broccoli
  • 1 can Pineapple Tidbits, drained
  • 2 Eggs, lightly beaten
  • 2 cloves Garlic, minced
  • Vegetable Oil for frying
  • Soy Sauce to taste
  • Salt and Pepper to taste
Instructions
  1. Optional: Marinate chicken overnight in soy sauce, sesame oil, and lime juice.
  2. In a large skillet over medium heat, scramble eggs.  Set aside.
  3. Add 2 tbsp vegetable oil to pan and increase to medium-high heat.  Saute chicken with minced garlic until cooked through.  Set aside.
  4. Add rice to oiled pan no more than 2 cups at a time in a single layer.  Cook 2-3 minutes, stir, and cook 2-3 more minutes.
  5. Add 1-2 cups frozen vegetables to rice.  Add soy sauce to taste.  Continue to cook, stirring often, until vegetables are hot and tender.
  6. Set aside finished rice.  Repeat steps 4-5 until all rice and vegetables are cooked.
  7. Add pineapple to hot pan and saute 4-5 minutes until hot and slightly charred.  Set aside.
  8. Combine rice mixture, cooked chicken, eggs, and pineapple.  Mix well and add additional soy sauce, salt, and pepper to taste.  Serve hot.

Sunday, April 8, 2012

Fresh Strawberry Cake with Orange Glaze


It's Easter Sunday, and Kristin and I are in charge of bringing lots of baked goods over to her parents' place to feed the clan.  I made my Cloverleaf Rolls, Kristin made some really tasty lemon cookies, and we joined forces to make this cake.  It's a really delicious, moist vanilla cake with lots of fresh strawberries baked right in, and covered in a light, tangy orange glaze.  I think it will be a hit.

I'd be lying if I said this cake didn't involve some trials and tribulations.  Our first attempt was perfectly done on top after its bake, but not quite there underneath, and came out of the bundt pan in pieces.  It was tempting to give up after baking all day, but we tried some of the fallen-apart first attempt and - oh man, it was good.  We knew we had to do it again and get it right.  A longer bake at lower temperature did the trick - the second attempt came out beautiful, and that sad first cake made a great breakfast this morning.


Here's what you'll need!  For the cake: flour, sugar, vanilla-flavored greek yogurt, a pound of fresh strawberries, butter, eggs, baking soda, orange zest and juice, and salt.  Just two ingredients in the glaze: powdered sugar and a little more orange juice.


First, clean and finely chop the fresh strawberries.  You want the pieces to be small enough to distribute thoroughly throughout the batter and really flavor the whole cake.


Next, combine the dry ingredients - all but 1/4 cup of the flour, baking soda, and salt - in a mixing bowl.

I like getting some color in the background of the "bowl of white powder" shot.  I also liked stealing strawberry bites periodically as we baked - these were tasty!


In a large mixing bowl, cream together butter and sugar, then beat in the three eggs, a tablespoon of orange juice, and the orange zest.


Alternate beating in dry ingredients and yogurt about 1/3 of each at a time.  Take care not to overmix, but do make sure to scrape the sides of the bowl - the flour mixture really likes to hide out around the edges.


Mix the last 1/4 cup with the fresh strawberries - this helps them to stay in place in the batter and keeps strawberry juice from inconsistently dying your cake pink.


Gently mix the floured strawberries into the batter.  Resist the urge to eat it with a spoon (though it is really tasty to lick from a mixing spoon).


Add the batter to a well-greased and floured bundt pan.  Be really, really certain not to skip the greasing/flouring - you don't want your cake to stick and fall apart like our first attempt.  It'll still be delicious, but it's truly sad to flip the cake and watch it go all to pieces.


Bake 75 minutes at 300 degrees until top of cake is golden brown and the edges have begun to pull away from the pan.  Test with a toothpick in a few spots and make sure that it comes out absolutely, 100% clean - if not, keep baking!


Let the cake cool a half-hour or so in the bundt before flipping and removing from the pan.


Whisk together 1 cup powdered confectioner's sugar with two tablespoons of fresh orange juice, and drizzle this glaze over the cake once it's completely cooled.  This adds a nice complex tartness to the sweetness of the cake itself.


This cake is perfectly tasty warm, cold, or room-temperature.  I just had some for breakfast, and am already looking forward to a slice for dessert after Easter dinner, too!


Recipe: Fresh Strawberry Cake with Orange Glaze
Prep Time: 20 Minutes | Cook Time: 75 Minutes (plus cooling) | Difficulty: Medium | Servings: 12 Slices

Ingredients
  • 2 1/2 cups Flour (divided)
  • 2 cups White Sugar
  • 1 cup Butter
  • 3 Eggs
  • 8 oz Vanilla Greek Yogurt
  • 3 tbsp Orange Juice (divided)
  • Zest of 1 Orange
  • 1 cup Powdered Sugar
  • 1 lb. Fresh Strawberries
  • 1/2 tsp Baking Soda
  • 1/2 tsp Salt
Instructions
  1. Pre-heat oven to 300 degrees.
  2. In a medium mixing bowl, combine 2 1/4 cups flour, baking soda, and salt.
  3. In a large mixing bowl, cream together sugar and softened butter with an electric mixer.  Beat in eggs, orange zest, and 1 tbsp orange juice.
  4. Alternate beating in dry ingredients and yogurt.  Scrape sides of bowl carefully to ensure mixing.
  5. Hull and finely chop fresh strawberries, then mix will remaining 1/4 cup flour.  Stir into batter.
  6. Thoroughly grease and flour a bundt pan and pour in the batter.
  7. Bake 75 minutes at 300 degrees until edges pull away from the pan and a toothpick inserted into the cake comes out 100% clean.
  8. Cool 30 minutes in the pan, then turn out and remove from pan to finish cooling.
  9. Whisk together powdered sugar and 2 tbsp Orange Juice into a glaze and drizzle over top of cake once completely cool.