Sunday, July 22, 2012

Sweet and Spicy Plum Chutney


My mother is a very talented cook, so it's hardly fair to say that I ever really "discovered" food.  I grew up eating flavorful, healthy meals cooked from quality ingredients, and that's a lot of the reason that I enjoy food and cooking as much as I do today.  Still, I think everyone - myself included - has moments as they grow up where food takes them by surprise.

One of my first surprising moments with food was on a family vacation to Hawaii.  We were going kayaking down a river, and stopped at a roadside stand to get some sandwiches to bring along for lunch.  Until that point, I had never been all that adventurous with sandwiches - that changed with this food stand.  I don't even remember everything that was on the sandwich - I think it was tuna.  What took me by surprise were the side-elements - bean sprouts and a mango chutney.  I'm not sure I had ever had a sprout or a mango before, so I wasn't too sure what I was getting into.  My worries were very quickly allayed.  Somewhere on the shore of a small Hawaiian river, it occurred to me that sandwiches - and their condiments - can be awesome.

More than a decade later, my family still talks about that mango chutney.  I'm tempted to try to recreate it, but I worry that doing so could never do justice to that first taste.  I tried something related, though - a plum chutney.  It's spicy and tangy and sweet and earthy all at once, and has made a great condiment for everything that I've put it on so far.  Best of all, I still have a bunch of it left, so I can look forward to grilling up something else and coating it with spicy plum goodness.


For a somewhat exotic recipe, the ingredients are pretty close to home - most are pantry staples.  Here's what I used: half a dozen ripe plums, one red onion, some brown sugar, some white sugar, apple cider vinegar, cayenne pepper, ginger root, garlic, whole mustard seeds, salt, and pepper.  Many chutney recipes also feature currants or golden raisins - I opted against for this attempt, but feel free to toss them in if that takes your fancy.


First, chop up all the fresh stuff: the garlic, the red onion, and the plums.  A coarse chop is all you need - everything will reduce in size pretty considerably, so don't worry about big chunks.

If you prefer your ginger minced, peel and chop it at this point, too.  I grated it right into the pot later on with a microplane, and that worked just fine for me.


The cooking process starts by combining the vinegar, brown sugar, and white sugar in a small saucepan.  Whisk together and bring to a quick boil to make sure all of the sugar is dissolved.


Next, keep the heat on, and add everything else to the pot - the chopped plums, garlic, and red onions, the mustard seeds, the cayenne, some grated ginger, and a generous hit of salt and pepper.  It will look like egregiously too much for the little bit of liquid at the bottom, but don't fear - the plums will release plenty of liquid quite quickly as everything comes back to a boil.  As soon as the pan is boiling again, reduce the heat to a steady simmer.


Simmer 30-45 minutes until everything is reduced by 1/3 to 1/2 and has a sticky, syrupy texture.


And that's it!  Serve it up as you see fit - this chutney is surprisingly versatile.  It makes a great condiment for sandwiches, a fantastic glaze for grilled meats, and even a top-notch hot dog topping.  Heck, I'd even be tempted to use it like cranberry sauce at Thanksgiving.  Give it a try, and let me know where it works.


Recipe: Sweet and Spicy Plum Chutney
Prep Time: 10 Minutes | Cook Time: 45 Minutes | Difficulty: Easy | Servings: 3-4 Cups

Ingredients
  • 6 Ripe Plums
  • 1 medium Red Onion
  • 3/4 cup Apple Cider Vinegar
  • 1/2 cup (packed) Brown Sugar
  • 1/3 cup White Sugar
  • 4 cloves Garlic
  • 2 tsp whole Mustard Seeds
  • 2 tsp Grated Ginger
  • 1 tsp Cayenne Pepper
  • Salt and Pepper to taste
Instructions
  1. Coarsely chop red onion, plums, and garlic.
  2. In a small saucepan, combine cider vinegar, brown sugar, and white sugar.  Whisk together and bring to a boil.
  3. Add all other ingredients to saucepan and return to a rapid boil.
  4. Reduce heat to a steady simmer, stirring often, 30-45 minutes until mixture has reduced by 1/3 and texture is syrupy.
  5. Store up to 3 weeks refrigerated or preserve by canning.

Sunday, July 15, 2012

Parmesan Zucchini Fries


Since Kristin and I live in a second-floor apartment, we don't get much of a chance to grow our own food.  In fact, even the poor herbs that I try to grow in the window only have about a 50% survival rate.  Kristin's family has a great garden, though, and they even like us enough that they sometimes share their home-grown veggies.  Thankfully, that means we don't miss out entirely on the fresher-than-fresh summer harvest.  This week, Kristin's mom shared a couple of beautiful, gargantuan zucchini with us.  I really don't think I've ever seen larger.  She mentioned that she was going to make Zucchini Parmesan out of the ones that she kept, and that sounded awfully good.

This week, I made something like a side-dish version of Zucchini Parmesan: zucchini fries. They're lightly breaded in crumbs and Parmesan, seasoned with classic Italian flavors, and served with marinara sauce.  These fries made an awesome accompaniment to our dinner, or could serve as an easy appetizer or party food.  If you find yourself saddled with a couple of giant zucchini (or some boring, regular-sized ones), give these fries a try.


Here's the cast of characters: a couple of enormous zucchini, some panko bread crumbs, some Parmesan cheese, an egg or two, a bit of milk, oregano, basil, garlic powder, salt, and pepper.

If you haven't been blessed with a giant zucchini, don't be too glum - just use a few more standard sized ones.


Start by cutting your zucchini down into 3-4 inch long sticks.  If you want your fries to be more crisp, err on the thinner side for the sticks.  I enjoyed getting a little more meaty zucchini bite, so left the sticks fairly thick.


Next, set up a breading station.  Make an egg wash by whisking the egg into the milk in a bowl large enough to submerge your zucchini sticks.  On a plate, combine the breadcrumbs, all of the seasonings, and plenty of grated Parmesan.  Don't be shy with salt and pepper - these fries will be a bit bland without a significant amount.


Cover a baking sheet with some parchment paper, or just grease it if you don't have parchment handy.

Your breading process is simple - dip each zucchini stick in the egg wash, roll in the breadcrumb mixture until it's lightly coated, and place the finished product on the baking sheet.

Don't worry about getting each and every piece 100% covered in crumbs, especially if you're using a larger crumb like panko and Parmesan that doesn't come from a green tube.  It just won't stick completely, but that's fine - you get plenty of crunch and flavor from this "rustic" breading.


Bake your fries for 25-30 minutes in a 425 degree oven until they're crispy and golden brown.


Serve immediately with marinara for dipping.


Recipe: Parmesan Zucchini Fries
Prep Time: 15 Minutes | Cook Time: 30 Minutes | Difficulty: Easy | Servings: 4-6 as Side Dish

Ingredients
  • 4 Large Zucchini (Or 2 Gargantuan Zucchini)
  • 2 Eggs
  • 1/2 cup Milk
  • 1 cup Panko Breadcrumbs
  • 1/2 cup Parmesan Cheese, grated
  • 1 tbsp Oregano
  • 1 tbsp Basil
  • 1/2 tbsp Garlic Powder
  • Salt and Pepper to taste
Instructions
  1. Pre-heat oven to 425 degrees.  Grease or cover baking sheets with parchment paper.
  2. Cut zucchini down into 3-4 inch long sticks.
  3. In bowl large enough to submerge zucchini sticks, whisk eggs into milk to create egg wash.
  4. On a large plate, combine panko breadcrumbs, grated Parmesan, oregano, basil, garlic powder, and plenty of salt and pepper.
  5. Dip each zucchini stick in egg wash, then roll in breadcrumb mixture to coat.  Place on prepared baking sheets.
  6. Bake 25-30 minutes at 425 degrees until fries are golden-brown and crispy.
  7. Serve immediately with marinara sauce for dipping.


Sunday, July 8, 2012

Guacamole


It's hot.  Unbearably hot.  Unspeakably hot.  Much too hot to heat up the kitchen unless life depends on it.  So what better time to use an ingredient that doesn't need heating - the avocado? In part to beat the heat and in part because it's just delicious, we made a nice big batch of guacamole this week.  It's fresh and creamy and, maybe most important of all this week, cool.


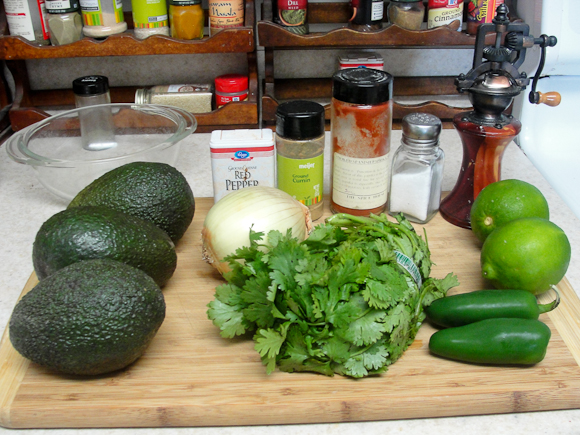
Here's what I used: three avocados, two jalapeno peppers, the juice from two limes, a sweet onion, a bunch of cilantro, some cayenne pepper, cumin, smoked paprika, salt, and pepper.

These ingredients form a solid "base" guacamole, which can then be jazzed up as you see fit.  If you like yours with pico de gallo or salsa or anything else mixed in, just mix in after the last step.


Start by opening up the avocados, scooping out the meat, and giving it a thorough mashing.


Next, chop up the onion, jalapeno, and cilantro.  I only used about half of the onion and it was plenty - and of course you can use red onion in place of sweet onion if you prefer.  As always, if you want more heat, leave the veins and seeds in the peppers.


Here's the last step: mix everything together.  Dump the chopped vegetables into the mashed avocado and mix them in, then add the seasonings and lime juice and keep stirring and adjusting until it's perfect.  Every avocado is a little different, so every batch of guacamole will need a somewhat different balance of seasonings.

Note that using plenty of smoked paprika can darken the color of the guacamole and even make it look a bit like it's browning prematurely - don't worry too much if this happens.  I love the smokiness of the flavor enough to overlook the color change.


And that's it!  Give it an hour or so in the fridge to let the flavors marry, then serve with plenty of chips, preferably along with some cold beers and/or sangria.


Recipe: Guacamole
Prep Time: 5-10 Minutes | Cook Time: None | Difficulty: Easy | Servings: 6 Cups

Ingredients

  • 3 Ripe Avocados
  • 2 Jalapeno Peppers
  • Juice of 2 Limes
  • 1/2 large Sweet Onion (or Red Onion)
  • 1/4 cup Cilantro, chopped
  • 1 tsp Cayenne Pepper
  • 2 tsp Ground Cumin
  • 2 tsp Smoked Paprika
  • Salt and Pepper to taste
Instructions
  1. Slice open avocados, scoop out flesh into a bowl, and mash thoroughly until few lumps remain.
  2. Chop onion, jalapeno, and cilantro.  Add to mashed avocado and mix.
  3. Add lime juice and seasonings, mix well, and adjust to taste.
  4. Refrigerate 1 hour before serving.


Monday, July 2, 2012

Teriyaki Chicken Kabobs


It is an undeniable truth in life that food on a stick is great.  Meat on a stick?  Great.  Vegetables on a stick?  Great.  Dessert on a stick?  Great.  Food and sticks just go so well together.  I took advantage of that fact for one of this week's meals - I made some really fantastic teriyaki chicken kabobs.  The same ingredients could have gone into a stir fry and been tasty, sure -- but really, why not put it on a stick?  

Kabobs are so tasty that Blogger's spell-check really wants to correct their name to "Kaboom!" The high-heat cooking method gives a great char to the vegetables that's hard to get from a pan while keeping the chicken tender and flavorful.  What are you waiting for?  Put some food on a stick!


Here's what I used: chicken breast, bell peppers, sweet onion, pineapple, fresh mushrooms, teriyaki sauce, rice vinegar, sesame oil, lime juice, and a bit of salt and pepper.


First, go ahead and chop the vegetables down to an appropriate bite-or-two size that will fit on your skewers.  I went ahead and left my mushrooms whole, but if yours are bigger feel free to chop them down, too.


Chop the chicken down into similar, bite-or-two sized pieces fit for skewering.  My chicken wasn't quite done thawing when I chopped it, but that actually worked to my advantage -- slightly frozen chicken is very, very easy to chop into just the right shape and size you're looking for.


The key to a good kabob is a good marinade.  I spiced up my bottle teriyaki sauce with some lime juice, rice vinegar, and sesame sesame oil to make sure that the chicken and vegetables would all be really packed with flavor.

I went ahead and marinated both the chicken and the vegetables (in separate bags) overnight - basically, everything but the pineapple.  Be especially certain not to leave pineapple in a marinade with meats for longer than an hour or so, as pineapple juice will break down meats and make them quite soft and unpleasant if they're in contact too long.

Give the chicken and vegetables plenty of time to marinate -- overnight if at all possible.


When it's time to cook, don't forget to chop your last ingredient - the pineapple!  Before you start chopping, get your skewers in to soak -- soak at least 30 minutes, lest they catch on fire.


Once your skewers have soaked at least a half-hour, assemble your kabobs.  I didn't really have a set pattern for my skewering - I just grabbed whatever seemed right to go next, and tried to make sure that each skewer got at least a few pieces of everything.  Pre-heat your grill or broiler while you assemble and it should be ready to go by the time you're done.


Broil the kebabs for 4-5 minutes per side, turning once, until the vegetables are slightly charred and the chicken is cooked through.  If you have some marinade leftover from the vegetables, feel free to give them an extra basting as you turn halfway through.


Serve hot over rice or your starch of choice.


Recipe: Teriyaki Chicken Kabobs
Prep Time: 15 Minutes (Plus Marinade Time) | Cook Time: 10 Minutes | Difficulty: Easy | Servings: 6-8

Ingredients
  • 2 lbs Boneless Skinless Chicken Breast
  • 1 whole Pineapple
  • 1 large Sweet Onion
  • 2 large Green Bell Peppers
  • 12 oz. Fresh Mushrooms
  • 1 cup Teriyaki Sauce
  • 2 tablespoons Lime Juice
  • 1/4 cup Rice Vinegar
  • 2 tsp Sesame Oil
  • Salt and Pepper to taste
  • Bamboo Skewers
Instructions
  1. Chop chicken and vegetables into bite-sized pieces large enough to easily skewer.
  2. Combine teriyaki sauce, rice vinegar, and lime juice.  Separate into two portions and marinate chicken and vegetables in separate containers overnight.
  3. Soak bamboo skewers at least 30 minutes before assembling kabobs.
  4. Chop pineapple into bite-sized pieces large enough to easily skewer.
  5. Assemble kabobs by alternating all ingredients on bamboo skewers.
  6. Broil kabobs 4-5 minutes per side until vegetables are lightly charred and chicken is cooked through.
  7. Serve warm over rice or other starch.