Saturday, July 30, 2011

Bribe Cookies


It's coming down to the end of summer term at BGSU.  I'm teaching an Introduction to Philosophy course that's got a funny structure - it's only 6 weeks long, twice per week, which means we get very few class sessions, and each session is really, really long.  I'm talking over 3 hours long.  This makes for some tired students, not to mention a tired instructor.  I like to have my students do a lot of writing, and that's usually not an issue, but in only 6 weeks, that means the students have had a paper due every other week.  They're getting a little weary.

I gave my students a shortened class one session this week, and had them bring in their papers to work on together.  This gave them a chance to do a little breathing and guaranteed that these papers wouldn't all be forgotten til the last minute.  So, they were already content with getting a little break.  But I like to earn some extra brownie points.  How better than to do so with cookies?

These are good cookies.  I mean, really good.  The brown sugar gives the cookie itself an almost caramel flavor, and the chocolate really pops.  Many students grabbed a cookie, took a bite, and grumbled something like "Theesh are good!" through a very full mouth.  They were pleased.  You will be too.


Our ingredients are more or less standard fare.  We'll just mostly brown sugar, though just a touch of white sugar keeps things from getting too dark.  All purpose flour, baking soda, salt, eggs, butter (unsalted, please!), vanilla, and - of course - chocolate chips round out the mix.


First things first.  Pre-heat the oven to 325 and find yourself a couple of big baking sheets.  Don't even think about greasing them.  Doing so will guarantee you that the bottom of your cookies are tragically burnt.  Instead, parchment paper those baking sheets and we'll call it good.


Melt some butter.  Be careful to do this on low power if you're using a microwave.  2 minutes of half power works great for me.


Mix together all of those powdery, dry, white ingredients.  That's the flour, salt, and baking soda.  Set this bowl aside.


In a nice large bowl, cream together the butter, white sugar, and brown sugar.  Really pack the brown sugar into the cup, otherwise you'll end up with too little.  And you get this fun ice-cream scoop effect when you add it to the bowl.  Mix those together, but don't worry if it's not particularly smooth.  Another mixing step is coming up immediately after this.


Add the eggs and vanilla and mix well.  The mixture won't be completely smooth, but it should be pretty close.  Make sure you don't have any stubborn brown sugar clumps.


Now for the dry stuff.  Add the dry bowl into the wet and mix.  I often start this process with an implement like a spoon or a spatula, but end up just finding that frustrating.  Be brave and mix with your hands.  It'll give you a good excuse to eat a little dough off of your fingers.


Now the really fun part - chocolate chips!  Two cups will seem like egregiously too much, but I promise it's not.  These cookies are perfectly tasty with standard semisweet milk chocolate, but you can also go ahead and get creative.  A cup of semisweet and a cup of white is good, as is sneaking in some peanut-butter or butterscotch chips.

Again, mix these in with your hands until the chips are well-distributed.  Sneak a bite or two to confirm that it's delicious (Hint: it will be).


Now it's time to drop some cookies.  You're aiming for roughly ball-shaped cookies between an inch and an inch and a half in diameter.  An ice cream scoop works well for this, or you can just stick to the hands.


Bake em.  These cookies are a little fickle when it comes to baking behavior - sometimes they're done done done after 14 minutes, sometimes they'll look disturbingly raw after 17.  So check after 13 or 14 minutes, but absolutely don't let them go more than 17 minutes at 325.  Even if the middles look entirely too squishy, I promise it will be okay.  Overcooking these just ruins the texture, as they firm up considerably as they cool.

So long as you've baked them so that they're not completely crisp, let them cool on the baking sheets and your cookies will reach a perfect crisp outside with a chewy, smooth center.


They may not be the prettiest things in the world, but they are mighty yummy.  Sometimes they spread more than others, and each cookie will be a little differently shaped.  But come on, are you baking to win beauty contests, or because you want to stuff your face with cookies?  Yeah, I thought so.

If you're watching your diet, I recommend sharing these with others, as they'll then disappear quickly and you won't be able to eat a dozen of them in an evening all by yourself.  Or, if that's your thing...well, okay.  However you do it, enjoy.


Recipe: Bribe Cookies

Prep Time: 10 minutes   |   Cook Time: 14-17 minutes  |   Difficulty: Easy   |   Servings: 18-24

Ingredients

  • 2 cups All-Purpose Flour
  • 1/4 cup White sugar
  • 1 cup Brown Sugar, packed
  • 3/4 cup Unsalted Butter, melted
  • 2 eggs
  • 2 cups Semisweet Chocolate Chips
  • 1 tablespoon Vanilla Extract
  • 1/4 tsp Salt
  • 1/2 tsp Baking Soda

Instructions

Pre-heat oven to 325 degrees.  Line cookies sheets with parchment paper.  Do not grease.

In a medium bowl, combine flour, baking soda, and salt.

In a large bowl, combine melted butter, brown sugar, and white sugar and mix well.  Add vanilla and eggs and beat until smooth.

Add medium bowl into large bowl and mix.  Add chocolate chips and mix by hand.

Drop cookies onto parchment-paper covered cookie sheets in inch balls roughly 2-3 inches apart.

Bake 14-17 minutes.  Edges should be set, though cookie centers will likely be soft.  Do not overcook.

Cool on baking sheets.

Sunday, July 24, 2011

Farfalle and Balsamic Chicken in Vodka Sauce


So we moved last weekend, and I've got myself a brand new (to me) kitchen!  I think I have five times more counter space than I did in our previous apartment - it's glorious!  The problem is, it's been nearly 100 degrees every day since we moved, so I've hardly been motivated to do much serious cooking.  I finally couldn't stand it, though, and had to really put the new kitchen through its paces.

There's a little place in downtown Elmhurst, Illinois called Fresco's.  It's a Mediterranean cafe owned by a very short, friendly Italian man and often staffed by his very tall, nerdy-looking son.  They're quite a combination.  My favorite dish there is called "Pasta Michele," and it's really to die for.  Tender grilled chicken breast and big, succulent mushrooms over penne pasta in a sweet tomato cream sauce and lots of fresh mozzarella.  This dish started as something of an attempt to recreate Pasta Michele, but has evolved into its own thing since.

This is a great dish to use if you need to impress company.  It's a people-pleaser - who doesn't like pasta.  On the other hand, it does take a good chunk of time and isn't the sort of thing most folks make at home on a regular basis.  Best of all, you can do most of the prep before they arrive, and just let things simmer while you mingle.


Here's the cast of characters.  My chicken has been marinating overnight in Balsamic at this point, but you can get away with just 30-60 minutes if you're pressed for time.  Use Penne or Farfalle (bowtie) pasta - it's pretty.  The sauce comprises the rest.  A large can of tomato sauce and one of diced tomatos are a base.  We'll make things interesting by adding mushrooms, sweet onion, red pepper, garlic, Herbes de Provence, and a touch of cream.  Oh, and vodka.  Plenty of vodka.


Marinate your chicken breast in Balsamic vinegar and plenty of minced garlic.  Overnight is vastly preferable.  Place chicken and marinade together in a baking dish, and throw into a 350 degree oven for 30-40 minutes, until chicken is just cooked.

That's the last you'll hear of the chicken 'til plating.  It's that simple.


Start the sauce by finely dicing your onion and red pepper.  More surface area means more flavor that can work its way into the sauce, not to mention finer pieces are easy to get into every bite.


Add just enough olive oil to cover the bottom to a large pot (or, better yet, a dutch oven) over medium heat.  Cook the onion and red pepper for just a minute or two until they begin to soften.  They'll cook the rest of the way in the sauce itself, which we'll build right on top of them.


Open up your diced tomatoes and tomato sauce and add them to the pot.  Plain diced tomatoes are fine, but "Italian Style" ones with some spices couldn't hurt, right?


Don't forget the mushrooms, either!  These may be my favorite part of the dish.  They get so incredibly flavorful after cooking in the sauce for a nice long time.


At this point, if you're like me, you'll realize that the giant bottle of Vodka you've had since last summer doesn't actually have a full cup left in it.  Oops.  The good news is that you can substitute in some other delicious alcohol without loss.  I ended up using about 3/4 cup Vodka to 1/4 cup Marsala wine.


Yup, that's already good enough to eat, though the veggies won't be quite cooked yet.  Add plenty of minced garlic and a good handful of Herbes de Provence.  If you don't keep Herbes de Provence on hand (how provincial), you can put them together out of marjoram, thyme, savory, basil, rosemary, sage, and fennel.  Or just poo-poo the whole concept and add your favorite French/Italian seasonings.  It'll probably be delicious.

Give it a taste at this point and add salt as needed.

Now cover your pot and simmer the sauce for about an hour over low heat.


I lied about this being the last you'll see of the chicken.  The chicken is actually an excellent way to time when you ought to start the "finishing" process for the dish.  When the chicken comes out of the oven, your sauce will probably be at least halfway through its hour of simmering.  That means two things:


First, you'd better cook some pasta.  Despite the fact that I would happily eat this sauce as a soup, it really is best over pasta.


It's also time to add the cream to the sauce itself.  Start with just 4 ounces or so, and add more to taste.


That's that!  When the sauce is done simmering, toss your al-dente pasta with it to finish the pasta while soaking up some flavors.


Then top with sliced chicken.


Top that with lots and lots of cheese.  Because cheese is delicious.  Parmesan is great, as is Asiago.  Alternatively, you could forego the hard cheeses entirely and add some fresh mozzarella.  Or be a rebel and do both.

That's it!  Go, eat it!  You'll have enough to feed 10 people or so, but may want to hide it away and keep all to yourself.  Or be ready to make another batch soon, because the first one won't last long.

-

Recipe: Farfalle and Balsamic Chicken in Vodka Sauce

Prep Time: 10-20 minutes minutes   |   Cook Time: 60 minutes  |   Difficulty: Easy   |   Servings: 10-12

Ingredients

Chicken
  • 2-3 Boneless Skinless Chicken Breasts
  • 1/2 cup Balsamic Vinegar
  • 2 cloves Garlic, minced

Sauce
  • 1 large (28 oz) can Tomato Sauce
  • 1 can (14.5 oz) diced Tomatoes
  • 1 large Sweet Onion
  • 1 large or 2 small Red Peppers
  • 8 oz Baby Portabella Mushrooms, sliced
  • 1 cup Vodka
  • 1/2 cup Heavy Cream
  • 3 cloves Garlic, minced
  • 1 tbsp Herbes de Provence
  • Parmesan/Asiago cheese to taste
  • Salt to taste

Instructions


Marinate chicken in Balsamic and garlic overnight.

Pre-heat oven to 350 degrees.  Bake chicken in marinade at 350 for 30-40 minutes until just tender.

Dice onion and red pepper finely.

Add 1 tbsp olive oil to a large dutch oven over medium heat.  Cook onion and red pepper 1-2 minutes until beginning to soften.

Add tomato sauce, diced tomatoes, mushrooms, vodka, garlic, and seasonings to dutch oven.  Simmer over low heat for one hour.

Cook pasta to al-dente.

Add cream when sauce has 10-20 minutes left to simmer.

Toss pasta in sauce to finish cooking.

Slice chicken and serve immediately over pasta and sauce.  Garnish with cheese to taste.


Sunday, July 10, 2011

Burger Glop


This is a recreation of a dish I loved as a kid.  It started off as a way to use up leftover hamburger, but it's become something that I'm happy to take a special trip to the store to stock up for.  It's probably the meal I make that comes the closest to "bachelor chow" - the kind of meal somebody could contentedly eat day after day after day without severe nutritional deficiency.  I don't recommend such things, of course, but it feeds Kristin and me for a solid few days, at least.  Cheap, easy, and tasty - it may not be beautiful, but give it a chance and you'll be hooked.


The ingredients are a simple lot.  Ground beef is our protein - I usually go for 80/20 for plenty of flavor.  Bell pepper and sweet onion add some vegetable matter, along with the sweet corn which I brilliantly left out of the picture - oops.  Canned tomato sauce adds nice flavor and binds everything together.  You can stick with plain tomato sauce and spice it as you like, but I usually just start from a base of Pizza sauce for this one.  Salt, pepper, and some Italian seasoning fill out the flavor.  And, of course, we'll need some pasta to add substance.  Macaroni is my go-to here.


For starters, get your water boiling.  Use a nice, large pasta pot, as we'll eventually combine all the ingredients in it.  

This is important: Undercook the pasta!  No, really.  If the box says 8-10 minutes, cook for 7, tops.  It'll be chewy, but we'll finish it in the sauce.


Now for knife work.  Dice the bell pepper finely.  We want the veggies in small enough pieces that every bite will contain some.


Dice the onion as well, then set your veggies aside.


Brown the beef in a large skillet over medium-high heat.  A large skillet is important here - we'll be adding a lot of ingredients.


Once the beef is browned, remove it from the skillet and set it aside for a few minutes.  If there's a great deal of grease left in the pan, remove all but a tablespoon or two.  Add all of the vegetables and sautee until tender, about 5-6 minutes.  Season with salt and pepper.


Time to retrieve the beef and open up the sauce.  Once the veggies are nice and tender, add the beef and two cans of tomato sauce to the skillet.  Season with a generous amount of Italian seasoning.  If you don't keep a blend on hand, go for garlic, onion powder, basil, and oregano.


Take your undercooked pasta and drain it well.  You undercooked it, right?  Good.  Just checking.  Now that your pasta pot is empty, it's time to put everything together.


In the large pot, combine the pasta with the contents of your skillet.  Mix well and cook over low heat just a couple of minutes until the pasta is finished.  Give it a taste and adjust seasonings as needed.


Add a generous handful of cheese over the top of your "glop" as soon as you serve it, and it will have melted by the time the plate makes it to the table.  Serve hot.  It will stand up fine by itself, but some fresh fruit on the side sets things off nicely in the summer.

 Recipe: Burger Glop

Prep Time: 5 minutes   |   Cook Time: 10-20 minutes  |   Difficulty: Easy   |   Servings: 6-8

Ingredients
  • 1 lb Ground Beef (80/20)
  • 1 box (16 oz.) Elbow Macaroni
  • 1 large Sweet Onion
  • 1 large Green Bell Pepper
  • 1 bag (12 oz.) frozen Sweet Corn (or 1-2 ears fresh)
  • 2 cans (15 oz. each) Pizza Sauce
  • 1/2 cup Cheddar/Jack cheese, shredded
  • 2 tbsp Italian Seasoning
  • Salt to taste
  • Pepper to taste

Instructions

In a large pot, cook pasta 1-2 minutes shy of directions on package.  Drain and set aside.

Dice onion and bell pepper finely.

Brown beef in a large skillet over medium-high heat.  Set aside.  Drain excess grease, retaining 1-2 tbsp.

Reduce heat to medium.  Add onion, bell pepper, and corn to skillet.  Season with salt and pepper.  Cook 5-6 minutes until vegetables are tender.

Add beef, pizza sauce, and Italian seasoning to skillet.  Simmer 3 minutes.

Return pasta to pot.  Pour skillet contents into pot and mix well.  Cook 2-4 minutes over medium-low heat until pasta is fully cooked.

Add a handful of shredded cheese after plating.  Serve hot.


Saturday, July 2, 2011

Kristin's French Toast with Blueberry Sauce


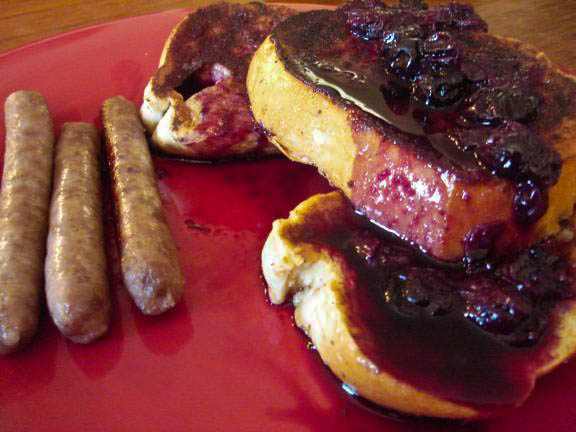
'Twas the night before a road trip to visit my dad in Chicago, and all through the house, we were trying to think of something to make for dinner that wouldn't leave enough leftovers to feed a mouse.  I have a bit of an issue with leftovers - I make a lot of food.  Enough to serve at least for lunch, if not for several days worth of dinner.  Kristin suggested breakfast - specifically, French Toast.  Yum.  I love French Toast, but hers goes above and beyond normal French Toast.  The only hangup - we were almost out of syrup.  I figured I'd get creative in an attempt to contribute, so I made up a Blueberry syrup recipe on the spot.  It turned out pretty tasty.

I took care of the Syrup, and made some sausage for the side.  French Toast Master Kristin made the Toast itself, and oh, it was good.

The Syrup


The syrup was pretty simple, ingredient-wise.  Blueberries, sugar, and vanilla are the obvious necessities.  As for the liquid, I used a mix of juices we had on-hand.  We had a really tasty blueberry-raspberry-blackberry juice mix and some OJ in the fridge, so I went for it.  The OJ alone probably would have worked fine.  Cranberry juice would have worked pretty well in place of the Blueberry mix, too.


Nothing fancy here.  Just dump everything into a saucepan.  Start off easy on the sugar and add to taste as you move through the process.


Bring the mixture in your saucepan to a simmer.  It will get quite frothy for a while.  No idea what the chemistry behind this reaction is.  In any case, watch for a boil-over.  You don't really want this very sugary mixture hitting the burner.


When the froth settles down, it's about ready.  You have one of two options, here.  For more of a sauce, leave it alone and just spoon the goodness over your chosen target.  If you're looking for more of a syrup, blend it up, strain, and return it to the saucepan to thicken with a touch of cornstarch if you like.

I opted for the sauce this time around - the whole blueberries still in the mixture offered a great blast of sweet-tart flavor and some nice texture.

The French Toast


The French Toast portion of the meal was 100% the work of the Breakfast Dynamo seen above.


The ingredients: good, thick bread, preferably a bit stale, milk, eggs, vanilla, brown sugar, cinnamon, nutmeg, and a pinch of salt.


Eggs come first.  Beat them into submission.


Add the milk and beat again until everything is nice and smooth.


Now add everything else: brown sugar (and plenty of it!), cinnamon, nutmeg, and salt.


It won't be smooth.  It won't be pretty.  It will be delicious.


Submerge each slice of bread completely and let soak briefly to maximize deliciousness.  The softer the bread, the shorter a period it needs to soak.  For our pillowy french bread, it just took a few seconds.  For something denser and/or more stale, give it some time.


 Now into the pan!  Low and slow is the name of the game.  Kristin always grumbles about how slowly she has to cook French Toast to make it really good, but it's so worth it in the end.  You want to get it cooked through, not just seared on the outside and untouched in the middle.


After a good several minutes per side, your toast should look about like this.


It's not a bad idea to distract yourself from the difficulty of waiting for all of the toast to be done by cooking up some breakfast sausage.  Sausage which, as it happens, is also tasty when it inevitably meets the blueberry sauce.


And soon, the work is done.  Constructing a giant French Toast tower is optional, but highly recommended.


Serve everything while still warm, spooning a generous portion of blueberry sauce over the french toast.


Recipe: Kristin's French Toast and Blueberry Sauce

Prep Time: 5 minutes   |   Cook Time: 10-20 minutes  |   Difficulty: Easy   |   Servings: 6-8

Ingredients

Blueberry Sauce
  • 1 pint fresh Blueberries
  • 2/3 cup Blueberry/Blackberry Juice blend (or similar)
  • 1/3 cup Orange Juice
  • 3 tbsp Sugar
  • 1 tbsp Vanilla

French Toast
  • 1 loaf French Bread, sliced approximately 1" thick
  • 4 Eggs, beaten
  • 3/4 cup Milk
  • 3 heaping tbsp Brown Sugar
  • 1 tsp Cinnamon
  • 1/2 tsp Nutmeg
  • 1 tsp Vanilla Extract
  • Pinch Salt

Instructions

Blueberry Sauce

Combine all ingredients in a small saucepan.  Bring to a boil.

Reduce heat and simmer 4-8 minutes until foam subsides.

Optional: Puree until smooth and strain.  Add 1/2 tbsp Corn Starch and simmer an additional 3-4 minutes to thicken.

Serve warm over French Toast.


French Toast

Crack eggs into a large mixing bowl and beat well.  Add milk and beat again to mix.

Add brown sugar, nutmeg, cinnamon, vanilla, and salt.  Mix well.  Mixture will not be smooth.

Immerse bread slices in egg mixture until well-soaked.

Cook slices at medium-low heat in a large skillet until golden brown, approximately 3 minutes per side.

Serve immediately with blueberry sauce and sausage or bacon.