Monday, November 21, 2011

Broccoli-Cheese Soup


If you've had it nowhere else, you've probably had Broccoli-Cheese Soup at Panera Bread.  Theirs is pretty tasty, particularly in a bread bowl.  Not that the bread bowl changes the flavor of the soup - it's just an added bonus that you get to devour a broccoli-cheese flavored breadbowl once the soup is gone.  This is quite in keeping with my general philosophy that soup and stews are best eaten with bread as an implement rather than silverware.

As it ends up, it's pretty easy to make broccoli-cheese soup at home, too - and it's quite a lot healthier than Panera's.  Give it a try!


It's a nice, vegetable-heavy cast of characters today.  Broccoli takes the forefront, in a broth of milk, cream, cheese, and chicken broth (vegetable broth or none at all is okay if you're going vegetarian).   Onion, salt, pepper, paprika, and nutmeg add a bit of flavor, and flour thickens things up nicely.


You've got a lot of vegetables to chop.  Start with the onion.


Then the broccoli!  It's hard to tell from the picture, but I contentedly included some stems as well.  The soup will simmer long enough to cook them thoroughly, so don't be afraid of a bit of stem with your florette.


Saute the onions with some butter in a large dutch oven or stock pot.  Use a bit more butter than you strictly need to keep the onions from sticking, as you'll need to give the flour something to mix with in a moment.


After 3-4 minutes of cooking, when the onions are becoming translucent, reduce the heat a bit and add the flour.  Stir for a bit and you'll end up with a truly unpleasant looking mixture.  Fear not.


Once the onions, butter, and flour are combined, it's time to get things simmering.  Add the milk, cream, chicken broth, and broccoli and simmer over medium-low heat for about a half hour.


That half-hour of simmering is the perfect chance to grate your cheese.  Yes, you could buy shredded cheese, but storebought shredded cheese generally comes with an extra helping of chemicals, and is covered in a starchy or pulpy coating to keep it from sticking - we don't need all that extra stuff.

So while everything simmers, bust out the grater and turn a block of cheese...


...into a pile of cheese.


After a half-hour of simmering, the flour from the onions will have thickened things up nicely, and the broccoli should be nice and tender.  Taste a piece (careful, it'll hold the heat like crazy!) to be sure it's at an edible texture - if not, give it another 10 minutes or so.


Once the broccoli is tender enough for your liking, mix the cheese in a bit at a time.


Once that's all mixed through, season to taste.  I like plenty of black pepper, a good amount of salt, some paprika, and just the barest dash of nutmeg.  Yes, nutmeg.  Trust me.


Give it a couple of minutes to make sure everything is melted and the flavors well-married, and it's time to eat!

If you're particularly picky about texture, you can give the finished soup a spin in the blender on puree until it's smoother.  This will result in a more Panera-esque soup, but also results in much smaller chunks of broccoli.  Personally, I just leave it alone and enjoy the rustic texture.


Recipe: Broccoli-Cheese Soup
Prep Time: 10 minutes | Cook Time: 40 minutes | Difficulty: Easy | Servings: 8-10

Ingredients
  • 4 Heads Broccoli, chopped
  • 1 large Sweet Onion, diced
  • 5 cups Milk
  • 1 cup Heavy Cream
  • 1/2 cup Chicken Broth
  • 1/2 cup Flour
  • 1/4 cup Butter
  • 12 oz. Grated Cheese (cheddar)
  • 1 tbsp Salt
  • 1 tbsp Black Pepper
  • 2 tsp Smoked Paprika
  • 1/2 tsp Nutmeg
Instructions
  1. Dice onion and chop broccoli into bite-sized pieces.
  2. In a large dutch oven over medium-high heat, saute onions with butter 4-5 minutes.  Reduce heat and add flour, stirring until combined.
  3. Add milk, cream, chicken broth, and broccoli.  Simmer over low heat 30 minutes until broccoli is tender.
  4. Slowly add grated cheese and seasonings.  Stir until cheese is melted.
  5. Optional: Puree to desired texture.
  6. Serve hot.

Sunday, November 13, 2011

Soy-Honey Chicken


This meal began as an attempt to replicate one of my favorite elements of Chinese take-out: Sesame Chicken.  And then, well...I sort of forgot about the "sesame" bit and ended up just making some tasty chicken.  Next time I'll put those poor, neglected sesame seeds in my cabinet to good use, I swear!  In the meantime, I'll just have to content myself with a tasty dish of lightly fried chicken breast and broccoli in sweet, tangy, and slightly-hot sauce.  Gee, life is tough.


Marinating is good.  I highly recommend it.  So long as you're not making this dish completely last-minute, make a quick marinade of soy sauce, sesame oil, white wine, sugar, salt, and pepper.


Marinade the chicken for at least an hour and you'll get extra-flavorful results.


Here's what you'll need for the sauce.  This is sort of a silly array of bottles, isn't it?  Clearly the sauce isn't exactly "from scratch."  However, this array of tasty, Asian ingredients (...and Ketchup) are all easy to find and mix into a really fantastic, sweet-tangy-hot sauce.


Mix together all of the sauce ingredients above with a bit of water in a small saucepan.  Bring to a boil, then reduce the heat and simmer over low until the sauce has reduced a bit.  Later, we'll cover everything in saucy tastiness.


Now back to that chicken!  The "breading" we'll fry in is a mixture of flour and cornstarch.  The cornstarch crisps up nicely, and the flour gives that classic golden-brown color.  It's a good pairing.


Drain off the excess marinade from the chicken, then toss it in the flour/cornstarch until coated. Set aside for a few minutes to make sure the coating will stick around.


In the meantime, it's the perfect opportunity to steam some broccoli!


Once you've rested the chicken for a few minutes, heat some oil in a wok or other high-walled pan. Don't use too much - just about a quarter-inch is more than plenty.


Now fry that chicken!  Use nice small batches, taking care not to overcrowd the pan.  A couple of minutes per side will result in wonderful, golden-brown color.


Once the chicken is golden-brown, carefully (carefully!) remove from the pan and transfer onto a plate covered in paper towels to absorb excess oil.  Keep frying chicken in small batches until it's all cooked.


And now, the grand combination!  Combine the broccoli, chicken, and sauce and mix well until everything is covered in deliciousness.


Serve hot over rice.  Devour promptly.


Recipe: Soy-Honey Chicken
Prep Time: 10 Minutes | Cook Time: 30 Minutes | Difficulty: Medium | Servings: 6-8

Ingredients
Chicken
  • 1 1/2 lbs Chicken Breast
  • 1/4 cup Flour
  • 2 tbsp Cornstarch
Marinade
  • 1 tbsp Soy Sauce
  • 2 tbsp White Wine
  • 2 tsp Sesame Oil
  • 1 tbsp White Sugar
  • Salt and Pepper to Taste
Sauce
  • 3 crowns Broccoli
  • 1/4 cup Chili Sauce
  • 2 tbsp Honey
  • 2 tbsp Ketchup
  • 1 tbsp Oyster Sauce
  • 1-2 tbsp Sriracha hot sauce (to taste)
  • 1/2 cup Water
Instructions
Chop chicken into bite-sized pieces.  

Combine all marinade ingredients in a gallon zip-loc bag.  Add chicken and marinade at least 1 hour.

Combine all sauce ingredients in a small saucepan.  Bring to boil, then simmer over low heat 10 minutes or until reduced slightly.

Dredge chicken in flour and cornstarch.  Set aside 2-3 minutes.

Chop broccoli into bite-sized florettes.  Steam until tender.

Heat 1/4 inch of frying oil in wok over medium-high heat.  Fry chicken approx. 2 minutes per side until golden brown.  Remove and pat dry on paper towels.

Combine chicken, broccoli, and sauce and mix thoroughly.

Serve hot over steamed rice.


Sunday, November 6, 2011

Goat-Cheese Meatballs


Is there anything more comforting than good, traditional Italian food?  Pasta isn't just an easy, standby meal - it can be a treat with just a bit of effort.  I like to fit some protein into my pasta meals, and what better way to do it than with meatballs?  Now there's nothing wrong with a standard, run of the mill meatball - but this week,  I was looking for a way to take things up a notch.  I pawed through the kitchen for something interesting to add, and realized that we had some goat cheese.  Inspiration!

At first, I considered trying to stuff each meatball with a cheesy center, but there wasn't enough goat cheese for that.  Still, it worked fantastically well crumbled up and added right to the mixture.  The whole meal took on that earthy flavor, and most bites were punctuated by a touch of creamy, fluffy cheese.  It was really a nice spin on a meatball, and one that I think I'll make again in the future.


Our meatball ingredients are more or less what you'd expect.  No fancy beef/pork/sausage mixtures here - I just stick to ground beef, mixed with eggs, breadcrumbs, milk, onion, and good Italian seasonings like Thyme, Basil, Oregano, Rosemary, Garlic, and a bit of Coriander.  The goat cheese adds some interest.  And, of course, you'll need some pasta to serve it over and plenty of sauce for simmering.


Meatballs are pleasantly straightforward.  Step one: combine everything but the cheese.  You'll have to dice the onion first, of course, but everything else can be more or less dumped into a large mixing bowl and mashed together.  Use your hands to mix it up well, don't be a chicken.  If it's too wet, add some more breadcrumbs.  If too dry, a bit more milk.


Now crumble up your goat cheese into pieces small enough to distribute well through the meatballs.  I aimed for roughly pea-sized, with some ranging slightly larger and smaller according to the whims of the cheese.


Combine the cheese with the rest of the mixture, again by hand.  Mix gently, as you don't want to pulverize the cheese.  The whole point is to have nice, cheesy bites, so you need those chunks to be relatively intact.


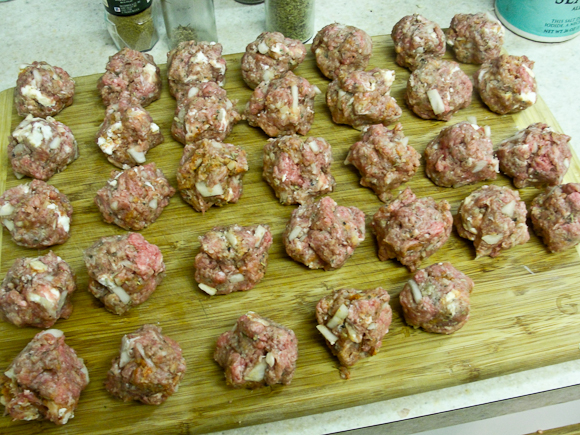
It's time: shape that mixture into some actual meatballs!  You can use an ice-cream scoop if you like, but I prefer to keep going by hand, aiming for 1 1/2 to 2 inches per meatball.  This recipe will make a lot of them.


Now into the sauce!  Most meatball recipes have you fry the meatballs first, but that's really not my preferred method.  They tend to cook unevenly or dry out that way.  Simmered in the sauce, they'll cook evenly and stay moist.  Perhaps best of all, they'll also lend a fantastic meatiness to the sauce itself.


After about 25 or 30 minutes, your meatballs will be cooked and your sauce will be transformed.  Even the jarred sauce that I used for this meal took on a much different texture and a really pleasant heartiness from the meat and cheese simmered into it.

The one real downside of cooking your meatballs in the sauce is that it makes it nigh impossible to finish the pasta itself in a pan with sauce, as is ideal.  This, however, is not the end of the world.  You'll be too busy devouring meatballs to really notice.


And that's it!  Serve hot over your pasta of choice.  Garlic bread would not go amiss as an accompaniment.


Recipe: Goat Cheese Meatballs
Prep Time: 15 Minutes | Cook Time: 30 Minutes | Difficulty: Easy | Servings: 10-12

Ingredients
  • 1 1/2 to 2 lbs Ground Beef
  • 2 Eggs
  • 1 Onion, diced
  • 4 oz. Goat Cheese
  • 1/2 cup Bread Crumbs (pref. Panko)
  • 1/2 cup Milk
  • 1 box Pasta
  • 1 family-size or 2 large jars Pasta Sauce
  • 2 tsp Oregano
  • 2 tsp Garlic Powder
  • 1 tsp Rosemary
  • 1 tsp Basil
  • 1 tsp Thyme
  • 1/2 tsp Coriander
  • Salt and Pepper to taste

Instructions

Simmer pasta sauce in a large pot over medium-low heat.

In a large mixing bowl, combine ground beef, diced onion, milk, breadcrumbs, eggs, and seasonings.  Mix well by hand.

Crumble goat-cheese into pea-sized pieces.  Incorporate gently into beef mixture.

Shape mixture into 1 1/2 to 2 inch balls.  Add to simmering sauce.

Cook meatballs 25-30 minutes in sauce.

Serve hot over pasta.  Top with Parmesan Cheese to taste.


Saturday, October 29, 2011

Ham and Broccoli Pasta in Herbed Mustard-Butter


For almost the past two years, I've been laboring under a false, tragic assumption.  Somehow, I decided that Kristin doesn't like ham.  Ham!  She loves bacon, she enjoys pork - I don't know why I thought she wouldn't like ham.  As a result, I always refrained from making this dish.  It ends up Kristin is a big ham fan, and I'm a big dummy.  Oops.  The good news is I got a chance to make mom's Ham and Broccoli Pasta again!

This is another adaptation of a childhood favorite.  I don't think there's much like it out there in the world.  Ham and pasta don't often appear together in one dish, let alone covered in a mustard sauce, but this is so, so good. It could be done with chicken, I suppose, but that's just not The Way Mom Did It.  And that way is what's worth reproducing.


It's a pretty simple set of ingredients.  The basics are thick-cut ham, broccoli, and pasta.  The rest goes into the herbed mustard-butter that holds it all together: butter, garlic, shallots, mustard, salt, pepper, and herbs.  I used a lovely blend from Chicago's "Spice House" composed of tarragon, chervil, basil, dill, chives, and white pepper.  Any or all of those would do nicely.  My shallots also came from Spice House in freeze-dried form - they're also quite nice to have on hand, as they reconstitute in water in 10 minutes.


First, chop the broccoli into bite-sized florettes.


Funny story: I lost my steamer.  Who loses a steamer?  This guy.  I ended up boiling my poor broccoli after searching for that steamer for a good 15 minutes.  Kristin promptly found it for me in about 10 seconds of searching after I told her what happened.  Oops.

Assuming you haven't also lost your steamer, you should steam your broccoli.  Boiling works in a pinch.

Speaking of boiling - boil some water and cook your pasta.


While the broccoli is steaming and the pasta is cooking, chop your ham down into bite-sized pieces, then set it aside.  Covering it in tiny pieces of broccoli is optional.


Soften the butter, then combine the softened butter with minced garlic and shallots, mustard, and plenty of herbs.  If your mustard has a lot of bite to it, a little brown sugar can help keep things pleasant.  I used a honey mustard, so that wasn't particularly necessary.  Mix well with a fork, and adjust ingredients to taste.  You should taste plenty of mustard and herb flavor, as this will flavor the entire dish.


Right around the point that you finish the mustard-butter, the pasta and broccoli should both be done cooking.  Combine everything in a sufficiently large pot - the pasta pot should do.


Now spoon in some of that butter mixture.  Start with about half, mix well, and taste.  If you like it quite subtle, that will probably do the trick.  If, like me, you want plenty of bold, mustardy flavor, you'll end up adding the rest after a taste.


Mix again if you added more mustard-butter, and you're ready to serve.  Be ready to offer seconds.


Recipe: Ham and Broccoli Pasta in Herbed Mustard-Butter
Prep Time: 5 Minutes | Cook Time: 20 Minutes | Difficulty: Easy | Servings: 6-8

Ingredients
  • 1/2 cup Butter
  • 3 tbsp Herbs (dill, chervil, basil, chives, tarragon, white pepper)
  • 1/4 cup Mustard
  • 1 Shallot, diced
  • 1 Clove garlic, diced
  • Salt and Pepper to Taste
  • 1 lb Ham
  • 16 oz Bowtie Pasta
  • 3-4 crowns Broccoli
Instructions

Cook pasta according to package directions.

Soften butter and combine first 6 ingredients (butter through salt and pepper) in a small bowl.  Adjust ingredients to taste.

Chop broccoli into bite-sized florettes and steam until tender.

Dice ham into bite-sized pieces and set aside.

Combine cooked pasta, steamed broccoli, and ham in a large pot.  Add half of mustard-butter and mix well.  Taste and add additional mustard-butter as needed.

Serve hot.