Showing posts with label nuts. Show all posts

Saturday, February 1, 2014

Apple Nut Pull-Apart Loaf

Kristin here. That's right. I'm taking over. Now take a seat, say good-bye to your extra calories, and get ready for one of the tastiest (and easiest) breakfasts in existence.

When I was very little, I wanted to help out in the kitchen. Unfortunately I was terrified of the oven, the stove, and knives. This was one of the first meals that my mom ever taught me that I was able to help with. Eventually I grew out of my fear and realized that this breakfast is so easy that I could sneak downstairs and make it for holidays like Mother's Day and Father's Day. This morning, I made it for the holiday commonly known as Saturday. Note: This is not the exact recipe my mom sent me. There was a pan that we had that was specifically for this recipe that Alex and I don't own. That, and I have a really hard time baking without brown sugar, so I just had to throw that in.

Preheat your oven to 400 degrees, and grease your bundt pan.

Here are your ingredients.


You see those apples? You see that I have three- count them - three apples? You do NOT need three apples. Even if they're kind of on the smallish side. You might be in the produce section, looking at the apples, thinking to yourself, "I could totally fit three apples into this." You can't. You won't. You will end up eating at least one, perhaps one and a half of the apples. That's not necessarily a bad thing, but you definitely don't need three for this recipe.

What you do need is a can of biscuits, sugar, brown sugar, cinnamon, butter or margarine, apples, raisins, and nuts. And probably a cup of coffee. It's early, and you deserve it. 


Take the biscuits out of their package (this recipe becomes very difficult if you skip this step) and tear them in half. Don't worry about cutting them perfectly, just use your hands and eyeball it. 


Then roll the biscuit halves into balls. 


I started with eight biscuits, so now I have sixteen dough balls. 


Melt two tablespoons on butter or margarine. I used margarine today, but they both work well.  Then mix the sugars and cinnamon. 

The original recipe calls for six tablespoons of white sugar, but I have a really hard time baking something without brown sugar. I only used three tablespoons of white sugar and then I threw in three tablespoons of brown sugar. Because I'm a rebel like that. Also, a teaspoon and a half of cinnamon gets mixed in there.


Roll the dough balls in the melted butter or margarine. 


Then roll them in the sugars and cinnamon. Previously when I made this, I would get a lot of cinnamon and sugar into the butter because it gets all over your hands. Today I realized that if I only buttered with my right hand, and only sugared with my left hand, the butter didn't get sugared. I'm pretty sure it doesn't make a difference, but I felt better about myself. That's what's important, right?  Important note: Save the leftover sugar and cinnamon!!


Put the lovely little dough ball into your greased bundt pan. Oh, but he's lonely. Let's get him some friends.  


What a lovely ring of dough balls! Now they are all friends, nice and cozy in your pan.


Glamor shot. They look like you could just eat them now, but don't. Raw biscuit dough is gross. 


After peeling and coring my apples, I pulled out my faux-mandoline. Apparently it isn't a real mandoline because it doesn't juilienne, but I still love it. 


My knife skills are very weak, so it's really nice to have a gadget that helps me get such nice, consistent slices. The slices should be a little on the thin side so that they can get nice and tender while they bake, but not so thin that they just disintegrate. 


In the original recipe, it calls for apples between each biscuit and along the outside of the pan. What you see here is a result of me having too many apples. Honestly though, if you have a space where an apple slice can go, put an apple slice there. You won't regret it later.


 Remember that cinnamon and sugar that you saved earlier? Now you get to mix it up with the two tablespoons of raisins and three tablespoons of chopped nuts. I used to be able to find mixed chopped nuts and that was delicious, but we couldn't find that at the store. I went with chopped walnuts and it worked well. Pick your favorite, be adventurous, it will probably work out. Attempt to resist just sitting down and eating this with a spoon. Please believe me when I say that it will be worth it.


Sprinkle the nuts and raisin mixture over the dough and apples. 


 It's just. So. Beautiful. Now pop that beauty in the oven for about 25-30 minutes.


Remember that cup of coffee? If you have a chance to photograph it artfully in front of the gently falling snow, it will really add a richness to the flavor. If you can't, well, you'll just have to make do. 


After only fifteen minutes your kitchen will smell amazing, but it won't even be close to done! Now close your oven and let it get back to baking.


The final result! I called it done after about 28 minutes. The apples on the outside looked a little overdone, but they were beautifully caramelized and very tasty. The most important thing was that the dough was cooked through.


I will admit it, it's not the prettiest looking thing. 


It's probably not going to win any beauty awards. 


But I still maintain that it's one of the tastiest breakfasts that you could make. And besides, if it's easy enough for a ten year old with, essentially, a fear of kitchen, then it's easy enough for anyone. 


Fun fact: When you don't blog in almost a year, the light box gets very wrinkly. Also, kitties think that it's a box for them to play in.


Posey was pretty sure the wrinkles were there to attack. 


Kitties be crazy. 


So anyway. back to breakfast. This is what Alex's plate looked like about thirty seconds after I asked him to taste test it for me.


Easy to make, wonderful to eat, I hope you enjoy this as much as I do!

Recipe: Apple Nut Pull-Apart Loaf
Prep Time: 45-60 Minutes | Cook Time: 25-30 Minutes | Difficulty: Easy | Servings: 4-6

Ingredients


  • 1 can Refrigerated Buttermilk Biscuits
  • 3 tbsp Sugar
  • 3 tbsp Brown Sugar
  • 1 1/2 tsp Cinnamon
  • 2 tbsp Butter or Margarine, melted
  • 2 small Apples or 1 medium Apple, peeled, cored, and thinly sliced
  • 3 tbsp Chopped Nuts
  • 2 tbsp Raisins

Instructions

  1. Preheat oven to 400°F. Separate biscuits in half and roll into balls.
  2. Mix sugars and cinnamon.
  3. Dip dough balls into butter, then roll in sugar and cinnamon mixture.
  4. Arrange sugared biscuit balls into bundt pan.
  5. Place an apple slice between each biscuit ball, and around the outer and inner edges of the pan.
  6. Mix nuts, raisins, and leftover sugar and cinnamon. Sprinkle over the biscuits and apples.
  7. Bake 25 to 30 minutes until golden brown.

Sunday, August 12, 2012

Broccoli Ramen Salad


Summertime demands some fresh, light, flavorful side dishes.  It can be tough to make cold food interesting, and especially to make raw food interesting, but this little salad really does the trick.  It's lightning fast to put together, super flavorful, and not at all heavy - we were so happy to have it when the temperature soared over 100 degrees for so much of this summer.

I'm no fan of prepackaged ramen noodles, but they really add life to this salad.  They soften just a bit in the tangy dressing, making for a nice textural counterpoint to the crunchy nuts and crisp vegetables, but they never end up too soft.  This recipe is also immensely easy to customize - a dash of soy sauce and ginger lend it an Asian flair, or some lime and cilantro make it an easy complement for Mexican food.  Whenever you need something tasty, cool, and easy in the heat, give this salad a try.


Here's what you'll need: A large package a broccoli slaw, two packages of chicken flavored ramen, a bunch of green onions, unsalted roasted peanuts and sunflower seeds, apple cider vinegar, vegetable oil, and a bit of white sugar.


First, make the dressing by whisking together vegetable oil, cider vinegar, sugar, and one ramen seasoning packet (just one, otherwise things get too salty and gross).


Next, chop down the green onions and crush up the ramen noodles into small pieces.  Don't worry about keeping things too uniform.

This process can sometimes involve tiny noodle pieces flying all around the kitchen.  This is immensely entertaining to the cat, but maybe less so to whoever has to clean it up - consider crushing the noodles in a bag or a bowl to minimize projectiles.


Now mix everything but the peanuts and sunflower seeds together in a large bowl, add the dressing, and give it a good stir.  You can serve right away if necessary, but the flavors really improve with an hour or two in the fridge.


Serve the salad up cold, and garnish with peanuts and sunflower seeds right when it's time to eat.  If you're bringing the salad elsewhere, like to a pot luck, it's fine to add the nuts before you leave - they can make it several hours before getting soggy.  If you expect leftovers or are just eating at home, though, you'll want to add nuts to individual portions.


Recipe: Broccoli Ramen Salad
Prep Time: 10 Minutes | Cook Time: None | Difficulty: Easy | Servings: 10-12

Ingredients
  • 1 large (16-20 oz) package Broccoli Slaw
  • 2 packages chicken flavored Ramen Noodles
  • 1 bunch Green Onions, chopped
  • 1/2 cup Unsalted Roasted Peanuts
  • 1/2 cup Unsalted Roasted Sunflower Seeds
  • 1/4 cup White Sugar
  • 1/4 cup Vegetable Oil
  • 1/3 cup Cider Vinegar
Instructions
  1. Whisk together vegetable oil, cider vinegar, sugar, and one ramen seasoning packet to create dressing.
  2. Finely chop green onions and break down ramen noodles into small pieces.
  3. In a large bowl, combine broccoli slaw, green onions, and broken ramen noodles.  Pour dressing over mixture and toss to coat.
  4. Refrigerate to chill - ideally 1-2 hours to enhance flavor.
  5. Top with peanuts and sunflower seeds just before serving.  Serve cold.

Sunday, February 5, 2012

Strawberry Cream-Cheese Danish


There was a time in my life when I didn't understand the point of a danish.  "Why eat this strange thing when I could just have a donut", I wondered.  I was a troubled youth.  I've since come to my senses and discovered just how pleasant a good danish can be, especially still warm from the oven.  Kristin and I have worked this recipe through a few permutations and several different fillings, and every time it's tasted utterly fantastic.  It's not the prettiest thing in the world, but really, isn't it what's inside that counts?  In this case, what counts is cream cheese and strawberry preserves.  Yum.


I'm separating the ingredients into three sets: the dough, the cream-cheese mixture, and the frosting.  For the dough, you'll need milk, flour, baking soda, salt, butter, and almond extract.  Preserves of your choice will top the dough and form the center of the danish.  We used strawberry preserves this time around, and have also particularly liked blueberry in the past.  I imagine just about anything would be tasty.


The cream-cheese mixture is a simple blend of cream cheese, an egg, a bit of white sugar, and a splash of vanilla.


The frosting is also quite simple: powdered sugar, just enough milk to liquify the sugar, and a tiny dash of both vanilla and almond extracts.  Topping everything off with toasted almonds is optional, but highly recommended.


We'll start with the dough.  Combine the dry ingredients in a large mixing bowl, then work in the softened butter.  The texture will resemble a cake mix - slightly lumpy and powdery.

While your hands are still relatively un-messy, you'll also want to pre-heat the oven to 425 degrees.


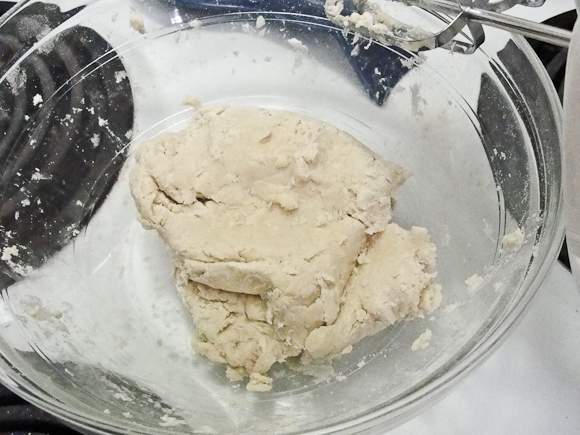
Add the milk and almond extract and mix well.  Press by hand until you've formed a loose, rough-textured dough.  Take care not to overwork it or the pastry may become tough.


Press the dough between sheets of wax paper and roll into a thick rectangle, about 12 inches by 8 inches.    Leave it here for a moment while we put together the filling.


Beat the cream cheese until it's soft and relatively smooth, then add the sugar, egg, and vanilla.  Beat again until smooth and creamy.


Time to assemble!  Place the pastry dough on a greased baking sheet, and mark out the dough lengthwise into thirds.  Spread a thick layer of preserves down the center of the middle third - try to keep it no more than 1 1/2 inches wide.


Add thick layers of the cream cheese mixture on either side of the preserves.  Try to leave a little peek of the preserves in the very center if possible for presentation's sake, though as you can tell, sometimes that's not easy to do.


Cut the outer thirds of the dough at a slight angle into strips about an inch wide.


Fold those strips up across the filled center of the dough.  They probably won't quite meet in the center.  Bake your assembled danish 12-15 minutes at 425 until the pastry is golden-brown.


In the meantime, toast up some almonds for the top.  Also, mix together the frosting using 1/2 cup powdered sugar, 1 tbsp milk, and a tiny dash of vanilla and almond extracts.  Whisk together with a fork until smooth.


When your danish is done baking, drizzle the frosting over the top and cover with toasted almonds.


Serve warm, one inch-wide slice at a time - but expect to go back for seconds.


Recipe: Strawberry Cream-Cheese Danish
Prep Time: 15-20 Minutes | Cook Time: 12-15 Minutes | Difficulty: Medium | Servings: 10-12 Slices

Ingredients
Pastry
  • 2 cups All-Purpose Flour
  • 1/2 cup unsalted Butter
  • 1/2 cup Milk
  • 1 tsp Baking Powder
  • 1/2 tsp Almond Extract
  • 1/2 tsp Salt
Filling
  • 1/2 cup Strawberry Preserves
  • 8 ounces Cream Cheese
  • 1/4 cup White Sugar
  • 1 Egg
  • 1/2 tsp Vanilla Extract
Frosting
  • 1/2 cup Powdered Sugar
  • 1 tbsp Milk
  • 1/8 tsp Vanilla Extract
  • 1/8 tsp Almond Extract
  • 2 tbsp Toasted Slivered Almonds

Instructions
  1. Pre-heat oven to 425 degrees.
  2. In a large mixing bowl, combine flour, baking powder, rand salt.  Add softened butter, milk, and almond extract, and mix well.  Press together by hand until a loose dough is formed.  The texture will be rough.
  3. In another mixing bowl, beat cream cheese until smooth.  Add sugar, egg, and vanilla and beat until combined and creamy.
  4. Press dough between two sheets of wax paper and roll into a large rectangle, roughly 8 by 12 inches. Discard wax paper and place dough on a greased baking sheet.
  5. Mark the dough out by thirds lengthwise.  Spread preserves down the center of the middle third, then add cream cheese mixture on either side of preserves.
  6. Cut the outer thirds of the dough into strips roughly 1-inch wide.  Fold strips over across the center.
  7. Bake at 425° 12-15 minutes until pastry is golden-brown.  Toast almonds while danish bakes.
  8. In a small mixing bowl, combine 1/2 cup powdered sugar, 1 tbsp milk, 1/8 tsp vanilla and almond extracts and whisk together with a fork to create frosting.
  9. Drizzle frosting over baked danish, and cover with toasted almonds.  Serve warm.