Monday, October 1, 2012

Pickled Hot Peppers


Pickling is pretty cool.  You take some food, throw it in something nice and acidic, and after a while the taste is transformed and your food will last way longer.  Neat!  I'm not the hugest fan of traditional pickles, but you can pickle lots of things, and pickled peppers are particularly tasty.  Kristin and I have eaten these peppers on Italian beef and hamburgers recently, and both have been really fantastic.  We've got half of a batch still in the fridge right now, and they'll likely go on some nachos later in the week.  If you haven't already, try some pickling.


Here's what I used for this batch of pickles: jalapeno peppers, poblano peppers, anaheim peppers, hungarian peppers, shallots, garlic, thyme, cider vinegar, salt, and sugar.  You can vary the peppers and veggies as you see fit - I went for a nice mix of milder and hotter peppers and it made for a nice heat level that's definitely noticeable, but doesn't take over the whole dish.  If you want things milder, you can include some regular belle peppers.  If you like it spicier, add some hotter peppers - the sky is the limit.


Start by chopping all of the vegetables.  I like to chop things fairly rough so that the finished product has a nice, firm texture with plenty of bite.


Once things are chopped, combine the vinegar, salt, sugar, and thyme in a saucepan.  Bring the contents to a boil, stir well to make sure that all of the sugar is absorbed, and remove your pan from the heat.


Once the brine in the saucepan has cooled a bit, add the chopped vegetables.  Let this sit until the whole mixture is room temperature.


When everything is cool, transfer the vegetables and brine into jars or your storage medium of choice.  Kristin and I intend to go through these fairly quickly, so we're not bothering with a long-term canning process.  If you want to make larger batches or save these longer, be sure to use safe and sterile processes.  For our purposes, we just re-used some well-scrubbed pasta sauce jars and plan to eat the pickles expediently.


Throw your jars into the fridge for at least 6 hours, then open them up and invent as many ways to eat these as possible.

These really may be my new favorite condiment.  We've made a couple of batches already as we keep on thinking of new ways to use them - I imagine there will only be more variations and more applications to come.  If you make these or something like them, leave a comment and let me know how it went and how you used them!


Recipe: Pickled Hot Peppers
Prep Time: 15 Minutes Hands-On + 6 Hours Refrigeration | Cook Time: 5 Minutes | Difficulty: Easy

Ingredients

  • 5 Jalapeno Peppers
  • 3 Anaheim Peppers
  • 3 Poblano Peppers
  • 3 Hungarian Peppers
  • 2 Shallots,
  • 3 cloves Garlic
  • 1/2 cup White Sugar
  • 2 cups Apple Cider Vinegar
  • 2 tsp Thyme
  • 2 tsp Salt 

Instructions
  1. Chop peppers and shallots and mince garlic.
  2. In a medium saucepan, combine vinegar, thyme, salt, and sugar.  Bring to a boil over medium-high heat and stir to dissolve sugar.  Remove from heat and let cool several minutes.
  3. Add chopped vegetables to saucepan and rest until completely cooled.
  4. Transfer vegetables and brine to glass jars.  Seal lids and refrigerate at least 6 hours.  Use sterile canning processes if storing pickles longer than 10 days. 

Sunday, September 16, 2012

Roasted Broccoli and Cauliflower


Roasting can be an unsung hero among cooking methods.  It's not flashy or noisy, it's simple.  It's not fiddly or complex, it's easy.  All you need is plenty of heat and plenty of time.  This week I roasted some broccoli and cauliflower, veggies that I would usually just steam.  Roasting took longer, but the flavors and texture were leaps and bounds more interesting than my usual methods.  This makes for a side that can stand up to just about anything, but without becoming too heavy or overpowering itself.


The ingredients this week are simple and inexpensive.  Here's what you'll need: broccoli, cauliflower, a lemon, a few cloves of garlic, some olive oil, salt and pepper, and a bit of Parmesan to sprinkle on top if you're so inclined.


There's lots of chopping to do.  Break down the broccoli and cauliflower into florettes, leaving a couple of inches of stalk.  Also mince the garlic and zest the lemon.


Throw everything you just chopped and zested into a large bowl.  Drizzle the mixture with olive oil and the juice from the lemon, then sprinkle with salt and black pepper.  Stir it around a bit and let it sit for 10 or 15 minutes.  Pre-heat the oven to 425 while you wait.


After you've waited 10 or 15 minutes, give the veggie mixture another good stir, then pour it out into a single layer on a greased sheet pan.


Roast in the oven at 425 degrees for 25-35 minutes, turning halfway, until the vegetables are nicely brown and tender enough to pierce easily with a fork.  These actually went back in a little longer after this shot, because I like mine quite crispy.  Don't fret if you end up with some really, really dark pieces - they may look burnt, but they're probably the tastiest ones.


Serve hot with a sprinkle of Parmesan cheese if you so desire.


Recipe: Roasted Broccoli and Cauliflower
Prep Time: 5 Minutes | Cook Time: 25-35 Minutes | Difficulty: Easy | Servings: 4-6

Ingredients

  • 1-2 pounds fresh Broccoli
  • 1 head fresh Cauliflower
  • 1 lemon
  • 3-4 tbsp Olive Oil
  • 4 cloves Garlic
  • Salt and Pepper to taste
  • Optional: Grated Parmesan Cheese
Instructions
  1. Pre-heat oven to 425 degrees.
  2. Chop broccoli and cauliflower into florettes with 1-2 inches of stalk.
  3. Mince garlic and zest lemon.  Add to large mixing  bowl with broccoli and cauliflower.
  4. Drizzle olive oil over contents of bowl.  Add lemon juice, salt, and pepper and stir to mix.  Let sit 10-15 minutes.
  5. Arrange vegetable mixture in a single layer on a greased baking sheet.
  6. Roast vegetables 25-35 minutes, turning halfway, until well-browned and tender enough to pierce easily with a fork.
  7. Serve hot with a sprinkle of Parmesan cheese if desired.

Sunday, September 9, 2012

Moo Shu Pork


Here are some things that are delicious:
  1. Pork
  2. Sauteed vegetables
  3. Mushrooms
  4. Eggs
  5. Hoi sin sauce

Conveniently enough, the items on this list can be combined to become something even more than the sum of its parts: Moo Shu Pork.  It's one of my dad's favorite dishes when we go for Chinese food, and for good reason.  When you take that pork mixture and wrap it up in a pancake with plenty of sweet-spicy Hoi Sin sauce...oh man.  Good things happen.  My Moo Shu may never quite stand up to the stuff we got from our favorite Chinese place growing up, but it's a pretty tasty alternative to make at home.  


Here's what you'll need: pork tenderloin, shredded cabbage, bean sprouts, shiitake mushrooms, green onions, eggs, hoi sin sauce, sesame oil, soy sauce, cornstarch, garlic, sake or rice wine vinegar, and some pancakes.

Your local grocery store may or may not have exactly what you would like - in my case, my pancakes are just flour tortillas, but many stores do sell pancakes specifically meant for moo shu and peking duck in the Asian food section.  It's also perfectly effective to shred cabbage yourself rather than grabbing cole-slaw mix, but I was in a weeknight hurry and the shredded stuff worked just fine.


First, chop the tenderloin into small strips.  Throw it in a bowl or ziploc bag with some soy sauce, sesame oil, a bit of sake or rice wine vinegar, and some corn starch.  Give it a good mixing, and let it sit for at least a half-hour.


While the pork is marinating, you can start in on the other components.  First, heat up a bit of oil and add your lightly-beaten eggs to the pan once it's hot.  Let the eggs set over medium heat, then flip the whole sheet and cook for just another minute or so.  Pull the eggs out of the pan, chop the sheet into small pieces, and set the eggs aside for later.


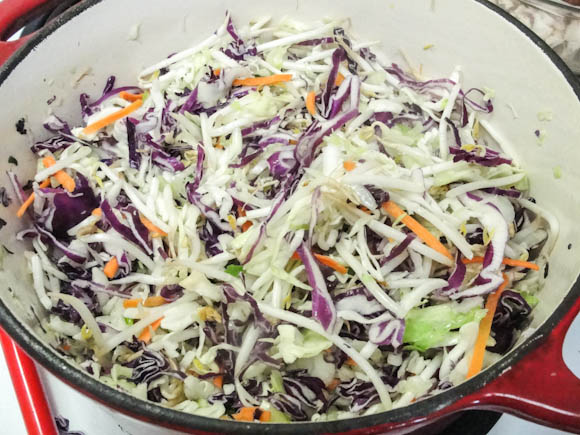
Add a bit more oil to your pan, then add your minced garlic and chopped green onions.  Saute just for a minute or so - be careful not to overcook - then add the shredded cabbage and bean sprouts.  At this point, it should be clear why I'm using a dutch oven rather than just a skillet: I'm making a whole lot of moo shu, and all that cabbage takes up lots of space.


Throw in a bit of sake or rice wine vinegar, since cabbage loves a touch of acid.  Let the veggies cook over medium heat, stirring often, until they're slightly wilted but still plenty crunchy.  The volume in the pan should reduce by about half.  Pull out the veggies and set them aside for later.


Add a bit more oil to the pan and bring the heat back up to medium-high.  Chop up your mushrooms, and saute them with the pork, marinade and all, until the pork is just barely cooked.  Do this in batches to make sure that the pan isn't too overcrowded.


Once your last batch of pork is done, the bottom of your pan will be covered in deep brown, flavorful porky goodness.  Don't let it go to waste!  Deglaze with some sake and soy sauce, scraping the bottom of the pan to mix in the porky goodness.  This will have the pleasant side effect of smelling divine.  Inhale deeply.


When you've got the pan nicely deglazed, bring back all of the elements that have been sitting and waiting so patiently on the side - the eggs, the veggies, and the pork mixture.  Mix well, and sample to see what flavors need adjusting.  Add more soy, sesame, or salt as you see fit.  Don't forget, this mixture doesn't need to do all of the heavy flavor-lifting - there's delicious hoi sin sauce to come, as well.


When you're ready to assemble, smear the center of a pancake with a generous amount of hoi sin, then spoon on plenty of the filling.  The filling retains a lot of liquid, so be careful, these can get messy fast - it wouldn't hurt to assemble using a slotted spoon.  Fold up your moo shu like a burrito, and you're ready to eat!

After writing this post, so am I.  Good thing we still have plenty of moo shu leftovers in the fridge.


Recipe: Moo Shu Pork
Prep Time: 30 Minutes | Cook Time: 30 Minutes | Difficulty: Easy | Servings: 12-16

Ingredients
  • 2-3 pounds Pork Tenderloin
  • 1 large bag (14 oz) Cole Slaw mix
  • 1 bag (8 oz) shredded Red Cabbage
  • 8 oz. Shiitake Mushrooms
  • 3 Eggs, lightly beaten
  • 1 bunch Green Onions
  • 1/4 cup Soy Sauce
  • 2 tsp Sesame Oil
  • 3 tsp Cornstarch
  • 1 cup Sake wine
  • 4 cloves Garlic, minced
  • 1 jar Hoi Sin sauce
  • Moo Shu pancakes (or tortillas)
Instructions
  1. Cut pork into thin strips.  Add to large bowl or ziploc bag with 2-3 tbsp soy sauce, 1 tsp sesame oil, a splash of Sake, and 2 tsp cornstarch.  Mix well and let sit at least 30 minutes.
  2. In a large pan or dutch oven over medium heat, cook lightly beaten eggs in a small amount of oil until barely set.  Flip and cook an additional minute.  Remove from pan and slice into small pieces.  Set aside.
  3. Saute minced garlic and chopped green onions in a tablespoon of oil over medium-high heat for about one minute.  Add cole slaw mix, red cabbage, bean sprouts, and sake. Cook over medium heat until vegetables are slightly wilted but still crispy.  Volume will reduce by about half.  Remove vegetables and set aside.
  4. Saute pork and chopped mushrooms in small batches with marinade over medium-high heat until pork is just cooked.
  5. After last batch of pork is finished, deglaze pan with sake and soy sauce.
  6. Return all ingredients set aside to the pan and mix well.  Taste and adjust seasonings as necessary.
  7. To assemble, spread a generous amount of hoi sin sauce onto a pancake, then add several spoonfuls of Moo Shu filling.  Roll burrito-style and serve warm.

Sunday, August 19, 2012

Rice Cooker Jambalaya


I received a rice cooker as a birthday gift several weeks ago - a gadget I'd been wanting for a while.  Not only will it make cooking rice much easier, but most rice cookers now also double as steamers and can cook a whole range of things.  I got my first use out of my new toy this week, making a big pot of jambalaya.

I searched around for recipes, and a few suggested that one could just dump all of the ingredients into the pot, hit "cook," and call it a day.  I wasn't quite that brave, so I did some pan cooking to prep the ingredients, but the rice cooker did the great share of the work - and did so admirably.  This meal ended up great - rich and meaty and flavorful and spicy.  It was a great use for a new gadget and a meal I'll definitely make again.


Here's what I used: medium-grain rice, shrimp, kielbasa sausage (not pictured - oops!), sweet onion, green peppers, garlic, chicken broth, crushed tomatoes, worcestershire sauce, cajun seasoning, salt, and pepper.

You can use just about any protein you like - I used shrimp and kielbasa, but you could use just one or the other.  Chicken and andouille sausage are also fairly common in jambalaya and worth considering.


First, chop up the vegetables.  I like a fairly large, rough chop on the onion and bell pepper to make sure that they maintain just a bit of crunch in the mixture.

Many jambalaya recipes also involve celery.  Kristin and I aren't celery fans, but if you are, feel free to chop some up and add it into the mix.


Saute the onion, bell pepper, and garlic over medium heat until they're just a bit tender and the onions are starting to get translucent.  Don't overcook them, as they'll cook a bit more in with the rice.


In the rice cooker, combine the rice, crushed tomatoes, chicken broth, worcestershire sauce, the sauted vegetables, plenty of cajun seasoning, and some salt and pepper.  Turn it on to cook and it will let you know when it's done.  You may need to add some more liquid and set it back to cook a bit longer after the first time the cooker stops cooking - taste and make sure the texture is to your liking.


While the rice cooker does its magic, give the shrimp and sausage a quick chop, then throw them into a pan together with a dash of seasoning and saute just until the shrimp are evenly pink - don't overcook the shrimp or they'll get tough.


When the rice cooker is finished, stir in the shrimp and sausage, taste to check and adjust the seasoning, and serve up some hot jambalaya!


Recipe: Rice Cooker Jambalaya
Prep Time: 10 Minutes | Cook Time: 1 Hour | Difficulty: Easy | Servings: 10-12

Ingredients

  • 3 cups medium grain White Rice
  • 1 pound Shrimp
  • 1-2 pounds Kielbasa Sausage
  • 1 large Sweet Onion
  • 2-3 medium Green Bell Peppers
  • 2-4 cloves Garlic
  • 1 large can (28 oz) Crushed Tomatoes
  • 2 cans low-sodium Chicken Broth
  • 2 tbsp Worcestershire Sauce
  • 3 tbsp Cajun Seasoning
  • Salt and Pepper to taste

Instructions

  1. Chop onion and bell pepper into large pieces.  Mince garlic.  Saute over medium heat until just tender.
  2. In rice cooker, combine rice, chicken broth, crushed tomatoes, sauteed vegetables, worcestershire sauce, cajun seasoning, salt, and pepper.  Set to cook.
  3. Shell shrimp if necessary.  Roughly chop shrimp and sausage.  Saute over medium-high heat until shrimp are pink.  Do not overcook.
  4. When rice cooker is finished (check doneness and add liquid if necessary), stir in shrimp and sausage. Taste and adjust seasoning as necessary.
  5. Serve hot.

Sunday, August 12, 2012

Broccoli Ramen Salad


Summertime demands some fresh, light, flavorful side dishes.  It can be tough to make cold food interesting, and especially to make raw food interesting, but this little salad really does the trick.  It's lightning fast to put together, super flavorful, and not at all heavy - we were so happy to have it when the temperature soared over 100 degrees for so much of this summer.

I'm no fan of prepackaged ramen noodles, but they really add life to this salad.  They soften just a bit in the tangy dressing, making for a nice textural counterpoint to the crunchy nuts and crisp vegetables, but they never end up too soft.  This recipe is also immensely easy to customize - a dash of soy sauce and ginger lend it an Asian flair, or some lime and cilantro make it an easy complement for Mexican food.  Whenever you need something tasty, cool, and easy in the heat, give this salad a try.


Here's what you'll need: A large package a broccoli slaw, two packages of chicken flavored ramen, a bunch of green onions, unsalted roasted peanuts and sunflower seeds, apple cider vinegar, vegetable oil, and a bit of white sugar.


First, make the dressing by whisking together vegetable oil, cider vinegar, sugar, and one ramen seasoning packet (just one, otherwise things get too salty and gross).


Next, chop down the green onions and crush up the ramen noodles into small pieces.  Don't worry about keeping things too uniform.

This process can sometimes involve tiny noodle pieces flying all around the kitchen.  This is immensely entertaining to the cat, but maybe less so to whoever has to clean it up - consider crushing the noodles in a bag or a bowl to minimize projectiles.


Now mix everything but the peanuts and sunflower seeds together in a large bowl, add the dressing, and give it a good stir.  You can serve right away if necessary, but the flavors really improve with an hour or two in the fridge.


Serve the salad up cold, and garnish with peanuts and sunflower seeds right when it's time to eat.  If you're bringing the salad elsewhere, like to a pot luck, it's fine to add the nuts before you leave - they can make it several hours before getting soggy.  If you expect leftovers or are just eating at home, though, you'll want to add nuts to individual portions.


Recipe: Broccoli Ramen Salad
Prep Time: 10 Minutes | Cook Time: None | Difficulty: Easy | Servings: 10-12

Ingredients
  • 1 large (16-20 oz) package Broccoli Slaw
  • 2 packages chicken flavored Ramen Noodles
  • 1 bunch Green Onions, chopped
  • 1/2 cup Unsalted Roasted Peanuts
  • 1/2 cup Unsalted Roasted Sunflower Seeds
  • 1/4 cup White Sugar
  • 1/4 cup Vegetable Oil
  • 1/3 cup Cider Vinegar
Instructions
  1. Whisk together vegetable oil, cider vinegar, sugar, and one ramen seasoning packet to create dressing.
  2. Finely chop green onions and break down ramen noodles into small pieces.
  3. In a large bowl, combine broccoli slaw, green onions, and broken ramen noodles.  Pour dressing over mixture and toss to coat.
  4. Refrigerate to chill - ideally 1-2 hours to enhance flavor.
  5. Top with peanuts and sunflower seeds just before serving.  Serve cold.